Dragon Age logo

BioWare


Dragon Age: Origins Online Walkthrough by David Milward


INTRODUCTION  |  GETTING STARTED  |  NPCs  |  ORIGINS  |  RECIPES |  ITEMS   
Areas in the original game:  
Brecilian Forest  |  The Camp  |  Circle Tower  |  Denerim  |  The Final Battle  |  Haven  |  Landsmeet  |  Lothering  |  Orzammar  |  Ostagar  |  Redcliffe  |  Ruined Temple  
Areas available as Downloadable Content:  
Honnleath  |  Return to Ostagar  |  Warden's Keep 
About the Walkthrough  |  About the Maps  |  About the Author  |  About Playing the Game  |  Where to Begin
Disable all ads!

Camp: 
Camp  |  World Map  

The Camp

The Camp

    Archdemon dream
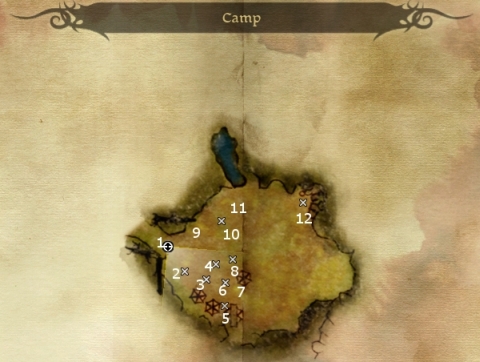
You will wake up here for the first time since leaving Lothering, where you have a dream in which you see the Archdemon commanding his horde.

  1. Here is the exit to the World Map.

  2. Here is the Mabari War Hound.

  3. Here is Zevran.

    Zevran doesn't have a personal quest in the same fashion as many of the other companions. However, throughout the game, he will repeatedly attempt to gauge your future intentions regarding himself, and to what degree you might trust him. At some point, while travelling from one location to another on the Map of Denerim during the Landsmeet, a high ranking member of the Antivan Crows named Taliseile will profess to have a contract on you, and will have brought along several cohorts to do the job. This encounter will happen whether or not Zevran is initially with the party. But once it occurs, Zevran will show up. If your approval rating with him is too low, he'll help the Antivan Crows try to kill you. If your approval rating is good enough, you'll be returned to the party selection screen with Zevran being one of the obligatory members. The Crows will be quite spread out, and will have various abilities such as Mark of Death and Scattershot, which can make this a tough fight. Immobilize as many as you can at the outset (e.g. Waking Nightmare, Blood Wound, etc.), and take out those still active as quickly as you can. Zevran will then have another conversation with you about future plans, trust, etc. Taliseile will leave behind the Gloves of Guile (Drakeskin). Whether or not you persuade him to stay, or let him go, is up to you.

  4. Here is Alistair.

    If you enter Redcliffe Village with Alistair, this will trigger the start of Alistair's personal quest. It is in Redcliffe where he 'confesses' that's he's the illegitimate son of the legendary King Maric, and that royal lineage is not exactly a source of pride for him. This fact has significant repercussions as you progress towards the end of the game.

    Afterwards, head to the Market District of Denerim. If Alistair spoke about his familial situation beforehand in Redcliffe, he'll want to find and visit Goldanna. Your willingness will win approval from him, and vice versa. When you actually do visit, she'll be bitter and resentful over her lot in life which she blames on the circumstances of her birth, and will project it onto Alistair. At some point, Alistair will leave the house and express disappointment that it wasn't quite what he expected. This is the point where you can 'harden' Alistair's personality, if you consistently choose dialogue options that emphasize that everybody looks out for themselves and he should realize this. This will make Alistair both more tolerant of less moral actions on your part, and also more assertive. This may mean that he has a greater willingness to assert a future claim to the Throne of Ferelden down the road. As an aside, if you are playing a female character with an Origin other than Human Noble, 'hardening' Alistair is the key to remaining Alistair's consort and queen during the game's epilogue.

  5. Here you will find Wynne. To trigger her personal quest, you'll need two things. One is to have a high, about 60+, rating with her. This can be helped along with gifts. Another is to thoroughly explore the available dialogue options with her, especially those concerning her past with the Circle of Magi.

    Once these prerequisites are met, you'll have a random encounter while travelling the world map whereby you assaulted by several Darkspawn, including a Darkspawn leader who packs powerful archer abilities like Scattershot. Once you've finished, make your way to the exit. Wynne will falter, seemingly as with exhuastion. Ask her about it, and she'll indicate that she's willing to discuss it in camp.

    Once in camp, speak with Wynne persistently. The conversations will eventually turn from resignation to her limited remaining years, to past regrets over a past apprentice that she treated harshly, Aneirin. This triggers the next part of the quest.

    AneirinNow go to the Dalish Camp and speak with Sarel the storyteller. Sarel will indicate that Aneirin still lives in the nearby forest. Now make for the East Brecilian Forest. You will find Aneirin just a little northwest of the Mad Hermit Clearing. Speak with Aneirin, and it turns out he doesn't have any hard feelings at all. Pick the obvious, non-insulting, dialogue choices and Aneirin will gift Aneirin's Token, an amulet that only Wynne can use. Wynne will also develop a spell unique to her, Vessel of the Spirit, a sustained ability that disorients nearby enemies and boosts health regeneration, mana regeneration, and spellpower.

    Now go back to camp, and speak with Wynne to confirm that she's reconciled with her past. Now your next random encounter should involve several Darkspawn led by a Hurlock Omega who can cast spells. The cutscene will have the Omega get the jump with a fireball spell, and this provokes Wynne into demonstrating her newfound ability, Vessel of the Spirit. Wait for the Omega to bend around the corner, and then gun straight for him. Mop up his followers afterwards.

  6. Here you will find Leliana. Keep in mind that her personal quest is also bound up with her romance. So in any event, engage her in conversation as much as you can when you enter the camp (or when you were still in Lothering). Select every branch of conversation that you can. At some point, a question along the lines of "I heard minstrels were spies" will come up. Pursue this one. Leliana will still be guarded about what she reveals. This is the first step to opening up her personal quest.

    Now leave camp, and come back. Speak to Leliana again. She'll then open up, and with enough questioning, reveal that her former Bard master, Majorlaine, betrayed her. This was why she sought refuge in the Lothering Chantry of Ferelden, well outside the reach of Orlais.

    An ideal way to progress the story is to head for the Market District of Denerim. You will get attacked by several Assassins, which will include their Leader and a Witch. If you want to end the fight quickly, cut their leader down to size. Speak to him, and it will become apparent that they were hired by Majorlaine to kill Leliana. Whether or not you let him live and walk away is up to you.

    MajorlaineOnce you arrive in the Market District of Denerim, head for the house at #21. Once inside, you'll have to defeat two guards. Now step through the second door. Now you'll have a conversation with Leliana's former mentor, Majorlaine. They'll obviously have their differences. Now there's two ways to go about this. One is let Majorlaine leave peacefully. The other is to confront her in combat. If you go this route, keep in mind that this fight can be tough. Majorlaine's approach is basically to try and keep the party still with Captivating Song so that her minions can overpower you en masse. The trick is to get rid of her servants first, so that her Captivating Song will be nowhere near as dangerous while she's by herself. I recommend getting everyone back out the door you just came through. Plant crowd-control spells at the door, and hit the room with any offensive spells you've got. Nail her servants as they come through the door. Search the house thoroughly, and you should find a chest in a smaller room. The chest will have Majorlaine's Recurve that only Leliana can use, as well as several high-grade random items.

    When you get back to camp, Leliana will want to speak to you to get things off her chest. She has something of a moral crisis over the fact that, if you killed Majorlaine, she enjoyed it, and in any event, will feel unsure that she truly received a vision to join the Maker. Here you have a fundamental choice. If you affirm that she's a good person, that she chose right, to keep her faith, etc., then she'll feel more assured than ever. If however you choose a dialogue option that implies to her that she enjoyed being a killer and she should resign herself to it, this will cause her to become 'Hardened'. This has repercussions down the road at certain points of the game when she is in your party.

    Anyway, leave camp and then come back later. Speak to Leliana again so that she can put things behind her.

  7. Here is Oghren.

    When you have enough approval with Oghren, speak to him and he'll open up about his personal quest. He wants to seek out Felsi, an old flame. Head to the Lake Calenhad Docks. Now enter the Spoiled Princess Tavern. Once inside, he'll want you to back him up in order to thaw the apparent ice that's developed between Felsi and himself. If you want to help him out when he talks to Felsi, you can't go wrong with dialogue options that are preceded by "(whisper)" or "(lie)". Whether or not you successfully help Oghren may have repercussions for the epilogue when you finish the game.

  8. Here is Sten. When you have enough approval from him, he's willing to divulge that the reason he killed the farmstead family was because he panicked when he lost his personal sword. This triggers his personal quest to help him recover that sword. First, head to the Lake Calenhad Docks. You'll now find a scavenger picking through dead bodies. Speak to him and you'll learn that the bodies were already picked clean by Faryn, a merchant who is likely at Orzammar now. From that point onwards, the quest becomes one of following the easy trail of bread crumbs.

  9. Here is Levi Dryden. He won't appear here unless you've downloaded the Warden's Keep DLC. To make it short, Levi Dryden had a famous though controversial Grey Warden ancestor named Sophia Dryden. Sophia's rebellion against the Crown has meant nothing but hardship for her descendants. Levi planned to explore her former stronghold with the help of Duncan, but those plans fell through when Duncan perished at Ostagar. So he would now like your help. If you agree, Soldier's Keep will become available on your world map.

  10. Here is Shale. Her personal quest won't become available until you've concluded the quest that involves putting a new King on the Throne of Orzammar. If you sided with a Paragon named Caradin, and helped destroy the device that was responsible for the creation of Golems, then it will be easier to get the information you need from Shale. If you sided with the Paragon named Branka instead, you may need to succeed at Persuasion (Lie) checks to get the info. That information is that Shale remembers having been a part of a Dwarven Thaig somewhere in the Deep Roads. Once you get that from her, bring her to Caridin's Crossing, and then she'll remember the location of the Cadash Thaig and mark it on your Deep Roads map.

  11. Here are the Dwarven father and son, Bodahn and Sandal. Sandal is the guy to see if you want to attach a rune to your weapon, and Bodahn is the shop keeper. His inventory includes:

    Tome of Physical Technique
    Tome of Arcane Technique
    The Veshialle (Dragonbone)
    Sylvans Mercy (Veridium)
    Conspirator's Foil (Inscribed)
    Proving Helmet (Iron)
    Spirit Hands (Inscribed)
    Angled Strikers (Rough)
    Bard's Dancing Shoes (Drakeskin)
    Imperial Weavers (Leather)
    Silverhammer's Tackmasters (Cured)
    Earthheart's Portable Bulwark (Red Steel)
    Enchanter's Arming Cap
    Collective Arming Cowl
    Black Metal Torque
    The Spellward
    Par Vollen Willstone
    Dalish Pendant
    Dalish Hunter's Belt
    Longbowman's Belt
    Hail Store
    Ember
    Journeyman Dweomer Rune
    Novice Dweomer Rune
    Journeyman Flame Rune
    Grandmaster Frost Rune
    Novice Frost Rune
    Master Lightning Rune
    Expert Lightning Rune
    Novice Lightning Rune
    Novice Cold Iron Rune
    Journeyman Hale Rune
    Journeyman Silverite Rune
    Grandmaster Slow Rune
    Golden Rope Necklace
    Manual: Ranger
    Manual: Templar

  12. Here you will find Morrigan, who doesn't seem quite inclined towards social interaction with the other companions.

    To trigger Morrigan's quest, you need to find the Black Grimoire and then present it to Morrigan as a gift. Once you return to the Camp, Morrigan will then give you her own quest. Basically, Morrigan will nurture a deep suspicion that her mother, Flemeth, intends to take over Morrigan's body in order to continue Flemeth's cycle of immortality. Morrigan therefore wants you to return to Flemeth's Hut and kill her, sans Morrigan herself for fear of getting possessed, and bring back Flemeth's true Grimoire.

    When you return to Flemeth's Hut Deep in the Korcari Wilds, Flemeth will offer two options. One is that she'll willingly give you the grimoire and then she'll leave. Your part is to persuade Morrigan into believing that Flemeth is dead and no longer a threat.

    Flemeth the ShapeshifterAnother option is to fight Flemeth to the death. If you go about it in this way, keep in mind that Flemeth is going to change into a very large dragon, Flemeth the Shapeshifter. Keep in mind that her fiery breath can score lots of damage at long range. If you get close to her in melee, it gets even worse. Her regular attacks are damaging enough, but sometimes she can do a special attack whereby she tosses a character in the air and bites him multiple times, which is guaranteed death. She can also Wing Buffet if characters are surrounding her. The question becomes how to handle this.

    Keep in mind that Flemeth will never leave her perching place at the top of the knoll. So a sound strategy is to bring along 3 characters that can use missile weapons effectively and keep them spread out so that her fiery breath won't hit all of them at once. Leliana stands out in this regard. The question then becomes using a fourth character that can get up close to Flemeth and distract her from the Archers.

    One approach is to always have Force Field cast on that character. This certainly works, but it also means relying solely on damage from spells and missile weapons, and always making sure that Force Field is up to avoid that character getting shredded.

    Another approach is to have spells that can freeze or interrupt Flemeth when she uses her Grab attack, like Cone of Cold. Basically save it for when she starts the Grab attack in order to minimize the damage.

    Another one is to select a character that will be immune to her special attacks. One candidate is Shale. Equip her with an armor crystal that imbues fire resistance, and this should work. Another possibility is the Mabari War Hound. He's also immune to the special attacks. Equipping him with the Black Metal Torque and the Kaddis of the Siege-Breaker will provide a good combination.

    When Flemeth falls, loot her body for Flemeth's Key. Use the key to enter her hut and open the chest inside. You'll find Flemeth's Grimoire and the Robes of Possession, which will be the most powerful robes that Morrigan can wear. Once you gift the Grimoire to Morrigan, depending on your past progress with her, this will represent the point where she actually does fall in love with your character. But it also means no more 'action'.

    If you speak with her afterwards, she'll give you her ring so that she can keep track of you.


Amazon.com
Amazon.ca
Amazon.co.uk
Sorcerer's Place is a project run entirely by fans and for fans. Maintaining Sorcerer's Place and a stable environment for all our hosted sites requires a substantial amount of our time and funds on a regular basis, so please consider supporting us to keep the site up & running smoothly. Thank you!

Disable all ads!