-

- Forums
- Chatrooms
- Gallery
- Gameplay Videos
- Upload
- Articles
- Mod Reviews
- Shop SP: Games, Movies, Books

Brecilian Forest | The Camp | Circle Tower | Denerim | The Final Battle | Haven | Landsmeet | Lothering | Orzammar | Ostagar | Redcliffe | Ruined Temple Areas available as Downloadable Content: Honnleath | Return to Ostagar | Warden's Keep |
Choosing Spells and Talents for your Characters | Combat | Equipping your Characters | Utilizing the scripting system in Dragon Age |
Combat in Dragon Age - some guidelines
Successful combat requires a number of approaches, and a number of varying considerations. What I offer below are a few general guidelines.Choose your Spells and Talents wisely
It goes without saying that the more effective and well developed your party members are, the better prepared they'll be for the various combat situations that will confront them. This will become clearer as you read further on this page. Refer to the page on "Choosing your Spells and Talents" for more detailed advice on this subject.
Avoid the rush
It may seem really tempting to rush the door and quickly get the fight over with. For many fights though, matters are often more than what they seem at first blush. Going in for the early rush can result in the lead characters getting overwhelmed. Hang back and together as a group first, and assess the situation as it develops.
The Drawing Out Technique
Sometimes, especially in the early going, it may seem like the foes in front of you are too numerous. At the same time, you may notice that some of them are straggling well ahead of the rest. So ... inch slowly forward just enough to get the stragglers to notice you and come forward. Lead them onwards and well away from the rest of the horde, and them kill them piecemeal. Keep in mind that some monsters may be too tightly crowded together, or too fast, for this to work. Werewolves and Blight Wolves are an example of both.
Bend the Corner
This is a variation on the Drawing Out theme. You may be faced with a large group of archers, and this may present you with an uncomfortable choice between returning fire outnumbered, or trying to rush them while they fire away. There is however another approach. Retreat until you find a corner that you've previously cleared. Stay behind the corner, and let the Archers come to you. You can pounce on them once they show around the corner.
Crowd Control - Keeping them at a Distance
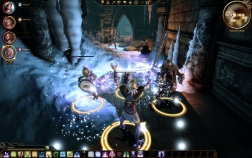
 Very often you'll be faced with a large horde of monsters in front of you, and its apparent that they're going to rush you in a relatively straightforward direction. Before you think 'offensive spells', take the time to set up crowd-control first. The idea is that the monsters will try to surge forward, but largely remain stuck while your mages are free to go to work. Examples of crowd control spells include the Glyph of Repulsion, Grease, and Earthquake. Once crowd-control is in place, then go to work with offensive spells. If you've got storm spells like Tempest, Blizzard, Inferno, and Death Spell, even better. Sit back and watch them die. And it gets even sweeter if you can set up the Storm of the Century combo. Very often, especially in indoor dungeons, a narrow hallway or bridge can serve as a 'bottleneck' that can make it difficult for your foes to escape.
Crowd Control - Keeping the Swarm at Bay
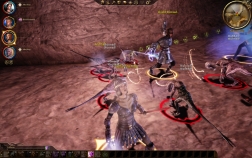
 There will be many times where you will get swarmed by several enemies from all sides. It's unavoidable, and it can also be a recipe for disaster and getting overwhelmed. The key here is come packed with at least one or two abilities that are both party-friendly, and will interfere will a large group's ability to land physical attacks. Some of the best abilities in this category include Blood Wound, Waking Nightmare, and Captivating Song. Once you've unleashed one or more of these, seize the moment and kill off/score as much damage as you can. As an example, note the screenshot where Leliana can keep a whole horde of monsters locked down and helpless with Captivating Song while Alistair and my Elven Arcane Warrior go to work.
The Singularly Powerful Foe
Once in a while, you'll run into something singularly nasty like a Revenant, an Ogre Alpha, or a Pride Demon. The idea here is to come prepared with abilities that can either freeze a singularly powerful foe in place, or minimize its ability to inflict damage. Examples of the former include Spirit Prison, Glyph: Paralysis, Cone of Cold, and Petrify. An example of the latter is Misdirection Hex. Another type of talent are abilities that make it more vulnerable to physical damage, like Telekinetic Weapons and Death Hex. Also, seize every advantage you can by flanking such a foe.
Bring Along Anti-Magic Abilities
Mages for the other side can be quite devastating, so come prepared for it. Mana Clash is arguably the best anti-mage ability since it can kill a group of hostile mages outright. Abilities that can stun mages before they unleash their spells are also very useful. These include Scattershot and the Templar's Holy Smite. Another good ability is the Glyph of Neutralization.


