Dragon Age logo

BioWare


Dragon Age: Origins Online Walkthrough by David Milward


INTRODUCTION  |  GETTING STARTED  |  NPCs  |  ORIGINS  |  RECIPES |  ITEMS   
Areas in the original game:  
Brecilian Forest  |  The Camp  |  Circle Tower  |  Denerim  |  The Final Battle  |  Haven  |  Landsmeet  |  Lothering  |  Orzammar  |  Ostagar  |  Redcliffe  |  Ruined Temple  
Areas available as Downloadable Content:  
Honnleath  |  Return to Ostagar  |  Warden's Keep 
About the Walkthrough  |  About the Maps  |  About the Author  |  About Playing the Game  |  Where to Begin
Disable all ads!

Ostagar: 
Korcari Wilds  |  Ostagar  |  Ostagar - The Battle  |  Tower of Ishal - First Floor  |  Tower of Ishal - Second Floor  |  Tower of Ishal - Third Floor  |  Tower of Ishal - Fourth Floor  

Korcari Wilds

Korcari Wilds


Finding Darkspawn to kill, and collecting vials of Darkspawn blood, won`t be a problem here. But thorough exploration is needed here, both to find the ruins that hold the ancient Grey Warden treaties, and to find other not-so-easy to find booty along the way.
  1. Here is the way back to Ostagar.

  2. Here you`ll get attacked a few wolves. Once you`re done, look for a dead body along the shoreline to the west. Click on it, and you`ll get a letter indicating that a Missionary of the Chantry plans on rendesvouzing with his son.

  3. Here you`ll run into a few Hurlocks and Grenlock Archers.

  4. Here is a large Genlock encampment, with at least a couple of archers. A recommended approach is the 'drawing out technique'. This is to say that if you have a mage staff or a ranged weapon like a bow, move forward slowly and then hit the foremost enemy with a shot or two. Now have everyone run back with the idea that only a couple of the enemy will run after you. Once you've separated them from the rest of the enemy, turn around and take care of them. Once they're dead, you may have to keep running away until your weapons are sheathed. This signifies that combat is over and you can save the game. Repeat until you're ready to take out the last of the bunch. Besides the Genlock, there's a couple of other interesting things about this place.

    A chest here contains a Mud Idol, Rigby's Field Notes, and another random item or two. Rigby's Field Notes will start a quest leading to an item cache. Basically, an X will appear on your map. Make your way very close to that spot. Now run your mouse-clicker left and right around the screen until you notice your mouse-clicker change into an 'eye' icon. Now fix your mouse-clicker on that spot, and it should also read, "Sign of the Chasind". Right-click on that spot. Now another X or two will appear on your map. Go to all of them, and eventually you'll be able to access the Chasind cache at #9.

    Also, you'll notice a now put out fire. You won't be able to do anything with this until you find Missionary Rigby's body at #7. Once you do, click on it, and you'll discover a Sealed Lockbox. You have the option of holding onto it, so that you can give it to his wife down the road, or taking the contents for yourself, which will include a few random gems and the Beloved Amulet.

  5. Here are more Hurlocks and Genlock Archers and Rogues for you to fight.

  6. Around here will be the Wilds Flower that can be used to treat the Mabari Hound back in the Dog Kennel in Ostagar.

  7. Here are more Darkspawn for you to fight. At the top of the hill, you'll find the body of the unfortunate Missionary Ribgy. Clicking on it reveals his last will and testament indicating his wishes concerning his lockbox.

  8. Here you'll have to cross a small natural bridge to a little island, where some Wolves and an Alpha Wolf will attack you. Be aware that the Alpha Wolf can knock down a character and chew on him. Once you've killed the wolves here, a chest contains a Chasind Flatblade (Iron), and a note from Missionary Rigby to his son.

  9. On the bridge is a Hurlock Emissary capable of casting spells. The bridge itself is trapped. For now, go forward and get the Emissary to flee. Deal with the Genlock Rogue that comes for you right away. Now edge your way forwards and use the drawing out technique to convince the Emissary, and then the Archers, to chase you across the bridge a couple at a time. Once you've thinned them out enough, cross the bridge and take out the remaining Archers. The Emissary leaves behind a Darkspawn Staff. One of the Genlocks will leave behind a Pouch of Ashes and a note describing the potential use of that pouch.

  10. Here is where the Chasind cache is to be found, that is if you also found all of the 'Signs of the Chasind' first. When you first click on the stash, you'll get ambushed by a bunch of Genlock Rogues. If you defeat them, the cache itself has a Barbarian Mace (Steel), a Chasind Crusher (Iron), a Wilds Bow (Yew), a Thane Helmet (Iron), and Chasind Robes.

  11. Here is a pile of stones. Use the Pouch of Ashes on it, and Gerzenath will appear. Gerzenath takes quite a beating before going down, and can use Flamestrike. Use Health Poutices, at least on yourself and Alastair, if you have to to go the distance. Gerzenath will then leave behind Enchanter's Footing (Cured).

  12. Here are more Darkspawn, led by an Alpha Hurlock. Use the drawing out technique whenever possible. The Alpha Hurlock leaves behind some random items in addition to an Enchanted Dagger (Iron).

  13. A Chasind Witch
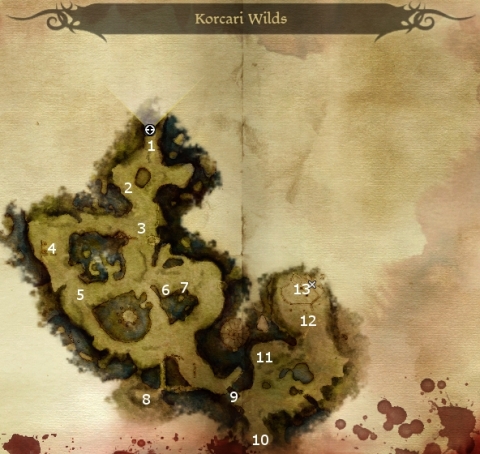
Here you will find the Grey Warden's cache, only it's empty. What's more, a witch named Morrigan has apprently been watching you for some time and only now reveals herself. A somewhat tense conversation occurs that eventually leads to Morrigan taking you to her mother, Flemeth. Flemeth insists on having something or other at the expense of you and your companions, but is nonetheless willing to give you the Ancient Treaties that you need. With that, you're ready to return to Ostagar.


Amazon.com
Amazon.ca
Amazon.co.uk
Sorcerer's Place is a project run entirely by fans and for fans. Maintaining Sorcerer's Place and a stable environment for all our hosted sites requires a substantial amount of our time and funds on a regular basis, so please consider supporting us to keep the site up & running smoothly. Thank you!

Disable all ads!