-

- Forums
- Chatrooms
- Gallery
- Gameplay Videos
- Upload
- Articles
- Mod Reviews
- Shop SP: Games, Movies, Books
|
|
The Shaengarne River
The Logging Village
The Shaengarne Ford
The Horde Fortress Gates
Goblin Warrens (Level 1)
The Goblin Horde Fortress
We have battled our way through these treacherous warrens, but the cost might have been too high. After battling the various camps, we ventured upon a goblin called Pondmuk - may he live an eternity in the fiery Abyss! For the price of a few spiders he gave us the password we needed to continue deeper into the warrens. The pathetic creature seemed honest enough, and we asked him to watch over us as we slept. But when we awoke, we found ourselves surrounded by worg riders! Halgren, ever our stalwart leader, quickly rallied the band and we defeated each and every one of them. But in the course of the battle, our fierce Alia was terribly wounded - a rider's spear driven deep within her. We have given her as much aid as we can, and she recovers, though at a dreadfully slow pace. Halgren is deeply shaken, and spends much of his time at her side.
With Halgren so distracted, and Alia still weak, I have taken the van of the band myself. Until Alia is recovered, we cannot continue to fight our way through. We must move cautiously, relying on stealth and wit to carry us now. I have even bargained with yet more members of the horde - but so far, these have been more fruitful than our previous dealings with such....creatures.
Kei the Wooden Idol, the Annals of Halgren
 As soon as you enter the second level, you'll be attacked by several Orogs and Orc Archers, including an Orog named Pusmug, an Orc shaman, and an Orc Witch Doctor. The spell casters have some fairly potent spells, but if you deal with them quickly it's not a tough fight. Loot what you can from the bodies and the nearby camp (mostly potions and ammunition).
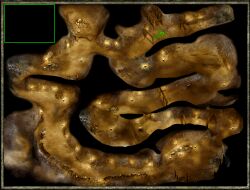
You can exit this chamber through either the north or the west. Either way will get you to your destination, but going west is the quicker way to find Kruntur for Yquog's quest.
The Training GroundsLeaving through the west exit will take you to the training grounds. There are several containers along the way that you can loot for more ammo, plus a few potions. The first group you encounter will be a band of Goblins and Half-goblins, as well as a Bugbear. Keep following the tunnel, and you'll come across a group of Orcs in training, along with an Orog Task Master. Make sure you check the Task Master's body after the fight for a Black Ward Stone - you'll need this later on.
A little further along you'll come across some of Yquog's minions. They'll challenge you for the password ("Xvim"). Give him the password, then head on into Kruntur's camp.
Kruntur
 Kruntur is in the south west corner of the chamber, surrounded by his dekanter Goblins. Talking to him you quickly find out that he's not all that upset about his brother. As it turns out, he's holding onto Yquog's message because he wants the magical bracers (Tamjans Bracers) that Yquog stole from Kruntur's brother before eating him. If you bargain with him, Kruntur will offer you the letter, and something else, in exchange for the bracers from Yquog. You can try to kill Kruntur and loot the message from his body afterwards - but it's a tough fight. Also, Yquog will not be happy if Kruntur is dead - he'll know and will attack you immediately.
Having struck your bargain with Kruntur, head back the way you came to Yquog. Yquog isn't happy about the deal, but he will agree to it. With the bracers in hand, head straight back to Kruntur and give them to him. He's quite pleased and informs you that he and his clan are finished with this war - they'll wait for a while and then take over these caverns for themselves. You'll also get the letter for Yquog, a nice shield (Tower Shield of Spell Resistance) and a very large xp reward (around 3150 xp). You may be able to get some information from Kruntur about the letter. He can't read it, but recognises it as being written in an Abyssal language, indicating a link between the invading hordes and demons (1400 xp). Return to Yquog with the note for another 1400 xp. As promised, Yquog also gives you a magic item. (Possible items from Yquog include a Corrosive Hammer, a Halberd of Corrosive Fire and Lightning Star).
Sleeping OrcsThis time, when you return to the second level of the Goblin warrens, go through the north exit of the first chamber. Here you'll find a group of sleeping Orcs and an Orog. Take care of the Orcs and the Orog while they sleep - and make sure none of them manage to escape down the western tunnel to sound the alarm. With the Orogs out of the way, move west down the tunnel.
Here you'll find two Trolls standing guard over a war drum, an iron gate and a wooden door. Destroy the war drum, then take care of the Trolls.
The Bug Zoo
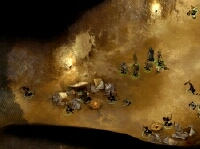
 Behind the iron gate are two otyughs, a host of fire beetles and a queen fire beetle. Using distance weapons you can dispose of the Otyughs and the fire beetles without even opening the gates - probably a good idea because there are a lot of critters in that cage. The fire beetle queen, however, is completely immune to piercing weapons and highly resistant to slashing damage, so you may need to open the gate and go toe-to-toe with her. Spend a few moments checking the cage for treasure; you'll find a large sum of gold, as well as a pretty good longbow (Sophia's Flight).
On the other side of the wooden door are a couple of Ogres, some Orcs, a Goblin sorcerer and an Orc shaman. They seem to be having a dispute amongst themselves, and if you're lucky they'll have done each other considerable damage by the time you get through the door. You can also use the construction of the iron cage to your advantage. You may notice that the iron cage forms a semi-circle with a gate at either end. The north gate opens next to the Ogres and the spellcasters. As a result, you can flank them by sending some of your party through the wooden door and the rest to the other iron gate. Using the gate as protection, your own spell casters and distance fighters can attack them without fear of being attacked themselves. Just be sure that no one escapes down the tunnel. East of the Ogre camp you'll find another war drum that you'll need to destroy.
The Butcher Yard
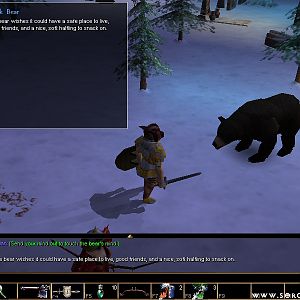
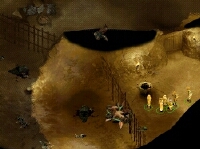
 Around the corner is a large animal pen, and a group of Orcs hard at work for their next meal. The Orcs are pretty straightforward to fight, as is their Hobgoblin overseer, Gumph. Check the Hobgoblin's body for an Iron Ward Stone.
Keep following the tunnel until it turns back east. If you haven't done so already, raid the Dekanter Goblin's treasure room for a few goodies (they don't seem to mind). In the north-eastern tunnel you'll find a large wooden stairway leading upwards. The exit is warded however, and you'll need both the Iron and the Black ward stones to leave. The stairs head up into the Horde Fortress Compound.