-

- Forums
- Chatrooms
- Gallery
- Gameplay Videos
- Upload
- Articles
- Mod Reviews
- Shop SP: Games, Movies, Books
|
|
Crash Site | Ice Wall | Ice Temple - Level 1 | Ice Temple - Level 2
The dragon-spawn Sherincal is no more. While our blades and arrows cut down her allies, Mordakais magic brought her to heel - and sent her cursed soul to the grave!
We have scoured this maze of ice and snow, but the secrets of the ice wall still elude us. And so, we now prepare to enter the Aurilites temple of ice, with the hope of finding a way to bring down the glacier that blocks the Western Pass.
Alia Shield-Maiden, the Annals of Halgren
CHAPTER 2: THE ICE TEMPLE - LEVEL 1
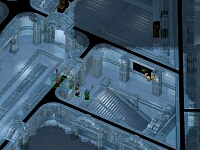
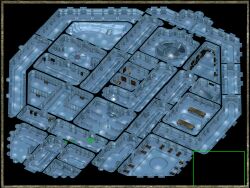 Things seem pretty quiet when you first enter the temple; but dont be deceived. On the floor directly in front of you is the corspe of some unfortunate soul. But take care moving towards it; at the northern edge of this room are an Ice Golem Champion and two Aurilite postulants. Unlike the Crystal Golem, the Ice Golem Champion is only immune to piercing damage. When youre finished, check the body on the floor for a note. Youll learn that the corpse is the late Brisbane, the leader of a mercenary band called the Talisman. Apparently the Talisman were hired to return someone named Nathaniel to Kuldahar from the Western Pass.
Both doors on the west side lead to the same room, inside which youll find a couple of Winter Wolves waiting for you. There are also three niches dug into the floor near the far west wall in which youll find some treasure (you may need to use the Alt key to see them). Leave here and go through the opposite doorway (east). Have a rogue, or someone with good Search skills, take a look around; you should find a secret door that leads to a room on the south side. Look inside the three alcoves of the room for some minor treasure items. Return to the entrance chamber and head north into the hallway.
High Priestess Cathin
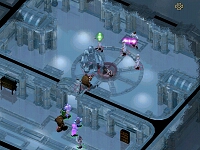
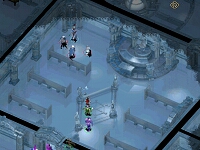 Here youll find two Frost Touches guarding the doorway above you. After youve dealt with them, be prepared for a slightly tougher fight when you enter this next room. Inside youll find the High Priestess Cathin, a couple of Aurilites and a Winter Wolf. Cathin will speak to you, saying that your quarrel is not with her clerics, but with her. Shell mention something about destroying her enemies which, if you ask, refers to Kuldahar and the Ten-Towns; all of this is revenge for the death someone named Lysan. She wont say much more, and it doesnt matter who speaks to her. After the fight starts, one or two other enemies from down the hall might also join in. When youre done, check Cathins remains for her temple key, and two Ice Axes +1. And dont forget to pick up the Winter Wolfs pelt either - you can get a good price for it later. Youll also notice that this room is dominated by five statues; four in the centre and one at the apex of the room. The four central statues are labelled Lysan, Lysara, Oria and Cathin; the larger statue is dedicated to the goddess Auril. (For those whove played IWD, Lysan is the priestess of Auril you found in the Vale of Shadows).
Turn back in the direction you came from and head east down the hallway. Here youll find several Barbarian warriors, some polar bears and two Frost Touches. Some of the inhabitants of this room might have joined the battle with Cathin. Finish up with this bunch and continue east to the sleeping quarters. Theres a Barbarian shaman and a Stormbrother here, but not much else. Now head west back to the hallway, and keep going until you reach the next room, where youll find some more Barbarian warriors and another polar bear or two. Check the cabinets for some minor treasure items. Along the west wall is a secret door you will eventually want to go through. It leads to a long corridor that encircles this entire floor. Right now, head through the doorway to the north.
 This room is the temple prison. To your immediate left youll find Nathaniel. Nathaniel is a druid from Kuldahar who was sent here to destroy the ice wall blocking the Western Pass. While he was able to knock holes into the wall with his magic, the ice slowly reformed each time. He was then confronted by three High Priestesses who quickly overpowered him, and brought him here. He tells you that the High Priestesses, Lysara, Oria and Cathin, are triplets whose power is amplified when the three are near each other. The Ice Temple is their creation, but he doesnt know how they did it. Nathaniel believes that the reinforcements from Neverwinter are either dead, or have turned back. He will also tell you how each morning at dawn, one of the prisoners is taken away and never returns.
He will mention an anti-magic shroud that operates in the prison, preventing him from using his spells, and will give you a quest to turn it off. (Note: The anti-magic shroud only affects the prison. Anywhere outside of it you can use magic freely). Although he doesnt understand what it means, he will pass along to you a phrase that he heard one of priestesses muttering about the anti-magic shroud: turn east then west to disable. Nathaniel will also ask you to help find his equipment, which he figures should be tucked into a treasury somewhere in the temple.
If you already have the temple key from Cathin, you can open the door and let Nathaniel out (2100 xp for freeing Nathaniel). In the cell above him are several prisoners that you can free - youll receive 1575 xp for each prisoner released. The number of prisoners still inside will depend on how long it has taken you to get here and free them. The cell to the east seems to be empty, but its certainly worth your while to go take a look around. If you look very carefully on the bench in the cell, youll see that there is something to pick up. What you find is a note left by the Master of Locks. The note warns about traps all over the temple, and refers to Lysaras ritual dais. He says that it can be turned clockwise by pushing on its right side, and counter-clockwise by pushing on the left.
High Priestess Lysara
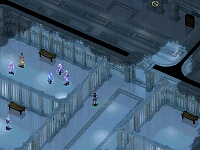
Moving north from the prison, youll find a small room that would appear to have only one exit, but appearances can be deceiving. The eastern wall of this room is an illusionary wall, and a few Aurilites just might attack you from the adjoining corridor. There are three cabinets in the room that you probably want to check for some treasure. But be careful moving about this room; walking too close to the northern doorway will alert its occupants to your presence.
When youre ready, move towards the northern doorway. At first you might only attract the attention of some Aurilites and an Ice Golem Champion, but soon enough the High Priestess Lysara will move into your field of view, and things will get a little more interesting.
 Lysara has several things of interest to say. She can tell you that the Aurilites created the massive glacier during one of their festivals (1425 xp). The glacier was created for Madae of the Legion of the Chimera. In return, the Aurilites have been promised the destruction of Kuldahar. Additionally, the three high priestesses will also be given Kuldahars Heartstone Gem. Continue to question Lysara and shell tell you about her mentor Lysan and why the triplets feel such hatred for Kuldahar. Other things you can learn from Lysara include the name of the Ice Temples architect (Nickademus), and that the prisoners are being sacrificed to Auril. If you ask about the crash, you will also learn that some Aurilite priests brought down your airship (1425 xp). Finally, you can try to appeal to Lysaras buried good side - although be warned that it won't work.
When youre finished talking, the fight starts up in earnest. For the most part its not too tough a fight, although the Aurilites will keep healing Lysara and she can cast some decent spells. Lysara can take quite a lot of punishment, so dont despair if she appears barely injured for a while. When its finally over, check the remains for Lysaras temple key and some Leather Armor +2.
The central feature of this chamber is the dais. In addition to serving as Lysaras sacrificial altar, the dais functions as a puzzle. Depending on the direction it is turned in, the dais can be used to unlock two doors and to remove the anti-magic shroud over the prison. From the Master of Locks note you should have learned that clicking on the right side of the dais turns it clockwise, while standing on the left side will turn it counter-clockwise. Each time the dais is turned, the direction it is facing is relayed to you. Now, recall Nathaniels cryptic message: turn east then west to disable. Stand to one side of the dais and, clicking on the same side, turn it east. Now click on the opposite side of the dais until it turns west.
All the directions you receive about using the dais will include a side (left or right) and a cardinal direction (north, south, east, west, etc). The left side of the dais is the east side; right is the west side. This is useful to keep in mind, since your perspective of left and right may differ from what was intended. It is also important to actually click on the sides of the dais - if you click the centre or the wrong side, the dais will turn in the wrong direction.
Youll know youve turned the dais correctly when you receive a message saying that the anti-magic shroud has been removed, allowing Nathaniel to use magic. When you go and speak to him next, tell him this; he will now offer temple services, and inform you that you need to defeat all three High Priestesses and a spirit that inhabits the temple. You can also share with him what you learned from Lysara (Telling Nathaniel that the prisoners were being sacrificed so that the glacier would reform itself: 1575 xp).
If any of your party members are injured, take some time to completely heal every member - you can also rest until your party is healed by speaking to Nathaniel. It is very important that your entire party be fully healed before continuing to the next area of the map.
The Abishai Lair
On the north wall of the chamber with the dais are three doors which all give the same message when you try to open them: L - North, R- North. Obviously, this is meant as instructions for how the dais can be turned to unlock these doors. Stand on the left side of the dais (the east) and click that side until it faces north (if it was already facing north keep turning it until it once again faces north). Then move to the right side (west) and turn it all the way around to north again. If you do this correctly, all three doors will open simultaneously.
 Beyond the doors is a large, ice-bound chamber in which youll find several Lesser White Abishai, including one named Xhaan. If he doesnt speak to you immediately, go and talk to him. If youre injured, he strongly suggests that you heal everyone in your party; the Abishai are overcome with bloodlust at the smell of blood, and only Xhaan is strong enough to resist. If an aasimar addresses Xhaan, she will want to know why your party should help the Abishai, given that they are sworn enemies. Youll then get a dialogue choice that leads to fighting them, if you take it.
Xhaan will tell you that he and the other Abishai were lured here by Sherincal to become part of the Legion. However, instead of serving in the Legion as promised, they were imprisoned in this room to serve in Lysaras ritual (you can guess the role they played). Apparently there is a voice in their heads that is controlling them, instilling them with the constant blood lust. Xhaan doesnt fully understand it, but he has been able to determine that the voice belongs to something called Aeij-Kllenzt, and he asks that you find and end this voice so that the Abishai can leave their prison.
At the back of the room you may also find a secret door. This door leads outside of the Ice Temple through a side door - while it doesnt seem all that important at the moment, it does provide a quick way to get to Zack Bossenburry and his inventory. You may have already found this side door earlier after fighting the second Crystal Golem on the Ice Wall map. From the outside, the door can only be opened by a person of smaller stature (gnomes, halflings and dwarves). Once open you would be able to enter the Ice Temple this way - unfortunately, with the doors of the Abishai lair locked you wouldnt be able to go anywhere else.
The Ice Trolls
When youve finished talking to Xhaan, head back to the chamber where you fought High Priestess Cathin (the room with all the statues). From here, head through the north doorway. On your left youll see a giant prism of ice that is focusing a large amount of light into a room below. For now, keep going north along this hallway, by-passing the three doors on the left side. You might encounter another Aurilite or two as you go. The hallway ends in another doorway at the very north end - by the sounds coming from the room ahead, youve probably already guessed that theres something waiting for you.
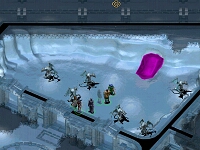
This next chamber is a large circular room, shaped somewhat like an amphitheatre - except that the audience consists entirely of Ice Trolls. Although they arent tough in their own right, there are about a dozen of the creatures so you should prepare your party for a lengthy battle. A well-placed fireball or two comes in quite handy here, allowing your warriors to move in and mop up. When the trolls are all taken care of, youll notice a door in middle of the floor. The door is locked and will require a key to open it. If you already have the key, it leads to the north staircase on the second level of the Ice Temple. Otherwise, go back to the three doors you passed on the way in here.
Ondabo the Marid
 The top most room is the most interesting of the three. Inside youll find a large group of Aurilite priests who seem very frightened of you - they run by you making apologies as they go. The last occupant of the room is the only one that actually converses with you: a marid (ocean genie) named Ondabo. Hes quite full of himself, and really enjoys talking about how great he is. He might also greet you rather rudely - if you take offense, you might provoke him into fighting with you. Otherwise, hes quite useful to get to know.
Ondabo was regaling the priests with tales of his greatness until you came along. As it turns out, the priests that ran by you are the same ones that brought down the airship while practising one of their rituals, and are now scared-stiff that theyre going to pay the price for it - at your hands! Ondabo suggests that they are repentant enough as it is. If you disagree with him, or insult him at any time during the conversation, Ondabo wont talk to you anyore, which would be unfortunate because he has some very interesting information for you.
After youve spoken with Xhaan the Abishai, you can ask Ondabo about Aeij-Kellnzt, the spirit that Xhaan says is controlling the Abishai. According to Ondabo, Aeij-Kellnzt is more commonly known as Caged Fury, a minion of Talos, the god of destruction. Talos rules over Auril and various other minor deities. You learn from Ondabo that Caged Fury is currently residing in an altar somewhere in the Ice Temple, and his presence helps to give the temple its powers. To remove the spirit of Caged Fury you merely need to invoke his true name (Aeij-Kellnzt) in his presence.
After youre finished talking with Ondabo, you can investigate the other two rooms. The middle chamber is locked, but the lock can be easily picked. Inside youll find several bookshelves, with various histories and tales you can read if you are so inclined. The last room is both trapped and locked. You can disarm the trap, but the door cannot be unlocked. You should recognise the message you receive when you try: L - Southwest, R - Northwest. Since youve already cleared out the rooms in between, just send one party member back to the dais to unlock this door. Click on the left (east) side until the dais is pointing southwest, then click on the right (west) side until it faces northwest. The door is now unlocked, and you can enter. Inside youll find a single Aurilite and more bookshelves, but not much else.
Secret Corridor
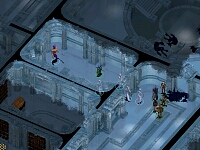
Head back to the room just south of the prison. On the west side of the room is a secret door that leads to a long corridor. The corridor leads all the way around to the other side of the temple. Careful going through the door - youll be greeted by a couple of Winter Wolves and some Aurilites.
Keep following the corridor north and around - youll encounter more wolves and Aurilites, as well as the odd Barbarian warrior, but they shouldnt put up much of a fight. When the corridor makes a turn to the east, it opens onto a small north-south chamber with a doorway to your immediate left (north). For the moment, head south through the chamber and clean up any Aurilites and other enemies you find. (Note: at the far south end is the illusionary wall that connects to the room north of the prison). Now turn around and head back to the north end where the doorway is.
 This next length of corridor is the most difficult: there are several Aurilites as well as an Ice Golem Champion here. Once youve dealt with them, continue to follow the corridor around until you are heading south. Again, there will be Aurilites along the way. Eventually the corridor makes a turn to the west, where it ends in another secret door. You are now on the opposite side of the Ice Temple.
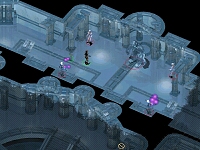
Go through the secret door into the next room, but dont stray too far just yet. The room to the immediate north and east appears to be the Aurilites' dining room, and several of them are still there. Before you go in, take a few moments to get your bearings. Using stealth, have somone take a peek through the doorway just north of you, where you should see another Ice Golem Champion. Unless youre careful, theres a good chance that the Ice Golem Champion will join the fight against you in the dining room, so keep an eye out for it.
When youre ready, move north (if you havent already dealt with the Ice Golem, nows your chance). Theres a locked door on the east side that the Ice Golem was guarding, and a treasury room to the north. Take a look through all the containers here - there arent any major items, but a variety of minor magic items and treasure. Now head back to the locked door on the east side.
The Painting of Kuldahar
 The door here is trapped, so take care when opening it. On the other side of it is a stairwell and a strange painting depicting a frozen Kuldahar. Dont be alarmed when the painting addresses you. This is one of the more interesting and unusual features of the Ice Temple. The stairwell will take you to various different places inside and outside of the Ice Temple, depending on how you respond. The responses available to you will depend on whom you have met and spoken with already. The full list of possible responses, and the corresponding destinations are as follows:
Death to Kuldahar
. - Eastern staircase on the second level.
In Aurils name
- A secret treasury on the second level.
Andora? - Sends you to the upper level of Andora village.
Lysan - A chamber outside of the altar room on the second level.
Auril shower me with strength! - The Battle Room on the second level.
Nickademus? - The circular room full of Ice Trolls on the first level.
Bedroom
- Nickademus' bedroom.
From the sea of moving ice
- The Abishai lair on the the first level.
Before using the painting to reach any rooms you havent explored yet (namely those on the second floor), you might want to take a look ahead in the walkthrough to find out what awaits you. Several of these rooms and chambers will have some nasty surprises waiting for you. In addition to getting you into a few places you might otherwise not be able to reach (such as the secret treasury room), the painting allows you to move quickly about the Ice Temple without having to travel through the maze of rooms and corridors. Also keep in mind that this is a one-way mode of travel - other than taking the stairs directly down (the first response), you will have to find another way back!
When youve finished everything you need to do on the first level, take the stairs down to the second level of the Ice Temple. For the most direct route, when giving the painting your repsonse, say Lysan. This will take you to an empty room on the second level. If you find that your inventory is filling up, you might want to take a trip to see Zack and sell off a few things before continuing to the next level.