-

- Forums
- Chatrooms
- Gallery
- Gameplay Videos
- Upload
- Articles
- Mod Reviews
- Shop SP: Games, Movies, Books
|
|
Kuldahar | Chult | Dragon's Eye | Magma Chamber | Fields of Slaughter
We landed outside of Kuldahar, in the midst of an ambush lead by an orog death-priest. The fool had us surrounded by his vile undead warriors, but Mordakai somehow managed to convince the orog priest into explaining his plans - and then fleeing! Without their leader, the undead fell before us quickly enough. We eventually tracked down the priest and brought an end to his foul existance.
Kuldahar itself fared no better than the lands surrounding it. Overrun by strange snake-warriors, we fought our way through the village, freeing those unfortunate souls we could. Eventually we found the Arch-druid, Iselore, guarding his magical gemstone. According to him, these 'yuan-ti' are in league with the Legion of the Chimera, bound together by some strange bargain. Whatever the nature of that bargain, the yuan-ti seem limitless. Iselore believes that reinforcements are arriving through a 'portal', from some jungle to the far south.
So, now we prepare to enter this 'portal', and trust that it will take us where we need to go. We are to find the 'Guardian', and somehow use it to seal this doorway. What we will find on the other side, I know not...but I pray that Tempus will yet again guide our blades in these strange times.
Alia Shield-Maiden, the Annals of Halgren
 Your mission in Chult is to cleanse Kuldahar Valley of the forces of Evil. There are two ways you can accomplish this: you can either slay all the leaders of the Yuan-Ti forces, or, you can summon and kill a black dragon called the Guardian. You can do both, but if you choose this option you must slay the Yuan-Ti leaders first because once the Guardian has been killed you have to immediately leave Chult before the portal closes. You will only get the quest points for saving Kuldahar once, but you will get sufficient combat experience from the various enemies within the temple, as well as from the dragon, to make it worthwhile.
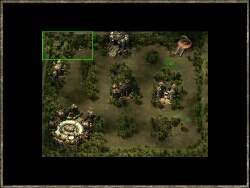
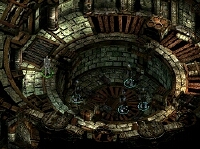
When you cross through the portal, you find yourself in a small, lush jungle area scattered with temple ruins. There are Yuan-Ti abominations, warriors, archers and shamen lying in wait everywhere; since they can cast some nasty spells, its best to take out the shamen first. You will find broken pieces of pillar (stele) here and there; be sure to pick them up if you plan to slay the dragon. As you will probably divine from examining these pieces, they are essential for the Guardian-summoning ritual. All but one of the pieces you need are on this map. The final piece is inside the temple. To save inventory space, you may attach the pillars you do have to their bases outside of the temple before heading in. The Guardian wont be summoned until the final pillar is attached. If you have decided not to kill the dragon, you can proceed directly to the temple as soon as you cross into Chult, without collecting any stele.
 If you dont want to kill the Yuan-Ti leaders immediately, you can go in disguised as initiates. This will allow you to pick up some additional quest points inside the temple through dialogue with various Yuan-Ti, and will not stop you from getting the quest points for killing them later. Just outside the temple, youll find a yuan-ti shaman named Sashkta lecturing a group of initiates on the tenets of faith. You will be tested on this later if you enter the temple disguised as initiates. The information will be in your journal but you wont be able to look at it when you are challenged, so here are the questions and answers:
Q: What approaches at dusk?
A: The growing darkness
Q: What drowns Selunes gleaming on a cloudless night?
A: The obscuring moon of our faith
Q: Who keeps the ancient venom of Sseth potent?
A: His faithful followers
Q: Where does Sseth embrace unbelievers?
A: The cradle of scales
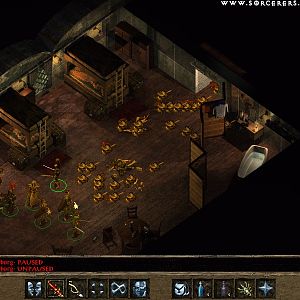
At the end of the lesson, Sashkta will notice you and attack. Dont bother with the initiates until Sashkta is dead; initiates are no more dangerous than goblins. A single fireball will take out all initiates in range, at which point their cloaks are yours. If you have a paladin in your party, she will refuse to disguise herself in the initiate robes (although a multi-classed paladin will don them), so if you want to talk to people inside the temple instead of being attacked on sight, youll have to leave any paladins in the party just inside the door while the rest of the party moves through the temple. If any of the Yuan-Ti sees the undisguised paladin, the game is up for the party and youll have to fight your way out.
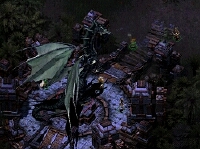 Once youve successfully retrieved the last stele from inside the temple, you can put it in place to summon the Guardian. You will get 2400 xp from the summoning alone, but unfortunately the portal will be sealed until you slay him so you cant take the experience points and run. Only your strongest melee fighters will be able to hit him at all, so any spells or artifacts that provide protection from acid and fear should be given to them and other party members should stay out of the fray. Magic-users and healers should be close enough to participate, but not so close that they will take damage or be paralysed with fear effects. The Guardian has a very high magic resistance but can occasionally be struck by spells. Your chances of hitting him are highest with spells that do electrical or fire damage. Magic Missile, Mordekainens Sword, and Disintegrate are all worth trying too. Otherwise, magic is best used to enhance the abilities of your team members.
As soon as you have killed the Guardian, your party will automatically rest until healed. If you are badly injured, you may rest for quite some time. If this is the case, and any of your party members have been killed in the battle, be sure to retrieve anything you might have dropped before finishing off the Guardian so it wont vanish while you sleep. An earthquake will then erupt, and will increase steadily in force until you cross the portal. As described in the Kuldahar section, upon your first return after either slaying the Guardian or defeating the Yuan-Ti leaders, you will be attacked by the Yuan-Ti Abomination Cedra and a substantial army.
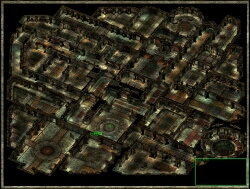 Throughout the temple you will find Yuan-Ti Priests. You can ask them about the various oddities you may have noticed about the temple to get some very useful information, but you wont get the dialogue option until youve actually seen the feature in question. You can move fairly freely about the eastern side of the temple, but be careful in the west as some of the traps are deadly.
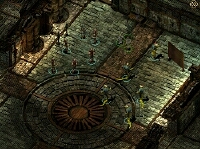
Frequent worship services are held in the altar area; during these services, nearly all of the monsters move to this area, so this is a good place to start if you choose to fight your way through. Ojaiha, the leader of the Yuan-Ti force, is in a room just north of the altar. You wont be able to talk him out of attacks on Kuldahar, but you can try, for which youll get 2400 xp. Ojaiha can also tell you, if you have seen the treasury, that to reset the combination lock you must press the eleventh brick. If you attack him, the other key leaders of the Yuan-Ti will come to his defence. Once youve killed all three (Ojaiha, Ashra, and Inhatri) you have officially stopped the Yuan-Ti threat and can return to Kuldahar (1600 xp). You can also find the Chameleon Ring on Ashra and the Ring of Shock Resistance on Inhatri. In the worship area south of Ojaiha, youll see levers on either side of the idol of Sseth. These control the drawbridge connecting the congregations worship area to the altar and can be a useful part of your battle strategy.
 If you prefer to talk your way through, there are several areas of interest you will want to visit in addition to Ojaihas room: the dungeon, the kitchen, and the lecture hall. You must visit the dungeon, which is full of Heartless Dead, before you can collect the last of the stele. A switch in the room to the north, once thrown, will lift the dungeon pit until its floor is level with the floor of the temple. You can now walk across it to get to the stele on the other side. The Heartless Dead will immediately depart in search of their hearts, which are on the altar of Sseth, killing any Yuan-Ti in their paths. Your party members will be safe unless for some reason they have one of the hearts in their inventories. If you would like the Heartless Dead to help you destroy the Yuan-Ti, scatter the hearts throughout the map before releasing them to ensure they encounter the maximum number of Yuan-Ti when they leave the dungeon.
In the kitchen, an emissary named Jeszrael can tell you about the forces in Dragons Eye, including the Legion of the Chimeras contributions. Once you have seen the treasury, return to the kitchen to speak with the cook, who will give you a cryptic message that reveals the second part of the code for breaking in to the treasury. If you want to provoke a fight with the people in this room (you can do so without making others on the map go hostile), the cook will give you an opportunity to say you want to close the crossroads to Kuldahar. Its not a particularly tough fight and Jeszrael in particular is worth looting. Among other items, you should find the Ring of the Warrior and two Scimitars of Acid.
You will find Inhatri and Ashra in the lecture hall, each surrounded by a small group of students. You may be able to persuade one or the other to fight you in a duel, but most characters, in attempting to speak with them, will simply turn them hostile. All students within the temple will join in the fray. From a table in this room, you can pick up some scrolls, Poisonfang, and the Vampiric Short Sword.
 Adjoining the lecture hall, you will find a room of Vipers Fang assassins to the west and another of Coiled Cabal sorcerers to the east. The Vipers Fang assassins will be flattered if a character with high Bluff asks to hear about his or her exploits, and will reveal the first portion of the code to open the treasury (you get 1200 xp for this too!). You can also trick a Coiled Cabal sorcerer into telling you how to summon the Guardian, for an additional 1200 xp. To get him to talk to you, tell him you are compiling a history. You dont need to get this information from him in order to complete summoning ritual, so dont worry if you kill him without having completed this quest.
Before you leave, you will probably want to visit the treasury. After unravelling the cryptic messages from the cook and the Vipers Fang assassin, the correct code is: 10-3-5-6-9-2. See the illustration for numbering of the bricks. However, you may find it easier to just work from left to right, pressing down each brick, and then doing it again for any brick that has popped back up. There are many combinations that successfully open this door. As soon as it is open, you will be attacked by a group of Histachii. They are slow-moving and very easy to kill. Now you can loot the treasury, which is full of useful spells, ammunition, and magical weaponry that will be very useful in the battle with the Guardian.