-

- Forums
- Chatrooms
- Gallery
- Gameplay Videos
- Upload
- Articles
- Mod Reviews
- Shop SP: Games, Movies, Books
|
|
Kuldahar
Chult
The Magma Chamber Time Loop
The Fields of Slaughter
Many times during our journeys I have thought our small band's abilities were at their limits...but I had never felt so...inadequate...until facing the Guardian in that distant jungle. The sheer power and force of the dragon's being was enough to make me cringe in fear...I would have fled, along with the others, but for Halgren's sake. In the face of that awesome beast, he stood alone...a mere speck beneath its mighty bulk! Never before had I realised the full strength and skill of our leader... and my mate. He fought like a demon, with that creature towering over him, lashing at him again and again with its enormous talons, dousing him with its acidic breath...but he never stopped, never paused, never withdrew. Relentlessly, he struck at the beast, slashing and hacking at it wherever he could reach...finally, with great gashes and rents scouring its flesh, the beast was driven back; its soft underbelly exposed, Halgren split the Guardian asunder, and the battle was won.
Halgren, exhausted as he was from that great and furious battle, pushed us on. As we approached the portal, we could see it was beginning to collapse...we drove on and thrust ourselves bodily through. Thus, we returned to Kuldahar, battered and weary, but victorious.
We found Iselore guarding his gemstone against a massive assault, and joining our forces together, drove the invaders out of Kuldahar. With the village and the gemstone safe for now, we have begun our final assault on the forces of the Legion of the Chimera. But in order to reach them, we must first make our way through Dragon's Eye.
Alia Shield-Maiden, the Annals of Halgren
 A large group of frost salamanders armed with bows and fire arrows awaits you on the bridge leading to Dragons Eye. The bridge is riddled with traps that trigger additional fire arrows, so have a concealed rogue remove the traps before the rest of the party approaches to avoid taking substantial damage. Waiting at the mouth of the cave, the Yuan-Ti high priestess Izbelah will attack with spells, but vanishes before you can kill her.
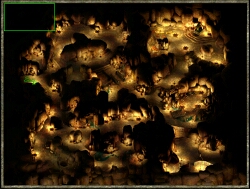
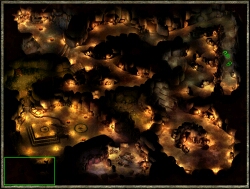
As soon as you enter the cave system, you will be attacked again. The main dangers in this area are concealed Yuan-Ti pureblood thieves, elite lizardman warriors, and wyverns. Be sure to collect the stingers from wyverns you slay; you will need at least four. Proceed directly to the south of the entrance, where you will find three chests. All are dangerously trapped and require a high level of skill to unlock. If you have a potion of master thievery, you may need to use it now. The chests contain a variety of very useful weapons, ammunition, spells and potions. In one of them, you will also find the first of four ropes that you will need in order to leave Dragons Eye. South of the chests, youll find a wyvern nest containing a small fortune in gold, gems and scrolls. Nearby is an entrance to a new cavern. You will need to descend into this additional cavern later, so you can leave it for now.
 East of where you came in, a doorway is protected by a swinging pendulum. There is a switch in a nearby room that disables it, so to protect your party members in this part of the map, send the rogue through first. He should be able to easily evade the pendulum, and use stealth to head north through a passageway. In the north-east of the map, you will find Commander Grishum standing with his back to an enormous idol of Sseth and surrounded by a small army. There is a small chamber to the left, in which youll find the mechanism to disable the pendulum trap. From Grishum's corpse, you can loot the Shortbow of Life, and Cloudkiss. Once you have taken care of Commander Grishum and the forces surrounding him, examine the braziers scattered throughout this area of the map. You can put a fire agate into each one to set it ablaze. When all the braziers have been lit, the idol will split open and a secret staircase becomes visible. This is the exit to the second level of Dragons Eye.
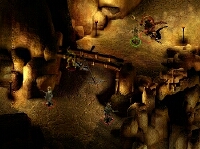
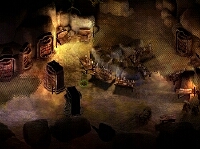
Moving south, keep your eyes open as you cross bridges because the second of the four ropes you will need can be taken from the bridge leading to the torture chamber. You will be repeatedly ambushed in this area, particularly by invisible thieves, so be careful to protect weaker party members. South of the torture chamber you will find a large wall blocking off an area of the map. Knock on the door. Nheero Futma, on the other side, will ask you to find a way to open the door and free him from the prison. He suggests that the solution must lie in the torture chamber, and he is correct; you can manipulate a knob on one corner of the rack.
 When you turn the knob, three things will happen: Dispel Magic and
Symbol of Fear will be cast on anyone in the vicinity, the prison
gate will open, and an alarm will sound. You will be attacked by
guards once the gate is open. Two of them are invisible, and one
is a wizard casting very damaging high-level spells, so you may
want to send only your strongest fighters into the prison until
these have been dealt with.
When you turn the knob, three things will happen: Dispel Magic and
Symbol of Fear will be cast on anyone in the vicinity, the prison
gate will open, and an alarm will sound. You will be attacked by
guards once the gate is open. Two of them are invisible, and one
is a wizard casting very damaging high-level spells, so you may
want to send only your strongest fighters into the prison until
these have been dealt with.
The prisoners will not attack you unless you make one of them hostile (a stray fireball or a similar spell can lead to this easily). If you were unable to open the chests on the other side of the map, tell the prisoners about them - they will walk over, unlock and empty out them out (oddly enough, the chests will still be trapped). If you're feeling particularly evil, you can now kill the prisoners and recover the items.
There will be one prisoner left over (not counting the troll). He will complain about being injured, and you can suggest that he rest, and he will do so. After you meet the fake Nathaniel, you'll have the option of telling the prisoner to go down to Nathaniel for safety, but this is a bad idea, because the prisoner will "mysteriously" disappear (Nathaniel eats him). You'll do better to kill the prisoner yourself; he carries a ring of regeneration and some scrolls.
Once you have handled the above, go speak with Nheero. He is waiting in the left hand chamber of the prison. For the rest of your time in Dragons Eye, Nheero will drive all your actions and you cannot complete this area without solving his quests, so be sure to cover all available subjects for dialogue whenever speaking with him. After completing each of the quests he gives you, you must return to Nheero to find out your next steps.
Nheero is a researcher, and allowed himself to be captured in the hopes of being transformed into a Histachii. Unfortunately, his partner Mandal Graye is missing in action. Mandal was supposed to adulterate the brew used to transform prisoners into Histachii so that the transformation would only be temporary. First, you will need to find Mandal Graye for Nheero. You will find his remains in Level Two of Dragons eye. Next, you will be asked to find Mandals sword and return it to him, so that his spirit will help you complete Nheeros mission. The sword is on the third level of Dragons Eye. When you have found it, place it next to Mandals remains. Mandals ghost will then show you where he threw the mandrake root essential for the sabotaged histachii brew; it is in the cavern by the wyvern nest. You will need to descend into the cavern, slay the ancient wyvern, and collect the mandrake root. Once you have found the mandrake root, you will need to create the histachii brew for Nheero in the alchemy lab on the second floor. Once you have given it to him, he will move to the second floor and your work on this map is now done. You may ask him, if you wish, about the purple monsters you have seen on other floors. If you ask him to research the Feyrs, he will arrange to meet you in the library near the alchemy lab in Level Two.
Level Two: The Alchemy Lab
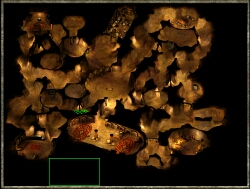
 The north and centre of this map are full of spiders, and you will be attacked by Yuan-Ti priestesses everywhere else. You will need to find Mandal Grayes remains before doing much else, so to find them, head to the east and then south down a long passageway. About the time that Mandals remains come into view, a huge boulder will roll down the passageway, damaging your party and knocking the members unconscious. When they have recovered, check the chest next to the remains for the third rope and some treasure, and then report back to Nheero.
In the north-west corner of this area you will find a room full of eggs. This is where you will find Nheero after his histachii experience, unless you have asked him to research the Feyrs for you. Clear the area of Yuan-Ti priestesses and histachii, and continue south where you will encounter Nathaniel. Although he is very useful to you here, buying anything you dont want to carry around and providing healing as you need it, a paladin or cleric will notice that he seems somehow changed, and not for the better. He also seems to know more than he should. If you have a character of very high intelligence speak with him, she may be able to discern that this is in fact an imposter. At this point, Nathaniel will turn into a rakshaka and attack you. You do get experience points for exposing him, but before taking this course of action you should consider whether you really want to lose his services.
 In the south-west corner, you will find the alchemical lab that youll need to use to create the sabotaged histachii brew. You cant do this until you have the modified mandrake root from Mandal. To the left of the alchemy tables is a small library in which you will find some useful spells. The alchemist, Dhey Jazerrion, will not be here the first time you visit but you will find his notes explaining how to use the alchemy tables. Note that there are two tables in the lab, on which only one can be used for histachii brew and the other for wyvern poison. You can tell them apart by clicking on the tables beside them, or by simply leaving the un-modified mandrake root on the histachii brew table, where you found it, as a marker until you are ready to make the potion. This is not the one that Nheero needs to complete the brew. Put the four wyvern stingers you have found on the other alchemy table.
When you have the modified mandrake root and are ready to create the brew, remove the ordinary mandrake root and save it for later. If you have a high alchemy skill, all you will need to do is put the modified mandrake root on the table. Otherwise, you will need to speak with the alchemist, Dhey-Jazzerion, whom you will find repairing a lever just west of the entrance to the alchemy lab. You will have to use either Persuade or Intimidate to get him to help you.
When the weak wyvern brew is ready, your journal will be updated to this effect. It will take longer than you probably expect it to, and the duration is measured in real-time so resting does not hasten it. Its probably best to keep adventuring as much as you can until you get the message that your journal has been updated, but if it seems to be taking too long you should verify that you put the modified mandrake root on the correct alchemy table.
The exit to the third level is in the south-centre of this map. The area surrounding the exit is extensively trapped and should be cleared before proceeding. The trap will keep casting Dispel Magic on your party members, as many times as it is triggered, until you have disabled it. The first time you approach this exit, Yuan-Ti priestesses will attack.
Level Three: Thorasskus
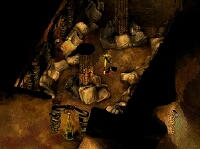
 Step very carefully as you move in this area because many dangers lie in wait: armoured skeletons, Yuan-Ti champions, Yuan-Ti archers, Yuan-Ti priests, histachii, jellies that are susceptible to little other than fire, monstrous snakes, and the purple nightmare-monsters known as Feyrs. Throughout this level, there are a number of doorways and passages you will not be able to enter on your first try. The ones in the south and east are dependent on the completion of unrelated quests, and the ones in the west are only open at certain times. If you are in the west and keep hitting dead ends, try resting.
The first thing you will need to do is retrieve Mandal Grayes sword, which is unfortunately underneath an iron golem in a room surrounded by swinging blades. Your best approach is probably to make yourself visible to the golem and draw him out of the room while a rogue with good evasion skills ducks under the blades to retrieve the sword. As soon as you have defeated the golem, return to Level Two and place the sword next to Mandals remains so that you can obtain the modified mandrake root from his spirit.
In each of the four corner rooms on Level Three, you will find a small basin of water with traces of wyvern poison in each one. You must put one dose of wyvern poison into each of these basins in order to activate the hydraulic mechanism that unlocks a door in the east. In the north-west corner, the basin of water is inside a small library. If you met Nheero Futma in the alchemical library, and asked him to do further research on this level, this is where you will find him now. You will not be able to get into the south-east corner room until you have completely finished all quests in Dragons Eye.
 As you attempt to approach the Histachii chamber, the Eye of Sseth hanging over the door will detect that you are neither Yuan-Ti nor a histachii and you will find yourself running away as if hypnotised. The Snake Blood feat (i.e. a human with distant Yuan-Ti ancestry) is unfortunately not enough to help you here. Of course, there is only one solution to this: one of the party members must become a histachii. Go back to Nheero and ask for the unfinished portion of the weak histachii brew that you made for him. Any party member can use it and then approach the Eye of Sseth unchallenged. At the back of the Histachii chamber, a lever is disguised as a small shelf. When you reach for the shelf, the drawbridge leading to the southernmost chamber will be lowered.
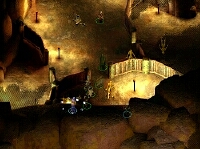
You will probably want to rest until the histachii brew wears off before entering the newly-accessible room, as it is full of efreeti and you will want all your party members to be in peak condition for the battle. Then, position your best fighters at the end of the drawbridge to hold back the efreeti so that you only need to battle two or three at a time.
When you have slain all the efreeti, you will find that the sole living occupant of the room is a little boy named Thorasskus, surrounded by the corpses of men and women as well as a number of clubs and spears. He will ask you to find his mother for him. If a paladin speaks with him, she will immediately detect that he is not a little boy but a monster. Otherwise, you will have to return to speak with Nheero to learn that Thorasskus is the well-disguised High Priest of the Yuan-Ti. When you confront him with your knowledge, you will have to fight him. First, he will transform the clubs and spears littered about the room into snakes and close the drawbridge so that no one can enter and leave the room.
 It is essential to kill Thorasskus quickly because he can produce new snakes faster than your party members can kill them, and soon they will be mired in a quicksand of snakes and unable to approach Thorasskus. He can even turn the arrows in your own inventory into snakes, which is why you will repeatedly see a message that you have lost an item. Fortunately, he is not difficult to kill, and in particular very susceptible to spells such as Finger of Death.
In the lower right-hand corner of this room is a secret passage that will take you to the final chamber of this level. Disarm the traps before opening the chests. Among other treasure, you will find the fourth and final rope, as well as the Medallion of the Lost Followers that you need in order to obtain the Holy Avenger longsword. When you have poisoned the final basin, which is in this room, you can leave Dragons Eye through the hydraulic door. You can either return to Kuldahar to retrieve the Holy Avenger first (the walkthrough of the Holy Avenger quest follows the Fields of Slaughter section), or, you can proceed with your journey and go back to Kuldahar after youve cleared a safe route through the Fields of Slaughter.