-

- Forums
- Chatrooms
- Gallery
- Gameplay Videos
- Upload
- Articles
- Mod Reviews
- Shop SP: Games, Movies, Books
|
|
Severed Hand, Level 1
Severed Hand, Level 2
Severed Hand, Level 3
The Four Towers
The Ilmater Ritual
Final Battles
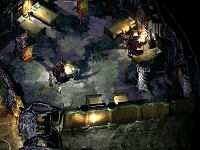
We continue to advance further into the Severed Hand. Although we managed to locate the demonspawns' throne room, neither Isair nor Madae were there. However, the area around the throne room was littered with their demonic lackeys, which leads us to believe that the leaders of the legion cannot be far away.
Alia Shield-Maiden, the Annals of Halgren
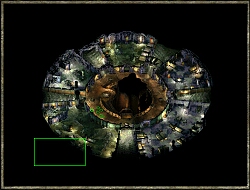 The fourth floor connects to four other towers branching off in all directions from the primary tower: the War Tower, the Wizard Tower, the Cleric Tower, and the Officer Tower. Of these, you can dispense with the Officer Tower for now because the only thing you need from it is on a character named Pudu who wont appear until nearly the end of the game.
The kitchen is in the north-west of the map, sandwiched between the entrance to the Wizards Tower to the west, and a sealed-off passage in the 11 oclock position. You will need to speak to the cook, Miriam, in this kitchen to advance the Food Thief quest if you accepted it.
Poisoning the GuardsYou will find a drow matriarch, Riki, waiting for you in the doorway to the sealed-off passage next to the kitchen. When you first meet her, Riki warns you that the guard barracks will present a formidable challenge, and that you will need to poison the guards food to neutralise them. Naturally, she has a recipe handy for just such a poison and suggests you use the alchemy lab on the second floor (Draceins room) to brew it. If you object on moral grounds to poison shell offer a sleeping-potion recipe instead. What you will need is Bonding Agent (which you can find in the third-floor demon room), Virulent Agent (which youll find in Kav Lathrams room), and either Tainted Demons Blood (which you can pick up on the second floor if you kill the demonic construct for Fynne) or ordinary Demons Blood (which you can inexplicably find next door in the kitchen) depending on whether you are making a poison or sleeping potion. Riki is not being entirely truthful; in fact, both recipes will kill the guards instantly, so it doesnt matter which potion you make. When you have made the potion, enlisting Draceins assistance if there is no alchemist in your party, put it into the sacks of food by the door in the kitchen and the cook will deliver it immediately to the guards.
 Be sure to notify Riki when youve neutralised the guards (1500 xp) as she will direct you through the major quests in the Severed Hand. First she will direct you to find a priest of Ilmater (see War Tower) to learn how to complete the Ilmater Ritual (see Ilmater Ritual and Globe of Essence), then, when you have reported completing the ritual, she will tell you how to find and kill the envoy from the Cabal of Dragonkin (see Final Battles). She will also buy and sell weapons and ammunition.
Jaebrilla, the fiancée of Kav Latham, is in a room to the north of this level. You will need to speak with her to complete the Death of Zaem Astyr quest you may have stumbled across on the second level. She will give you information that suggests Cedrin Zil could not possibly have known what Zaem was working on unless he read Zaems research notes- and is likely Zaems killer. Armed with this knowledge you can return to confront Cedrin. If you return to notify her once youve completed that quest, you can get some additional experience points. In the corner of her room you can find an urn containing spell scrolls and a useful helmet called the Black Hands of Shelgroth.
Moving clockwise to the right of Jaebrillas room, you will pass the entrance to the War Tower; this is the first of the five towers you should explore once youve finished exploring this level.
Hatemaster Drothan
 On the right-hand side of the entrance to the War Tower, you will find the room of two clerics: Hatemaster Drothan and Ruinlord Eradru. Drothan is standing in the doorway but refers you to Eradru if you need healing; he is too upset to help you. He feels he is not been given the challenges he needs to grow in his faith, and in any case is beginning to doubt that struggle will make him stronger as his church preaches. You can show him Garuks diary if you picked it up on the second floor, to prove to him that his lack of opportunities are a result of Garuks double-crossing. If you do so, he will reveal that the holy symbol Garuk sports grants access to the sealed-off Priests Chambers. To use it, the bearer must stand in the teleport circle in the Cleric tower. He will also tell you that the Globe of Essence is the secret to the demons immortality, and that a priest of Ilmater imprisoned in the War Tower can tell you how to destroy the globe. Upon thus betraying the secrets of his faith, he leaves the Tower.
Ruinlord Eradru remains, with two Slayer Knights of Xvim guarding him. If you accepted the quest to cure Vylu for Roga Thulc, Eradru is the one who can provide a potion to cure her confusion. For the rest of the game, he will be available to provide healing and watch over you while you rest if you have a delegate pass.
The Guard Barracks
 The Cleric Tower exit is the next room clockwise from Eradrus, and next to that you will find the Guard Barracks that Riki warned you about. If you poison the guards, as Riki suggests (see above for details), you will be able to simply walk in and loot the corpses after they all drop dead. You get 1500 experience points for completing the quest this way. Entering the room before then is likely to start a fight. They will speak to you once, telling you to leave, and if you attempt to interact with any of them after that the entire room will go hostile. In this case you will have to fight the two Thayvian mages, a bugbear, a guard, a half goblin, a Yuan-Ti halfbreed and Ruinlord Gadu Crum that live in this room - and you arent likely to get experience for any of them unless your party is at an unusually low level. Either way, be sure to check all bodies and chests before you leave. In addition to some good scrolls, you will pick up the Chain of Drakkas. Once youve killed the guards, report back to Riki. Your next major quest will be to complete the Ilmater Ritual in the Cleric Tower.
At the southernmost point of the fourth level is the entrance to the Officer Tower. You will not need to visit this tower until Riki tells you to meet the envoy from the Cabal of Dragonkin. At that point, Captain Pudu will spawn in the top floor and you can go to him to get the key you need. If you wish to visit earlier, however, you can engage some of the monsters on the lower levels for a small number of additional experience points.
In the south-west, next to the entrance to the Officer Tower, youll find a gruesome human anatomy lesson in progress. A Red Abishai and a Ruinlord are demonstrating torture techniques on human slaves. When they see you and a fight breaks out, a glabrezu guard teleports in as well.