-

- Forums
- Chatrooms
- Gallery
- Gameplay Videos
- Upload
- Articles
- Mod Reviews
- Shop SP: Games, Movies, Books
|
|
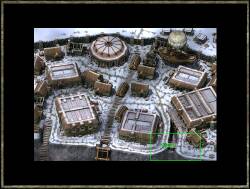
Targos Docks
Smugglers'
Caves
The
Palisade
The soldiers at the docks were well pleased with our efforts,
and have asked us to seek out the lord of this town, a man named Ulbrec.
I would have us go straight to him, but both Kei and Silence-Before-Iron
have advised caution. Halgren agreed, perhaps wisely, as it was also Kei
who insisted on scouting the tunnels before plunging through - several
times, her careful reconnaissance kept us from marching blindly into a
battle.
The town looks to be all but abandoned - many houses have been stripped
of their timbers, and piles of lumber line the otherwise empty streets.
Someone, somewhere, must be working to ensure that Targos is not taken
unawares.
Alia Shield-Maiden, the Annals of Halgren
 When you get to the top of the cliffs, follow the road up and around the
town towards the Weeping Widow (you'll probably need to rest by now anyway,
if you haven't already done so). Most of the buildings have been boarded
up, but on the north west part of the road you'll find one house that's
open. Inside you'll find Koluhm, the priest that the Iron Collar band
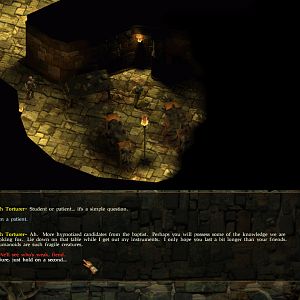
mentioned. Although at first Koluhm appears to be a little on the crazy
side, he's actually a Priest of Myrkul. You'll soon learn that Koluhm
is talking to the spirit of a dead goblin on the orders of Lord Ulbrec
(unlike the rest of the Iron Collar band, he's earning his keep). At this
point, he seems to be speaking in riddles, murmuring something about all
of Targos serving Myrkul soon. If you ask him about this, he'll continue
to talk cryptically about Myrkul. But you can still have a fairly coherent
conversation with him, as long as you keep him on other topics. Mention
that you spoke with the other members of the Iron Collar band, and ask
him why he's here instead of at the Weeping Widow. He'll tell you that
he couldn't sleep there - the crying spirit kept him awake at night, so
he left and set up camp here. You can also ask him about the other member
the band mentioned: Phaen. It's obvious that Koluhm doesn't think much
of Phaen. He tells you that Phaen can be found at a make-shift barracks
just north of the Town Hall. He also warns you to be careful of him, but
won't say anything more than that.
When you get to the top of the cliffs, follow the road up and around the
town towards the Weeping Widow (you'll probably need to rest by now anyway,
if you haven't already done so). Most of the buildings have been boarded
up, but on the north west part of the road you'll find one house that's
open. Inside you'll find Koluhm, the priest that the Iron Collar band
mentioned. Although at first Koluhm appears to be a little on the crazy
side, he's actually a Priest of Myrkul. You'll soon learn that Koluhm
is talking to the spirit of a dead goblin on the orders of Lord Ulbrec
(unlike the rest of the Iron Collar band, he's earning his keep). At this
point, he seems to be speaking in riddles, murmuring something about all
of Targos serving Myrkul soon. If you ask him about this, he'll continue
to talk cryptically about Myrkul. But you can still have a fairly coherent
conversation with him, as long as you keep him on other topics. Mention
that you spoke with the other members of the Iron Collar band, and ask
him why he's here instead of at the Weeping Widow. He'll tell you that
he couldn't sleep there - the crying spirit kept him awake at night, so
he left and set up camp here. You can also ask him about the other member
the band mentioned: Phaen. It's obvious that Koluhm doesn't think much
of Phaen. He tells you that Phaen can be found at a make-shift barracks
just north of the Town Hall. He also warns you to be careful of him, but
won't say anything more than that.
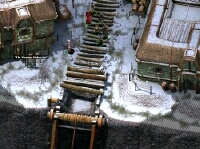 Leaving Koluhm behind, continue to follow the main road. When you come
to a trail made of large logs, go south towards the cliff. You'll find
Lumbar Grundwall just above the edge of the cliff (you'll see a massive
crane there too). He has a load of lumber that needs to get to the Palisade,
but the crane is broken and he has no workers. Tell him that you'll try
to find someone to give him a hand fixing the crane. You'll be able to
solve Lumbar's quest when you speak to Olap at the Palisade.
Leaving Koluhm behind, continue to follow the main road. When you come
to a trail made of large logs, go south towards the cliff. You'll find
Lumbar Grundwall just above the edge of the cliff (you'll see a massive
crane there too). He has a load of lumber that needs to get to the Palisade,
but the crane is broken and he has no workers. Tell him that you'll try
to find someone to give him a hand fixing the crane. You'll be able to
solve Lumbar's quest when you speak to Olap at the Palisade.
To the west of Lumbar is the Weeping Widow inn. Go inside and find the innkeeper, Cahl-Hyred. Ask him about the 'weeping spirit' that Koluhm told you about. Cahl will tell you that it's the spirit of a woman who died while waiting for her husband to return from Dualdon. Apparently she threw herself out of the window to the cliffs below. If you offer to look into it for him he'll give you the key to the room. You'll also learn that he's not exactly pleased with Koluhm because he left without paying for his room. In part this isn't true: he warded the room for Cahl and then gave him a mysterious potion which Cahl will give you if you ask for it. The potion is unidentified (you can identify it yourself or have another merchant identify it for you, but the best choice is to show it to Elytharra). If you're so inclined, there are some decent items to steal from the back room of the Weeping Widow.
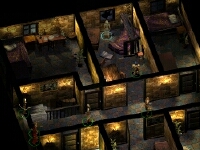 The spirit of the Weeping Widow only appears at night, so you might need
to sleep in the inn before going to find her (Note: To avoid missing your
window of opportunity when you rest, make sure that the Rest Until Healed
option is turned off. If it's on and any one of your party members are
injured, you could end up sleeping longer than 8 hours, and you'll have
to pay for a room again to wake up at night). Once it's night, head upstairs.
The warded room is the middle one on the top floor - the door will open
with the key. You should see the widow standing in front of the broken
window (if you don't see her, make sure it is night time). When you talk
to her, you find out that she is weeping for her husband. She speaks rather
cryptically so you won't get much out of her other than his name: Donovan.
Go back downstairs and speak to Cahl-Hyred about Donovan. He knows a little
bit about Donovan, and will share the information with you. He'll suggest
you go talk to Gohar, the barkeeper at the Salty Dog; apparently Gohar
is in the habit of collecting the bits of old ships and placing them on
the tavern walls. (Note: You may want to wait before going back down to
the Docks, as you'll eventually have to go down there again). Alternatively,
a Cleric can exorcise the spirit immediately. Take note that while you
will get experience for getting rid of the spirit and for solving Cahl's
problem, this option will prevent you from completing the remainder of
the quest.
The spirit of the Weeping Widow only appears at night, so you might need
to sleep in the inn before going to find her (Note: To avoid missing your
window of opportunity when you rest, make sure that the Rest Until Healed
option is turned off. If it's on and any one of your party members are
injured, you could end up sleeping longer than 8 hours, and you'll have
to pay for a room again to wake up at night). Once it's night, head upstairs.
The warded room is the middle one on the top floor - the door will open
with the key. You should see the widow standing in front of the broken
window (if you don't see her, make sure it is night time). When you talk
to her, you find out that she is weeping for her husband. She speaks rather
cryptically so you won't get much out of her other than his name: Donovan.
Go back downstairs and speak to Cahl-Hyred about Donovan. He knows a little
bit about Donovan, and will share the information with you. He'll suggest
you go talk to Gohar, the barkeeper at the Salty Dog; apparently Gohar
is in the habit of collecting the bits of old ships and placing them on
the tavern walls. (Note: You may want to wait before going back down to
the Docks, as you'll eventually have to go down there again). Alternatively,
a Cleric can exorcise the spirit immediately. Take note that while you
will get experience for getting rid of the spirit and for solving Cahl's
problem, this option will prevent you from completing the remainder of
the quest.
When you speak to Gohar, he's happy to give you a piece of Donovan's ship (called "Veira's Gaze"). He's also willing to tell you a bit more of the tale. Before you speak to Veira (the Widow) you should get Cahl-Hyred's bottle identified by Elytharra. Return to the Weeping Widow, and give Veira's ghost the piece from Donovan's ship. Remember, she only appears at night so you might need to rest again. Veira is very thankful for being freed from her mourning. She will also give you a warning of more trouble coming to Targos. In exchange for being freed, Veira will offer you a boon. If you have the 'ghost-touched' bottle with you, ask her to shed a final tear into the bottle. Once this is done, she vanishes. When she's gone, go back downstairs and let Cahl-Hyred know that you've solved his ghost problem. Because you don't really know what the tears are 'for', take the bottled tears to Elytharra. Not only is she impressed that you managed to aid the ghost, she'll also offer to buy the bottle of tears for 500 gp. Alternatively, she might offer to use the tears to enchant a dagger for you (there's no cost). The dagger you get is Sorrow's Tear and is quite useful (although if you sell it back to her later you'll only get 255gp). Finally, you can try to talk her into giving you a better price for the tears. If it works, you can sell the tears to Elytharra for 700 gp.
Gallaway Trading PostLeave the Weeping Widow and follow the cliff heading east. Just past the broken crane you'll find the Gallaway Trading Post. Inside you'll find Deirde Gallaway, who never seems to be in a good mood. Still, she's happy for some business, and she has a good selection of equipment. She can also identify items for you, but at a higher cost than Elytharra in the Town Hall.
Lord Ulbrec
 Keep going east along the cliff until you come to the Town Hall. Go on
inside and speak to Lord Ulbrec. He's pretty unpleasant at first, but
then softens up a little when he finds out that you solved the goblin
problem down at the Docks. Don't forget to tell him about the tunnels
(he's not interested in the scroll you found, so don't worry about it).
He'll give you a little more background information on the goblin attacks.
If you ask him about all the lumber you've seen in town he tells you about
the Palisade that he ordered built as well as some catapults - it's pretty
clear that Targos is gearing up for some major battles. All of these things
are happening under the direction of Shawford Crale, and Ulbrec wants
you to go report to him at the Palisade above Targos. If you keep questioning
him, you might also learn about two scouts (Ennelia and Braston) who have
gone missing. You can also learn a few more things about Ulbrec himself.
Keep going east along the cliff until you come to the Town Hall. Go on
inside and speak to Lord Ulbrec. He's pretty unpleasant at first, but
then softens up a little when he finds out that you solved the goblin
problem down at the Docks. Don't forget to tell him about the tunnels
(he's not interested in the scroll you found, so don't worry about it).
He'll give you a little more background information on the goblin attacks.
If you ask him about all the lumber you've seen in town he tells you about
the Palisade that he ordered built as well as some catapults - it's pretty
clear that Targos is gearing up for some major battles. All of these things
are happening under the direction of Shawford Crale, and Ulbrec wants
you to go report to him at the Palisade above Targos. If you keep questioning
him, you might also learn about two scouts (Ennelia and Braston) who have
gone missing. You can also learn a few more things about Ulbrec himself.
After speaking with Ulbrec, go through the door on your right, where you can find Elytharra, Ulbrec's wife. Elytharra is a very useful person to know. She's an enchantress, and will identify unknown items much more cheaply (50 gp) than other merchants. After she identifies the charred scroll and Cahl-Hyred's potion, make sure you speak to her again about each, because she has more to say about them. The scroll is an expended teleportation scroll, and she seems to think that means there might be a traitor somewhere in town. If you ask her whether magic has been used against the goblins, she'll tell you about Valin Geldencross, a Diviner from Bayn Shander. Valin had been helping to locate the goblin's camp before he fell mysteriously ill. She might ask you to look into the situation with Valin, whom you can find at the healing pavilion. Elytharra also sells various magical items, so you might want to spend some time seeing what she has to offer. For the theiving type, she is surprisingly easy to pick-pocket, and the rewards are pretty good.
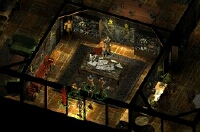
Phaen of the RagsLeaving the Town Hall, keep following the main road, now heading north. Just above and behind the Town Hall is another house you can enter. Inside you'll find a mage dressed all in rags. This is the other member of the Iron Collar band, Phaen of the Rags. Phaen isn't very pleasant at all, but you can still ask him about the rags. He'll say he got on the wrong side of a political argument in Cormyr. If you were paying atpavilionion to the Iron Collar band, this should grab your atpavilionion: although the Iron Collar band was kicked out of Cormyr, Phaen didn't join up with them until Luskan. If you mention this, he'll attack you. (If you already had the scroll identified, he'll attack you anyways.) If you still haven't had the scroll identified, and ask Phaen about it, he'll ask you to give it to him. When you question his motives, he'll attack you. No matter how it comes about, before he attacks you Phaen admits that he is the traitor inside Targos, and has been working with the goblin raiders. A character with good Bluff skills might also be able to find out who Phaen is working for. Phaen doesn't put up too much of a fight (he'll cast Mirror Image and then attack you in melee), although he does teleport in some goblin reinforcements. When you've dealt with them all, don't forget to loot the bodies. There's a nice robe that's handy for a wizard at this early stage of the game (Phaen's Robe). You can go back to Elytharra and give her a report on the traitor Phaen (Ulbrec isn't interested). If you had the 'Traitor in Targos' quest already, you'll get some quest points for dealing with Phaen.
Oswald Fiddlebender
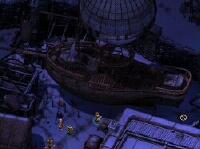 Just beside Phaen's house is a strange looking thing: a ship grounded
above the cliffs. In front of the ship is a little gnome named Oswald
Fiddlebender (for those that have played the original IWD, it's the same
Oswald and the same ship from Kuldahar). Oswald is a strange little fellow,
but fun to chat with. The ship is an air-ship that he built, and he's
happy to tell you all about it. Apparently Oswald was flying the ship
from his previous location in Kuldahar, before a forced landing here in
Targos. Aside from being interesting, Oswald also has his uses. An inventor
by trade, he has set up a little shop here in Targos selling potions.
If you keep talking to him about the ship, ask him about the damaged ship's
hull - he'll make mention of repairs and a spell he 'invented' called
Oswald's Mending. He's a little vague on the details, but he has some
notes on the spell inside his lab. Unfortunately, there's no way to get
into the ship to see them. If you are very skilled, you can pick-pocket
some interesting items from Oswald, including some useful potions.
Just beside Phaen's house is a strange looking thing: a ship grounded
above the cliffs. In front of the ship is a little gnome named Oswald
Fiddlebender (for those that have played the original IWD, it's the same
Oswald and the same ship from Kuldahar). Oswald is a strange little fellow,
but fun to chat with. The ship is an air-ship that he built, and he's
happy to tell you all about it. Apparently Oswald was flying the ship
from his previous location in Kuldahar, before a forced landing here in
Targos. Aside from being interesting, Oswald also has his uses. An inventor
by trade, he has set up a little shop here in Targos selling potions.
If you keep talking to him about the ship, ask him about the damaged ship's
hull - he'll make mention of repairs and a spell he 'invented' called
Oswald's Mending. He's a little vague on the details, but he has some
notes on the spell inside his lab. Unfortunately, there's no way to get
into the ship to see them. If you are very skilled, you can pick-pocket
some interesting items from Oswald, including some useful potions.
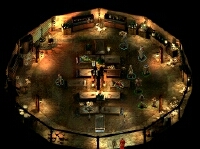
To report to Shawford Crale as Ulbrec requested, you'll need to head to the north edge of town. On your way, you'll pass a large pavilion. The pavilion is being used to house the wounded, and is tended by two Priests of Tempus: Denham Fisher and Ragni Bellows. There are a couple of other people in the pavilion as well: Maxiel of Silverymoon and Deagle Elmwood. You can talk to each of them to find out some bits of information, as well as various tips on combat. You can also access temple services through either Denham or Fisher. Denham can be pick-pocketed for a scroll of Cure Serious Wounds and some gold. The more important characters, however, are lying on the beds.
 Garradun Tanner seems to be quite unwell. He mumbles a bit in his injured
state, but you can make out something about his beloved Raina. Apparently
Garradun is afraid that he'll never see her again. He gives you a note
and asks you to deliver it to Captain Mariner of the Neverwinter guard.
The Captain will see to it that Raina gets the letter. Since you haven't
come across any Captain Mariner it might be a good idea to ask someone
about it. Only Denham seems to know anything; when you ask him about it,
he's rather suspicious about the note, and wants to check it in case it
contains information that could fall into enemy hands. If you let him
look at it, it turns out that his suspicions were correct. Garrunder was
sending a list of troop movements to Captain Mariner, presumably also
a spy. Furthermore, he thinks that the Garrunder in the pavilion is a
doppleganger who killed the real Garrunder sometime ago. Denham will replace
the letter with a fake - a 'fiery trap' that will be triggered if Mariner
also proves to be a spy. If you confront the doppleganger-Garrunder about
the fake letter he'll attack you, so make sure you're ready for a battle.
Garradun Tanner seems to be quite unwell. He mumbles a bit in his injured
state, but you can make out something about his beloved Raina. Apparently
Garradun is afraid that he'll never see her again. He gives you a note
and asks you to deliver it to Captain Mariner of the Neverwinter guard.
The Captain will see to it that Raina gets the letter. Since you haven't
come across any Captain Mariner it might be a good idea to ask someone
about it. Only Denham seems to know anything; when you ask him about it,
he's rather suspicious about the note, and wants to check it in case it
contains information that could fall into enemy hands. If you let him
look at it, it turns out that his suspicions were correct. Garrunder was
sending a list of troop movements to Captain Mariner, presumably also
a spy. Furthermore, he thinks that the Garrunder in the pavilion is a
doppleganger who killed the real Garrunder sometime ago. Denham will replace
the letter with a fake - a 'fiery trap' that will be triggered if Mariner
also proves to be a spy. If you confront the doppleganger-Garrunder about
the fake letter he'll attack you, so make sure you're ready for a battle.
You'll also find the sick diviner, Valin Geldencross, in the pavilion. When you first talk to him, he's clearly not well. He mumbles about some monsters and various other things. If Elytharra sent you to help him, tell him so and he'll mumble something about "braehg". If you spoke to Guthewulfe Henghelm in the Salty Dog and asked him about the wolf charm, you'll recognise "braehg" as the boar's blood drink in the game. You can buy some from Guthewulfe's inventory. Alternatively, if you didn't get a quest from Elytharra to help Valin you can try to pickpocket him. Among other items, you'll find a note written by Valin. In it, the seer explains about the "braehg" and how to bring him out of his stupor. Either way, you can offer Valin some of the "braehg" and he'll start to come out of his stupor (just for reviving him you'll get some quest points). Valin will tell you all about the vision, although he didn't succeed in finding the location of the goblin camp. However, he does make a few cryptic remarks about a fortress seeking you out, and that he saw a woman, distracted by thoughts of another, who will show you the way. Finally, gives you a warning about a flying ship. If you got the quest to help Valin from Elytharra, be sure to go back to her to complete the quest and collect your reward.
Right, now you're all set to report to Shawford Crale. Head straight north, following the lumber-tile trail until you come to the north gates (the solder might tell you that you're not allowed through, but if so just ignore him). Open the gate, and go on up to the Palisade.