-

- Forums
- Chatrooms
- Gallery
- Gameplay Videos
- Upload
- Articles
- Mod Reviews
- Shop SP: Games, Movies, Books
|
|
CHAPTER 5
Kuldahar Valley

When you arrive in Kuldahar Valley, you'll get swarmed by several hordes of undead that include Wights, Barrow Wights, Wraiths, and Black Archers.
It goes without saying that I bring out my anti-undead weapons for this, such as the Club of Disruption and the Moonblade of Selune. If your Cleric's level is high enough, Turn Undead can also prove highly effective by keeping many of the undead divided and unable to attack.
Elanna saved any Bullets of Disruption she found along the way just for this moment. She uses her sling to take out the Black Archers, allowing the warriors to concentrate on the other undead.
In a tower to the north, you'll find Jermsy and Nathaniel. Nathaniel has a few items for sale, including:
Hrothgar's Glen
Afterwards, there's more undead to clear in the Glen. Then it's on to ...

Your battle with Hiepherus, the priest of Bane. Again, the ol' Feeblemind trick won't work. Begin casting a few summons right in front of Hiepherus as meat shields. When the Orog close in, hit them with spells like Slow, Chaos, Power Word: Blind, and the like. You can also consider throwing in a Turn Undead to keep the Wraiths out of the battle. Once the numbers are thinned out, you can go all out for Hiepherus. He'll leave behind:
Report the good news to Jermsy, and he'll give you the Farmer's Cloak (+3 deflection bonus to armor class) and (as part of the Light of Selune mod) Flicker, a +3 Longsword that is Keen (improved chance for critical hits) and imbues its wielder with a constant Blink effect.
Kuldahar

When you arrive in Kuldahar itself, there will be Yuan-ti all over the place in fairly small groups. Some within the group will charge you, while others will fire their bows at you. Play accordingly. Have your warriors take out their warriors one at a time. Have your archers and/or spellcasters take out their archers one at a time, especially with ammunition that can either stun or inflict extra damage.
One of the early merchants you'll find is Conlan the Blacksmith, who's in the first house to the east that you see when you first arrive in Kuldahar. He sells:
The Light of Selune mod also adds a few items here ...
The second merchant you can find is Sheemish, inside of what used to be Orrick's tower. He'll have a lot of spell scrolls to sell. If you have the collector's edition CD, or you downloaded the file for it, you can also talk to the Air Elemental on the left side of the tower to give its inventory to Sheemish, who can then sell:
Another merchant will be in Kuldahar as part of the Light of Selune Mod. Wencit, a Wizard, can be found in Arundel's former home. He sells:
Jungle of Chult
This area is fairly simple. There will be at least two distinct packs of Yuan-ti Purebloods around here. One to the southeast will have two Pureblood Sorcerers among them. Another to the northwest will have two Priests among them. There's more than one way to go about the combats. One way is to send a scout ahead to mark their location, and then get in the first strike with a spell or three. Or you can charge straight in if you feel confident enough. Suffice to say, go for the spellcasters first. For the Sorcerers, combine missile fire with periodic castings of Magic Missile in order to tear down their Mirror Images.
Yuan-ti Temple
Now get those robes on, and scout out the Temple, scoring as much loot and getting as much xp from quests as you can. If you couldn't afford everything you wanted in Kuldahar, by all means, scour the temple for loot, go back through the portal and sell your loot, and then use your proceeds to purchase what you want. You can always come back to slaughter the Yuan-ti or kill off the Guardian when you return. I'll describe below some of the more notable items you can find.
In the southern room, where the Coiled Cabal Disciples are, you can find:
In the treasure cache to the east that requires the combination puzzle to enter, you can find:
There's more loot to be found in Ojaiha's chamber to the north. Keep in mind that if he returns to his chamber and his chests have been looted, he'll order everyone in the temple to attack you, robes or not. This can prove unfavorable to you since everybody will be coming after you from all sides. If you want to loot the chamber, you'll have to be fast about making a clean get away. Wait until a brief 'blackout episode' occurs that signals that he is attending ceremonies away from his personal chamber. You then have to loot his chests and then get out of the temple before the next 'blackout episode' occurs that signals his return to his personal chamber, upon which he'll notice your theft. You can then sell off the loot in Kuldahar, buy whatever you can afford, and then return to slaughter everyone in the Temple. Notable items in his chest include:
When I come back, I'm ready to commence the slaughter. The odd archer or priest is easy enough. There's three distinct groups that you may need to be careful with. One is the large group of Yuan-ti in the south chamber led by Ashra and Ihrati. Another large group to the southeast. Then there's the group led by Ojaiha in the northeast part.

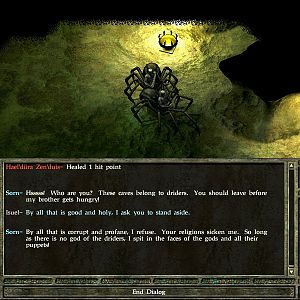
There's room for individual approaches, although they may be dictated somewhat by differing circumstances. For the group led by Ashra and Ihrati, keep in mind that the hallway north of the room allows your characters to position themselves just out of sight of the enemy, as per the picture above. This means you can grab the initiative with crowd-control spells like Spike Stones, Spike Growth, Stink Cloud, Web. At this level, Alliria throws in Sun Ray for good measure. One thing to keep in mind when it comes time for offensive spells is that the Assassins here have the evasion ability, which allows them to avoid damage altogether from spells that involve a Reflex saving throw. Therefore, be sure to throw in at least one Horrid Wilting, which involves a Fortitude saving throw instead of a Reflex saving throw.
Ashra will leave behind (courtesy of the Light of Selune mod):
The next group to the southeast I find to be a little harder to set up crowd control on, simply because the wall of the adjacent hallway forces you to be much closer to the door leading to their room. So I simply charged, fired off Slow and Chaos right away, and then mopped up.
For the northeast group led by Ojaiha, I found that they were so spread out that neither crowd-control nor area-effect spells were especially helpful. In this instance, I simply summoned as much meat-shield help as I could, and then charged in. Keep in mind that Ojaiha can cast both Blasphemy and Heal repeatedly, so it may not hurt to use Spell Resistance on any characters who going to be close to Ojaiha beforehand.
As for the Guardian of Chult, that infamous Black Dragon, he's even more killer in Tactics. I'm avoiding him for the time being. I'll take care of him later. Now it's back to Kuldahar.
Kuldahar under Attack

When you return from the Crossroads, the action continues non-stop with a combined assault by the Yuan-ti and the Legion of the Chimera.
This is going to come in several waves, so do not expend all of your resources at once. Use as much as is necessary to tip the scales in your favour against a particular wave, and no more.
The first wave will consist of several Orogs coming after you, while the Yuan-ti Sorceress, Cedra, will hang back and cast spells. Start off by summoning some help right around Cedra in order to keep her occupied. It will be a good idea to hit the Orogs with Chaos, and use Mass Haste on your own party, in order to get through this as quickly as possible. Keep in mind that Cedra can cast Disintegrate repeatedly, so it may be worth your while to cast spells like Death Ward or Spell Resistance when you can. After a while, a group of Harpies will appear, so have somebody cast Remove Fear in order to prevent your party from getting divided.
The next wave will consist of several more Orogs, led by a Neo-Orog General, and two Yuan-ti Sorceresses. Go for the Sorceresses first, and use Chaos to keep the Orogs divided.

Next up, a very large wave of Yuan-ti that includes Archers, Warriors, Priestesses, and Sorcerers will appear across the two bridges to the east. Simply stay on your own side, since the two bridges can act as choke points for those warriors who come through. The fight is almost over, so be generous with crowd-control and offensive spells.
The last wave will be several Orogs, led by a General and a Neo-Orog Priest. They'll spawn to the north, and won't be immediately in sight right away. Simply wait on your own side of the bridges, and let them come to you. Nail them with spells once they show up.
Cedra will leave behind a +4 Scimitar, a Golden Girdle (+3 to armor class vs. Slashing Weapons), and a Ring of Protection +3, which Tithian now wears.
Dragon's Eye, Entrance
When you first arrive, you'll get ambushed by a large pack of Frost Salamanders, which shouldn't be too difficult. Also have your Rogue disarm the long line of traps leading to the cave entrance.
Dragon's Eye, First Level
The various bands of Wyverns, Lizardmen, and Purebloods you may run into here should not be too difficult by now.
There are a few chests in the southwest corner. Some of the more noteworthy items include:
There are two key fights to watch out for. One is against two of the prisoners in the southeast corner, the Troll and the Mage. The Mage will cast a lot of spell protections on himself and the Troll, including Improved Invisibility. This fight can be a good deal tougher, because the Mage can spells like Chaos, Disintegrate, Horrid Wilting, Wail of the Banshee, Skulltrap, and Sunfire repeatedly. By now, if you've been following my advice, your Cleric should be able to cast Holy Aura by now, which will raise everybody's spell resistance. Elanna adds in Mass Haste. It may also help if you memorize multiple instances of Death Ward so that you can cast it on everybody beforehand. If things don't work out, simply reload and try again.

Your next major battle is against the leader on this level, High Commander Grishum. Note that you arrived by a narrow hallway to get here, so use this to your advantage. Position everybody back some distance in the hallway. Now have a character with good foot speed to run ahead and get the brief dialogue with Grishum over with. Have him or her run back to the party. Now have your spellcasters fire away with crowd-control spells at the entrance. Tithian can now add spells like Suffocate and Acid Fog as well into the mix. Once they're tied down, fire away with offensive spells.
Grishum will leave behind:
Dragon's Eye, Second Level
Around here, you'll run into various groups of Spiders, Beetles, Histachii, and Pureblood Priestesses and Sorcerers. They shouldn't be too difficult, since they tend to come in small groups. The one notable exception is a large group of Yuan-ti Priests, and Pureblood Priestesses and Sorcerers, gathered around the Ziggurat in the western portion of the level. Don't bother with crowd-control spells here, since they won't be inclined to move towards you, and their own spellcasting compels a certain urgency here. Instead, seize the initiative by blasting away with as many area-of-effect damaging spells as you can, and in as short a time sequence as you can.
In the southwest corner are several bookshelves and other containers that have scrolls and other times. One in particular to keep an eye out for is another Scroll of Protection from Magic, which I'll save for a final fight.
*Note for the Future*
Something I need to keep mind is that soon I'll have to fight the Six Lost Followers of Bane in order to earn the Holy Avenger. In Tactics, this fight is way more hellish than before. A key part of my plan is the Executioner's Eyes spell. Problem is, Elanna will need to reach 18th level to be able to cast it. So, for the time being, I rest for random monsters to kill for xp, until Elanna reaches 17th level.
The large cavern in the first level, with the large snake statue that opens up the entrance to the second level, is an ideal spot for this.
Dragon's Eye, Third Level
Again, you'll run into various groups of Yuan-ti Archers, Priests, Champions, Armored Skeletons, Monstrous Snakes, and so on. They shouldn't be too much trouble. There are however a few battles of note.
There is the odd time that you'll run into an Iron Golem. Remember, +3 or better weapons. A Druid or Ranger might find it worthwhile to use Star Metal Cudgel.
One is when you start to head westward. There will be a large group of Mustard Jellies that will attack you from all sides. Their one notable weakness is fire, so crank up spells like Fireball and Flame Strike and so on. Having a Druid use Flame Blade can't hurt either.

When you finish Nheero Futma's quests, you'll have to use his Sabotaged Histachii Brew to temporarily change one of your party members into a Histachii to enter the room where you can lower the drawbridge. There will be a couple of Histachii in the room. If you want to collect the xp, you can buff up your party-member-turned-Histachii beforehand. He can then get past Sseth's Eye and then kill the two Histachii.
Once you lower the drawbridge, there will be a very large group of Efreeti waiting across the bridge. They will have Fire Shield: Red cast on themselves beforehand. Trying to hit them physically can really take its toll on your health. The fact that they love to churn out Fireballs and Aganazzar's Scorchers as well doesn't help. My strategy is to have a decoy, Tithian, buff up to the max and set himself up at the bridge. Elanna also protects herself, and takes the initiative by casting a couple of Horrid Wiltings over the area. This should take out some of the Efreeti, and weaken others. I let the rest rush Tithian, and get pinned down. Elanna continues to fire away with spells like Cone of Cold and Chain Lightning.

Next up is your battle against the High Priest of the Yuan-ti, Thorasskus. Again, the ol' Feeblemind trick won't work here, so Thorasskus can go crazy with spells like Blasphemy, Heal, etc. Two spells that you'll want to cast beforehand, in addition to your usual buffs, are Holy Aura and Mass Haste. Once the battle starts, I start off with a combo of Chaos and Slow to take the horde of snakes out of the battle. Everybody else goes all out for Thorasskus. He'll leave behind:
Follow the door in the southeast corner of the room, which leads to the treasure trove. You'll find, among other things:
*Note*
The upcoming fight for the Holy Avenger is next, so now it's time for me to sleep around for random monsters until Elanna reaches 18th level and can cast Executioner's Eyes.
The Six Lost Followers

*The Lowdown*
Now it's time for the big fight against the Six Lost Followers. Here's the breakdown in terms of what Tactics does for this fight.
They all have more hit points, enhanced stats, higher attack bonuses, etc. They are also immune to disruption, and plenty of other things. Atalaclys is now under an enduring 'Improved Invisibility' effect from the word go. It is pretty much impossible to disrupt the spellcasting of either Atalaclys or Inhein by conventional means. Veddion and Kaervas can crank out hideous damage, especially on a critical hit.
Jaeger's arrows can now cause instant death unless a saving throw is made.
What you do have going for you is that the Followers still have the same damage immunities, but also the same damage vulnerabilities, as described in the Medallion. You can formulate a strategy accordingly.
*Preparation*
First things first, you need to prepare to the max for this battle before you click on Khosa's grave, which is second to the right from the gateway. Cast all of your long lasting buffs first, like Stoneskin, Barkskin, Spell Resistance, etc. Alliria casts Barkskin not only on herself, but also on Markus and Stygar (this one from her Oakshield).
Now summon some help. My recommendation is to summon some very specific monsters, and there's reasons why.
My strategy includes Elanna summoning two Zombie lords. The idea is to try to hold up Veddion for a little while. If your Animate Dead spell turns up a Greater Boneguard, just reload and try again. Veddion's hammer will blow through skeletal undead in no time at all. With the Zombie Lords, their partial resistance to blunt damage will at least give them more staying power.
Stygar, being a Cleric, summons two Remorhazes. If I happen to get either a Greater Werewolf or a Greater Feyr upon casting Summon Monster IX, I just reload. The point here is that the Remorhazes can score blunt damage, and this will help against Kaervas.
Once all the conjured monsters are summoned, its time for the last three buffs. Stygar casts Holy Aura, Elanna casts Mass Haste, and Tithian casts Emotion: Hope. Now it's time to begin the battle.
*Phase One*
First and foremost, I have Markus quickly grab the Holy Avenger. Just wait until the pickup option shows up at the bottom, hit pause, go to your inventory screen, and place the weapon in the right slot. It will be useful in this battle.
*Phase Two*
Now that the Holy Avenger has been claimed, it's time for my first battle commands.
The two Zombie Lords go after Veddion.
Tithian uses a Scroll of Protection from Magic on Atalaclys, to remove his magic as a factor in the battle.
Markus switches over to his hammer, and Stygar switches over to his Club of Disruption.
Alliria starts to head over to Jaeger.
Elanna casts Executioner's Eyes, ideally catching not just everyone in the party, but also the summoned monsters as well.
*Phase Three*
Markus, Stygar, and Akutagawa head straight for Kaervas. I also command the two Remorhazes to go after Kaervas as well. Between my three main warriors and the two Remorhazes, all of them packing blunt damage, and all of them ideally under the effect of Executioner's Eyes, they should be able to take out Kaervas quickly, and thus remove his x3 damage on a critical hit axe from the battle.
Alliria and Tithian stay on top of Jaeger. If only one character, or no character, is attacking Jaeger up close, he'll continue to fire away with his bow. This is something you want to avoid as much as possible. If however two melee characters are within range, he'll draw a halberd instead of his bow.
Elanna summons a Mordenkainen's Sword, and is also ready to summon more undead if needed against Veddion.
*Phase Four*
If any of the Remorhazes survived the initial attack on Kaervas, I'll send them after Veddion.
Everybody else goes all out for Jaeger, in order to permanently remove his instant death bow as a factor from the battle.
*Phase Five*
Now everybody goes all out for Inhein, to stop her from summoning anymore monsters. This means switching over to piercing or slashing weapons, like Silentkiller for Akutagawa, the Ice Spear for Alliria, and the Brilliant Short Sword for Tithian.
*Phase Six*
Now everybody goes for Veddion, who will be vulnerable to slashing weapons. He's the heaviest hitter remaining.
Elanna now throws out Banishment for any monsters that Inhein may have summoned.
Note that if Executioner's Eyes ever runs out, Elanna won't bat an eyelash at casting it again.
*Phase Seven*
By now its a mop-up operation. Next is Broken Khree, and then its Atalaclys.
'Cera Sumat,' Holy Avenger, is now Markus' main weapon. The stats of the improved version are:
+10 to attack bonus, +10 to damage, +5 enchantment, +2d6 magic damage against evil, +2d6 magic damage against chaotic, Dispel Magic on target (Will save), can cast the spell Dispel Magic without limit, +30 spell resistance. Yes, its overpowered, but I don't mind since it seems more consistent with the story in the Medallion of the Lost Followers.
Winning this battle gives Markus a +1 to Strength and a +1 to Wisdom. This was the point behind adding +1 strength at 12th level. It combines with the bonus added after the battle, and the Little Giant Belt, to give Markus a total Strength of 24. The +1 Wisdom here, combined with the Ring of the Wise (when he starts wearing it), and the +1 Wisdom bonus from the Ritual of Purification ritual will raise his Wisdom to 16.
*Incidentally ...*
If you feel that using the Scroll of Protection from Magic on Atalaclys feels a little too cheesy for you, it is still very possible to win this battle without using it. It will make things harder, and longer, but its still quite winnable.
If you prefer it this way, then Atalaclys should be taken out earlier rather then later, probably just after Kaervas. The reason is that while many of his Lost Followers are still around, he'll avoid casting spells that will hurt his comrades and therefore settle for things like Flame of Arrow. If he's by himself, or has a large enough area, then he'll start going crazy with things like Horrid Wilting. His spell protections will enable repeated castings of Horrid Wilting, which can doom the party. It will take time to work up enough damage through his Improved Invisibility effect and other protections to take him out, but it is necessary to take him out early in the battle.
If you're wondering, here's the proof that it is possible (SittingBull99 is my user name on Youtube):
In any event, there are 3 Scrolls of Protection from Magic to be found in the game, even unmodded. Why not use them? This is the first of 3 fights where I use them.
The Black Dragon of Chult

Now that I've gone up a level or two, and also now that I have the Holy Avenger, I set my sights on the Black Dragon guarding the Crossroads. The differences in Tactics are:
In addition to its acid breath attack, it will now occasionally throw out a Whirlwind effect similar to the Druid spell, which will go around randomly and can stun party members caught in its path. Suffice to say, this can make things even more dire for you.
Needless to say, buff to the max, including Holy Aura and Mass Haste. With higher levels, and better weapons, this battle is definitely more manageable. This is not by any means a cake walk though. The Dragon is still entirely capable of cutting down a party member in mere moments, especially when hasted or when it lands a critical hit. So be ready with multiple castings of Heal when needed. In fact, it may be advisable for your divine spellcasters to devote their 6th or 7th level spell slots to Heal exclusively, at least for this battle. Once you're ready, take it down with physical attacks, keep a diligent eye on your own hit points, and it should go down in a while.
Lava Level, The Time Puzzle

Most of the fights here still aren't particularly difficult. One of the key ones, however, is against the Beholder during the first phase of the time loop. Don't bother buffing up, since everything will get dispelled anyway. Also, Finger of Death won't work on the Beholder anymore. For its part, it packs all the usual attacks associated with Beholders, including instant death and petrification. So the key is to try and get everyone south as far as possible. The strategy is to get rid of all of the Beholder's minions, but beyond its sight. Once all the Trolls, Efreeti, Mephits, etc. are gone, keep in mind that the Beholder can only be attacked by missile weapons or by weapons with an extended reach, like a Greatsword or a Spear. The best character for now taking out the Beholder is someone who can pack a punch with an extended range weapon, but also has high Fortitude saving throws in case of a death or petrification ray. A Paladin or Monk make obvious choices, although a Barbarian may do as well with some luck.
Many of the ensuing fights will not be difficult, because they tend to occur in small groups.
The next major fight is against King Lothar. In Tactics, King Lothar can pack quite a punch. However, the fight can be made decidedly easier by whipping out spells like Power Word: Blind and Slow.
Incidentally, the chest in the small island in the middle of the lava, the Sword of Dykhast gets replaced by:
When you get to the part of the time loop where you have to stop Sorceress Izbelah from casting her Temporal Stasis Spell, cast Mass Haste right away. Head straight for the path to the Archon on the west side of the level. Don't worry about the rubble collapse. All you need is for one character to make it past the rubble, and then speak to the Archon to get to Jasper's Embassy. One there, send your most damaging warriors to take out Izbelah before she gets the spell off. Now head for the Fields of Slaughter exit for the last time.
Ice Temple, Return

Except when you leave, Nickademus will call in his favor and bring you back to the Ice Temple, because he wants your help in trapping fiends inside the Temple.
I wouldn't recommend buffing up for this part, for two reasons. One is, chances are good more fiends will arrive to interrupt, forcing you to fight anyway. Another reason is that some of the fiends love to cast Chaos or Confusion (e.g. Gelugon, Glabrezu). So to minimize the hassle, it helps to be able to cast Dispel Magic on yourselves whenever its needed. Now the exit will lead to the Fields of Slaughter.
Fields of Slaughter
When I arrive for this part of the game, I memorize enough instances of Death in order to be able to cast it on all 6 members of the party. There are specific reasons why. But first ...
You'll run into a contingent of the Legion of the Chimera, where you'll discover that Saablic Tan has been cured of his Umber Hulk affliction by Isair and Madae. He orders his troops to attack before teleporting away. The usual suspects in terms of spells, e.g. Power Word: Blind, crowd-control, Sunray, Suffocate, then damaging spells, is enough to tip this fight in my favour.
Next, I'll have Tithian use Bluff to get in the temporarily good graces of the Dread Orc Shaman, Krutuuk. Now start fighting the undead east of Krutuuk's camp. There will also be an xp reward for getting Gorg and his Dread Orc Scouts to join you.

Next up is the Elven Lich, M'Dorfein, and his Elven Dread Warriors. M'Dorfein can engage in repeated casting of spells like Disintegrate and Wail of the Banshee. This is the first reason that I advise making sure everybody is protected by Death Ward. This way, the battle simply becomes a matter of taking out M'Dorfein first, and then mopping up on his Warriors.
At various places around this camp, you may find:
Next up is Krutuuk and the other Dread Orcs. Saablic Tan will have informed Krutuuk who you really are, that is, if you agreed to help Krutuuk earlier. Before you actually start this fight, buff up with Holy Aura and Mass Haste. Also, position your position warriors, including one with the Club of Disruption, as close to Krutuuk as possible before initiating dialogue. The idea is to take out Krutuuk as quickly as possible, and then finish off his Warriors. Krutuuk leaves behind:
The stone just behind where Krutuuk used to stand holds:
Saablic Tan

Before you actually leave the Fields of Slaughter, take the time to stop at the northeast corner and buff up to the max. Your buffs should also include a Death Ward for everyone in the party. The reason is that Saablic Tan will be waiting in the next area, along with a LOT of help, Red Wizards, archers, a Neo-Orog Priest, Half-Dragons, Slayer Knights of Xvim, Greater Feyrs, Half-Orcs, and Wanmok.
Suffice to say, crank out as many spells as you can to blanket the area in front of you. Higher-level spells like Sunray, Suffocate, Insect Plague, Acid Fog, Cloudkill, etc. should now be a regular part of the mix. Let your warriors take down anybody that makes it through.
Note that Saablic Tan, when given the opportunity, will try to come right next to the party to unleash Wail of the Banshee. His fellow Red Wizards can also cast Disintegrate and Power Word: Kill. This is the reason for having Death Ward in place for everybody beforehand.
The enemy spellcasters will also frequently summon monsters to their aid, and this can lead to practically an extra army being summoned against you. It helps to be able to cast multiple instances of Banishment a la the Sorceress.
Saablic Tan himself will leave behind:
Now, for the final chapter...