Neverwinter Nights 2 logo

Obsidian Entertainment


NWN 2: Mask of the Betrayer Online Walkthrough by David Milward


INTRODUCTION  |  SPIRIT EATING  |  NPCs & EQUIPPING GUIDE  |  ITEMS   
NWN2 OC  |||  MotB: ACT I  |  ACT II  |  ACT III  |||  SoZ
About the Walkthrough  |  About the Maps  |  About the Author  |  Where to Begin
Disable all ads!

Act II:   Mulsantir  |  Death God's Vault  |  Wells of Lurue  |  Ashenwood  |  Sunken City  |  Thay Academy

Sunken City:   Lakeshore  |  Nightshore  |  Coveya Kurgannis  |  The Skein  |  Return to Coveya Kurgannis

The Skein

Skein Map

Adversaries that you can expect to find here include Maverick Fire Elementals, Malignant Water Elementals that can cast Swamp Lung, Telthor Panthers, Telthor Rats, Exiled Hags, and Exiled Hagspawn.

  1. Here is the initial point of entry if you bumped ahead of the petitioners. A short way ahead you’ll encounter some humanoids of various races that seem bent on attacking you. A successful Diplomacy or Intimidate check will convince some of them to leave. The Hagspawn, the Drow (a wizard) and the Duergar will in any event attack you.

  2. Here is a fresh corpse lying on the ground. There will be others lying about the Skein. Their significance will become apparent if you choose to progress the game a certain way.

  3. Here you find some humanoids seeking shelter from the other horrors that crowd the Skein. They are lead by Geiard Riverdweller.

    One of them includes a Gnoll who’s holding on to an Imaskari Device Lever that you may want to use later on. One way of getting it is to kill him for this though this commits you to killing the rest of the humanoids. The other way is to fulfill his demand that you trade him an axe wielded by a ‘mad dwarf’ warrior for it. The axe in question is at #10.

    There’s also an old woman at the west edge of the room called The Sleeper.  She’s suspended in a dream like state.

    If you’re good, you won’t be able to enter her dreams until you’ve acquired a certain power from the Hag that you’re seeking.

    If you’re evil, you can use Devour Soul on her. If One of Many is in your party he’ll want to devour her soul and assimilate her powers. This allows him to access the Warlock class if your influence with him is high enough.

  4. Here you’ll find one of three Imaskari Devices. You may have noticed by now that you’re periodically attacked by a Greater Air Elemental that always vanishes just as you’re about to finish it off. It always leaves behind a ‘Glowing Powder’ in its wake. The three Imaskari Devices are designed to lure and then hold fast the Elementals.

    Here’s how to make them work:  Each one holds an Empty Imaskari Globe that you can remove from the machine. Click on one of the fresh corpses found at #2, #5, #7, or #10 to obtain an Imaskari Globe of Blood. Then click on one of the Glowing Powders left behind by a Greater Air Elemental to obtain an Imaskari Globe of Energized Blood. Insert the globe back into the machine. The finishing touch is to insert an Imaskari Device Lever and then use the lever to set the machine in motion. A Greater Air Elemental will arrive shortly and the machine is active.

    The machine here incidentally already holds one of the levers. The other two Imaskari Devices are at #9 and #13.

    Activate all three devices and the water that you’ve noticed periodically throughout the Skein will drain away, allowing you to loot the floating corpses as well as gain access to the Hag that you’ll need to confront. You’ll also get 5,000xp.

  5. Here you’ll find another fresh corpse. There’s also a door to the east that’s locked. It’s a matter of either causing it to open or getting around it.

  6. Here is the Earth Elemental that Fentomy was referring to. It is a Primal Earth Elemental. This represents an alternative method of reaching the Hag that haunts the Skein.

    Primal Earth Elemental
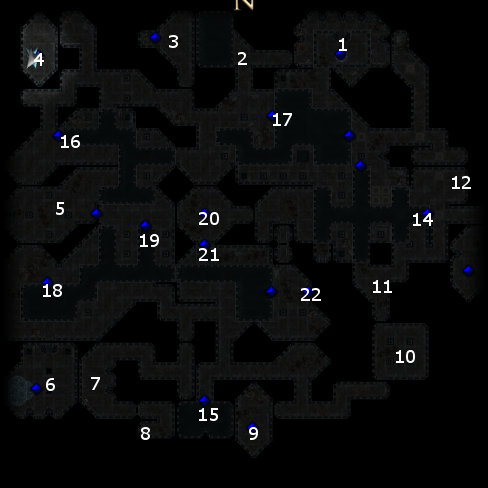
If you use the lever to the machine, the Primal Earth Elemental is released and it will attack. With a good enough Armor Class for all your characters chances are you’ll be able to take it down unscathed. If it does hit, it will really hurt but Heal or Bestow Life Force can undo that. If you use Devour Spirit on it you’ll get a Pristine Spirit Essence. It will also leave behind a Ring of Untherite Generals. This has the effect of opening the doorways on the east sides of locations #5 and #20 and allowing you to reach the Hag. It does cause rubble to fall, blocking passageways leading north away from #5 and leading east away from here. This means that you won’t be able to power all three of the Imaskari Devices designed to trap Air Elementals or access the flooded portions of the Skein.

    The other way to deal with this is to remove the Imaskari Device Lever from the machine. If you use it to power one of the three Imaskari Devices to trap an Air Elemental, you won’t be able to pull it back out to release the Primal Earth Elemental. This effectively commits you to using the three Imaskari Devices and leaving the Primal Earth Elemental as it. This will also earn the enmity of Fentomy.

    The Golem lying on the floor can be looted for the Swift Golem Legs. The corpse on the floor can be looted for the Staff of Defense.

  7. Here you’ll find another fresh corpse. Another corpse nearby holds a Scale Mail +4.

  8. If you chose to enter the Skein directly through the use of the Key to the Skein here is your initial point of entry. The same race of humanoids wanting to attack you will instead end up confronting you here. A nearby corpse holds a Club +3.

  9. Here is another of the three Imaskari Devices. A corpse in the room holds a Chain Shirt +4.

  10. In this room are a number of foes, included a Crazed Drow, an Insane Deep Gnome, and a Mad Axe Wielding Duergar among others. The Duergar drops a Duergar Waraxe. This is the axe that the Gnoll at #3 wants in exchange for an Imaskari Device Lever. There is also another fresh corpse here to provide a source of blood.

  11. A corpse here can be looted for a Tower Shield +4.

  12. A corpse here can be looted for the Charming Sling.

  13. Here is one of the three Imaskari Devices.

  14. The stairway here can lead down if the water has been drained by the Imaskari Devices. Among the corpses you’ll be able to find a Blade of the Elements.

  15. The stairway here can lead down if the water has been drained by the Imaskari Devices. Among the corpses here you’ll be able to loot a Storm Armor of the Earth’s Children and a Kukri of the Eclipse.

  16. The stairway here can lead down if the water has been drained by the Imaskari Devices. You’ll find here the Gloves of the Long Death +5 and the Austruth Flute among other things.

  17. The stairway here can lead down if the water has been drained by the Imaskari Devices. As far as I can tell, the loot here is random though fairly valuable.

  18. The stairway here can lead down if the water has been drained by the Imaskari Devices. It is also the stairway to take if you activated all three Devices and want to make your way to the Hag. You’ll be able to find the Leech and other random items.

  19. The other end of the passageway starting at #18 that leads to the Hag of the Skein.

  20. Gual KaushHere is the hag known as Gual’kash who’s been terrifying the other residents of the Skein. Combat is inevitable and goes in three phases. The first phase is fighting her directly. She can cast spells. Taking her down isn’t difficult subject to the proviso that she always seems to have a fear effect on your PC. Once she’s taken enough damage, she’ll possess one of your companions, forcing you and the rest of that party to kill that companion. Once that happens, you’ll have to fight her again, with the previously possessed companion back to normal but with next to no hit points.

    Once the third phase is over, you’ll enter into a dialogue with her. If Gann is in your party it will become apparent that Gual’kash is his mother and they have quite a bit to say to one another. Gual’kash was banished from the Slumbering Coven, left to rot in the Skein, and condemned to eternal sleeplessness for loving Gann’s father without devouring him. You can choose to let her go. If you have Devour Soul, you can devour her soul though this will cost you influence with Gann. This will yield Gual’kash’s Essence. You can use Mold Spirit to combine this with a powerful gem to produce the Amulet of Pure Love.

    You’ll also get the Hag’s Eye. This allows you at certain points in the game to enter the dreams of others. With this, you can head back to The Sleeper at #3 and enter her dream. She’s being tortured in a nightmare by the Slumbering Coven because they want the monopoly on the ability to enter dreams. You can elect to kill her but this earns the enmity of the others who protect her. Refusing to kill her earns you 5,00xp and good points. If you subsequently destroy the Slumbering Coven, you'll find the Sleeper back in her home in Mulsantir. She'll then reward you with a Periapt of Wisdom +8.

    The doorway to the east will be opened if you killed the Primal Earth Elemental at #6.

  21. You’ll be able to enter this drained passageway if you activated all 3 of the Imaskari Devices. Along the way you’ll be able to find a Weather Resistant Golem Torso.

  22. Here is the door leading back up to the Coveya Kurgannis.

Amazon.com
Amazon.ca
Amazon.co.uk
Sorcerer's Place is a project run entirely by fans and for fans. Maintaining Sorcerer's Place and a stable environment for all our hosted sites requires a substantial amount of our time and funds on a regular basis, so please consider supporting us to keep the site up & running smoothly. Thank you!

Disable all ads!