Neverwinter Nights 2 logo

Obsidian Entertainment


NWN 2: Mask of the Betrayer Online Walkthrough by David Milward


INTRODUCTION  |  SPIRIT EATING  |  NPCs & EQUIPPING GUIDE  |  ITEMS   
NWN2 OC  |||  MotB: ACT I  |  ACT II  |  ACT III  |||  SoZ
About the Walkthrough  |  About the Maps  |  About the Author  |  Where to Begin
Disable all ads!

Act II:   Mulsantir  |  Death God's Vault  |  Wells of Lurue  |  Ashenwood  |  Sunken City  |  Thay Academy

Thay Academy:   Thaymount  |  Classrooms  |  Instructor's Quarters  |  Headmistress' Tower  |  Boneyard

Instructors’ Quarters

Instructor's Quarters Map

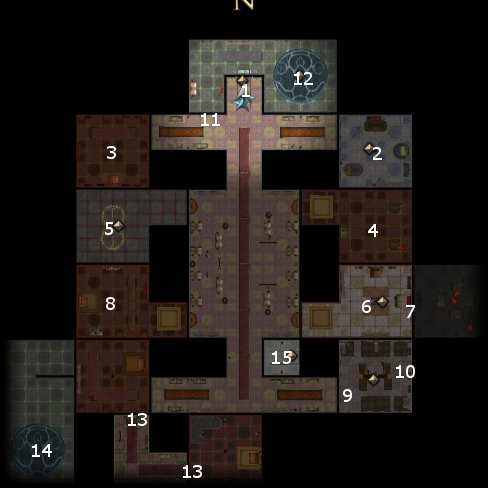
Most of the doors here need Iranus’ Keyring to open them, with one notable exception.

  1. Exit to the Classrooms.

  2. Here is Safiya’s room. On the floor you’ll find a Galvanized Golem Torso and a Scorching Gaze Golem Head.

  3. In an armoire in here you’ll find the Kitten Slippers.

  4. In a bookcase here you’ll find the Book of Waves.

  5. Here you’ll find two Pit Friends named Oronock and Thael-ka, who carry on a commerce in souls and more mundane wears. They sell various Essences, as well as:

    Belt of Cloud Giant Strength
    Boots of Striding +7
    Breastplate +5
    Chain Shirt +5
    Cloak of Protection +4
    Finch’s Comforting Cloak
    Headband of Intellect +8
    Light Shield +5
    Nymph Cloak +8
    Robe of the Archmagi
    Bolts +5
    Bolts of Lightning
    Darts +5
    Kukri +5
    Long Sword +5
    Ra Bane Blade
    Runescarred Greatsword
    Ring of Fortitude +7
    Ring of Magic Defenses
    Ring of Sorcerous Power
    Ring of Wizardry (5)
    Wand of Fire
    Bowl of Commanding Water Elementals

    If you’ve examined the magically sealed doorway in the Headmistress’ Tower you can ask them about obtaining a flawed soul. They do have a soul to offer, but want another one in return. They want a soul with a number of polar opposite qualities (e.g. both selfishness and selflessness) as part of its personality.

    The first step to solve this is to visit Master Poruset in the Classrooms at #10. Explain the situation to him and he’ll give you a Work Order. Take the Work Order to the Caretaker Golem at #7 of the Classrooms. He’ll give you permission to leave the room with two souls. The ones you want are Soul Housing no. 91 and Soul Housing no. 127. Come back to Master Poruset and he’ll give you the Fused Soul. He’ll also give two Promissory Notes that you can take back to the Caretaker Golem in order to have your removal of the souls forgiven. Now bring the Fused Soul back to Oronock and Thael-ka. They won’t like the apparent sham, but they’ll nonetheless give you the Marked Soul. This is one of the souls that you need to open the sealed door in the Headmistress’ Tower.

  6. A chest in this room holds a Soul Housing. This is a potential item for bartering.

  7. Bash down this bookcase to gain access to the room beyond. Master Iranus will confront you for entering his private quarters despite his forbidding it. He’ll start off combat by casting some sort of protective aura that all but makes him unhittable. He’ll then proceed with spells like Epic Gate and offensive spells. You’ve either got to hit him right away to disrupt the initial casting or somehow be able to weather the storm that follows. He leaves behind the Binder’s Robes.

  8. A trapped chest here holds the Gnollgrip. A trapped vase holds another Soul Housing.

  9. Here is Bebtu  He offers you one of the flawed souls you need to open the sealed door in the Headmistress’ Tower. To make it short, he’s carrying somebody else’s soul as part of an arcane experiment. To get it from him, you need to bring him his own soul back. The soul he needs is Soul Housing no. 346 which is in the Classrooms at #7. If you oblige, he’ll give you the Surrogate Soul and a Promissory Note that can be given to the Caretaker Golem so that your removal of a soul will be forgiven. The other way is to use Devour Soul on him though this tips your alignment towards evil.

  10. Here you find Ammon Jerro, now lying dormant because Nefris ambushed him and removed his soul. A successful heal check explicitly reveals his condition.

    To get his soul back, speak to Oronock and Thael-ka at #5. Their agreement is 50,000gp and 3 souls. If you make a successful Appraise check (in the 20s I think) you can lower it to 2 souls and 20,000gp. If you fail the Appraise check, Gann can score the better deal for you if he’s in your party. The two Soul Housings that can be found at #6 and #8 will suffice if you managed to strike the favorable bargain. Otherwise you’ll need a third soul. One way is nab a soul from the repository in the Classrooms at #7. Another way is to win Artesh’s Soul at #8 if you successfully wager him for it. Once you come back to the Pit Fiends with the requisite number of souls, they’ll give you Ammon Jerro’s Soul.

    Now click on Ammon Jerro’s body again. Ammon can fill you in on the fate of your companions from the Official Campaign based on what you choose to ‘remember’. He can also join your party, but he’s not controllable and will always operate on his own AI. If you choose to kill him, he’ll leave behind the same starting inventory as when he first became available to you as an NPC.

  11. To open this door you’ll need Nefris’ Key from the Headmistress’ Tower.

  12. Uncanny ReflectionYou may have noticed by now that several mirrors are scattered throughout this level. There’s a reason for this. They’re part of a magical device. The obelisk and dais in this room form another part of the device. There’s also a nearby Activation Orb that you can grab and use as the trigger for the device. Use the Activation Orb and a ray of light will shoot from the Obelisk, but only so far as it can be reflected form one mirror to the next. Your objective then is this: Align the mirrors so that the light ray travels from this room in an unimpeded path to the dais at #14.

    If somebody is standing in the dais here, the light ray will form an image of that person in the dais at #14. Click on this link to see how you want to align the mirrors and what path you want the light to take.

  13. You want to bash down the bookcase or wall at these points in order to clear a path for the ray of light.

  14. Uncanny ReflectionHere is the destination that you want your ray of light to reach. If your PC is standing on the dais at #12 when you use the Activation Orb an image of your PC will appear here. Click on it and it will give you the Incomplete Soul which you will need to open the sealed door in the Headmistress’ Tower.

    If one of your companions is standing in the dais at #12 instead when you use the Activation Orb, the results can be quite interesting. If it’s Kaelyn, she’ll appear with black wings suggesting that her mission to tear down the Wall of the Faithless will lead her to becoming Fallen and cast out of the Upper Planes. If it’s One of Many, a wraith like creature will appear here and attack your party.

  15. Exit to the Headmistress’ Tower.

Amazon.com
Amazon.ca
Amazon.co.uk
Sorcerer's Place is a project run entirely by fans and for fans. Maintaining Sorcerer's Place and a stable environment for all our hosted sites requires a substantial amount of our time and funds on a regular basis, so please consider supporting us to keep the site up & running smoothly. Thank you!

Disable all ads!