-

- Forums
- Chatrooms
- Gallery
- Gameplay Videos
- Upload
- Articles
- Mod Reviews
- Shop SP: Games, Movies, Books
|
|
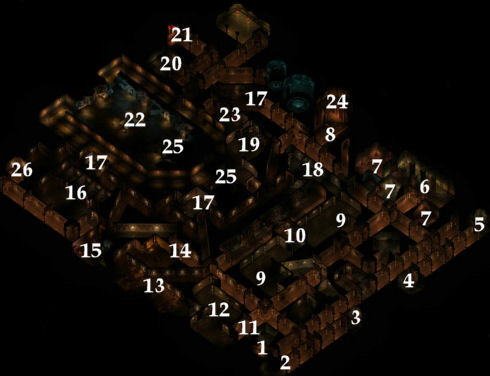
TEMPLE DUNGEON LEVEL 1
This level is the principal residence of the Earth Temple, one of the four factions competing with each other for supremacy. The other 3 will be found on the second level. Wearing any of the coloured robes from the Throne Room allows the party the full run of the level. Even so, the level has plenty of monstrosities who aren’t so discriminating as to whether to attack the party.
1. Stairs leading to the Throne Room.
2. A group of Gnolls have holed themselves here. One of the Barrels contains some Silver Arrows.
3. An Ogre stands guard here. One of the chests contains Silver Arrows, and a Spear +1.
4. Several Ghouls are here. In one of the Barrels, the party finds a Masterwork Glaive, Masterwork Maul, Masterwork Ranseur, and a Masterwork Warhammer. Pay particular attention to the Masterwork Maul, for it may come in handy when you’re ready to end the game.
5. A Gelatinous Cube resides here. The cube is capable of paralyzing its victim, and scores acid damage to boot. What the party will have going for it is the low hit points of the Cube. This is where the Improved Initiative feat really comes into play, allowing the party to finish off the Cube before it can become dangerous.
6. A few Harpies reside here. According to the Monster Manual, they’re capable of a captivating song that renders the victim helpless. I honestly don’t remember any of them using such an ability. Otherwise, they’re none too dangerous.
7. A room filled with Ghouls. By now, a party hoping to survive this stage of the game should have spells which cause damage over an area (i.e. Fireball) and be using them for such occasions.
8. A flock of Stirges are found here. Stirges are pretty small, but they can be fairly dangerous if not taken seriously. They’ll be hard to notice in the dark of this room. Even once seen, their small size gives them an Armor Class boost. Once they ‘attach’ to a character, they’ll drain his or her blood, causing the temporary loss of 1 point of Constitution each round. And if one character allows multiple Stirges to reduce their Constitution to 0, death results. Magic Missiles, guaranteed to strike their targets, as well as consistent melee attacks, should take care of them.
9. In both of these rooms, one can find groups of Gnolls, Ogres, and Goblins nestled together. The comments I made regarding Ghouls in paragraph #7 are equally applicable to the large numbers of evil humanoids you’ll find in service to the Temple. Incidentally, they’ll also attack whether or not you’re wearing Earth Robes.
10. This long hallway is littered with Gnoll Skeletons.
Note also that there is a long-running staircase in this hallway. Taking it upwards leads to #8 of the Throne Room. Taking it downwards leads to the Air Temple Shrine, located at #14 of the Temple of Elemental Evil, Level 2. Note that once the party goes down the stairs, they won’t be able to come back up. Furthermore, if you’re not wearing Air Robes, you’ll get attacked from all sides by several Air Elementals.
11. The party will find a pirate named Morgan here. Morgan is willing to join your party with very little persuasion. There’s one catch, bringing him to Nulb isn’t a good idea because he became imprisoned in the Temple for making a pass at Renstch’s consort, Dala.
If you chose the ‘humorous’ option after completing the Mystic Orb quest, you’ll find 3 more NPCs ready to join your party, Ted, and two Eds. Ted speaks with an overdone hick accent, and the other two are mute.
No NPC ready for hire here offers anything worth noting, so just move on.
12. This area has a great number of Ghouls, as well as a couple of Ghasts (like Ghouls, but with more hit points). The chest they leave behind contains a Potion of Protection from Undead, and a Scroll of Shocking Grasp.
13. In this large room, the party will find a lone Ogre surrounded by a huge pack of Goblins.
14. This is the kitchen of the level, which has been taken over by a Giant Viper.
15. A Turnkey, somebody who tortures other people for the pleasure of it, is here along with his guard. They’re not terribly difficult.
In the southern cell will be two girls that have been tortured for weeks. They’ll obviously be glad of their release when you’ve lifted the bar.
In the eastern cell will be two Orcs, Pitak and Truelk. Evidently, both can join the party as NPCs.
16. These are the prison cells of the Earth Temple, watched over by a couple of Bugbear guards. Most of the cells contain Zombies.
One of them, however, contains a Gnome named Wonnilon. For more on Wonnilon, see the section on Wonnilon’s quest.
17. Some Bugbears in service to the Earth Temple reside here. Be mindful that all bugbears in the Temple can now invoke Barbarian Rage, so you may want to consider using spells that disable them, or otherwise impair their attacking ability.
18. Humans serving as rank and file troops for the Earth Temple are in this room.
19. More Earth Temple Troops are here. Their commander wields a Battle Axe +1.
20. Black Widow Spiders lay an ambush here. These creatures pack a pretty potent poison. Take note that they’ll come after your party from both front and back. Make sure your spellcasters protect themselves beforehand. Having a fighter-type stand close to your wizard or sorcerer is also recommended.
21. Wonnilon will likely end up relocating here as part of Wonnilon’s quest.
22. The shrine of the Earth Temple. You’ll notice a few Earth Clerics here supplicating themselves before a Pyramid. You might also notice a few chests lying around. You can go ahead and loot them without the Clerics taking offense.
If you decide to kill the clerics, they’ll instantly summon two Earth Elementals to their aid. If you feel you can survive the initial attacks by the Elementals, which I did, go all out for the clerics first. They’ll have fewer hit points. As such, you can reduce the number of attacks or casters more speedily by going after them first.
23. The quarters of the high priest of the Earth Temple, Romag. Romag’s the man to see if you want to complete the Earth Quests.
If you decide to attack Romag, the fight isn’t very hard. Both Romag and his assistant Cleric don’t have very many hit points. Once they’re gone, it’s a matter of cutting down the Bugbears, with spells affecting single opponents thrown in for good measure. Romag leaves behind a Mace +1, and Chainmail +2, and a Diary that contains some insight into the bitter feuds going on within the Temple. He’ll also leave behind the key to his chest, which holds a fair amount of treasure.
24. A secret door is here.
25. These doors are magically sealed. There’s nothing you can do to open them, and they’re not significant for purposes of advancing your game, so don’t worry about them.
26. Stairs leading down to level 2.