-

- Forums
- Chatrooms
- Gallery
- Gameplay Videos
- Upload
- Articles
- Mod Reviews
- Shop SP: Games, Movies, Books

|
|
The Castle | Hazard Zone | The Mines | The Mountain | The Pyramid | River Styx | Hall of the Dead | The Forest | The Temple of Ramm |
THE CASTLE
Maps
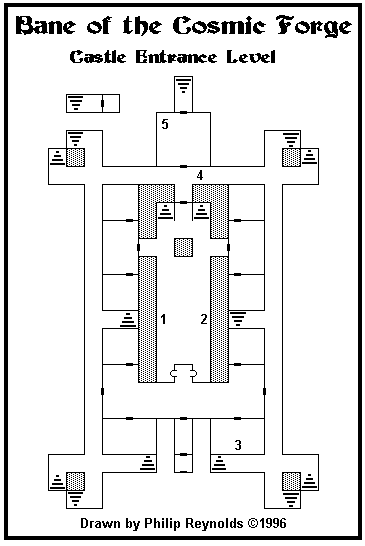
Entrance Level:
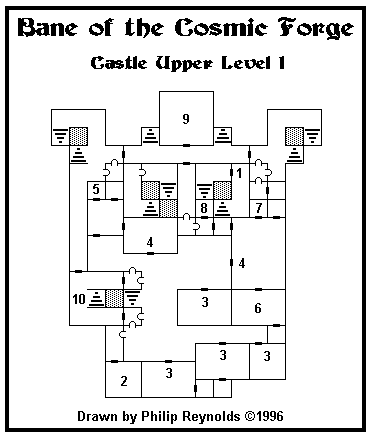
Upper Level 1:
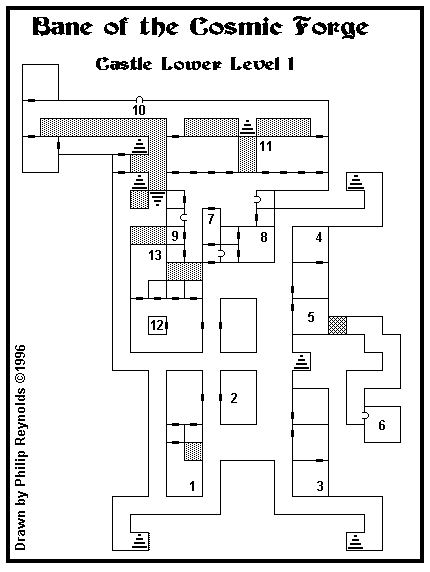
Lower Level 1:
Lower Level 2:
Training your Skills
There is a certain reality I wish to address before I actually begin exploring the castle. When a character advances a level, he or she gets 6 to 10 skill points to distribute. The game forces certain professions to allocate some of that 6 to 10 skill points in profession-specific skills until those skills reach a minimum of 51. For example, each time my Lord advances a level, the game will force the Lord to allocate some of his 6 to 10 skill points to the Swords skill. This will hold true until the Lord reaches at least 51 in his Swords skill. For both my Monk and Ninja, it's Martial Arts and Ninjutsu. For my Bard, it's Music. For my Bishop, it's Thaumaturgy and Theology. The Fighter faces no such restrictions.
The good (or bad) news is that some of these skills can be trained. If you can practice/train those skills until they reach 51, and before you ever advance a level, your characters can then distribute their 6 to 10 skill points each level however they see fit. Having a Bard in my party makes this so much easier to pull off.
So I spin around until monsters appear. When any monsters appear, my Bard puts them to sleep and practices her Music skill as well. The Fighter always stands pat as he has no skills he needs to develop in this way. As long as there's more than one monster, my Lord will attack. My Monk and Ninja will practice Ninjitsu by hiding in the shadows. If there's at least four monsters still standing, my Monk and Ninja will also backstab to practice martial arts in addition to my Lord's attack. If there's three monsters, only the Lord and Monk attack. If my Monk and Ninja end up blowing their cover during an attack, they can simply hide again to get more practice. Once I'm down to one monster, I run away. If only one monster shows up during an encounter, I simply have my Bard put it to sleep, get my Monk and Ninja to hide, and then run away. This process allows me to practice my skills without getting any experience points.
Once the Lord raises his Swords skill to 51, he quits attacking in future encounters. I shift the lineup so that the Fighter takes over the 1st spot and the Lord takes up the 4th slot. Then I prioritize my Monk hiding and attacking to raise his skills, with my Ninja taking turns if there's at least three monsters still standing.
Once the Ninja raises his Martial Arts and Ninjitsu to 51, then my Monk gets all the practice. At the end of it all, everyone is then free to allocate their skill points as they see fit when they advance levels.
*NOTE* This is an extremely tedious and lengthy process, but well worth it when you get there. I recommend interspersing this with playing another game well before you try a Wizardry playthrough if you're so inclined.
*NOTE* OR, if you're interested, my own party after having grinded their skills out, is available for download here.
Now I have Zarax and Rothgar switch places, and Rothgar equip the Quarterstaff that Terra had.
Sword of Striking
Now I take the opportunity to simply spin around waiting for monsters so that I can attain the next three levels for my characters.
Note a few themes here. One is, be patient and wait for good rolls for your characters. This includes multiple bonus attribute points (instead of just one), more hit points, and more skill points (preferably 8 to 10).
I also got a Suede Doublet, Suede Pants, and a Cutlass as random loot from fights with Bushwackers. I had Errol equip them on an interim basis, although the Suede set will down the road go to Chun-Li.
.Note also that my spell casters, at least during the early levels, pick spells from previously untouched elemental spheres. For example, Terra my Bishop picked up Chill Touch instead of another spell from either the Fire or Divine spheres. The reason for this is that mana for the Water sphere will accumulate early and onwards, whereas I wouldn't be able to accumulate as much Divine mana if I simply continued to accumulate more Fire and Divine spells.
Note also that I sometimes select different options for more versatility. Sure, my Bard could also get Chill Blast at 3rd level, but going with Terror instead provides another option.
Another thing to keep in mind is that Weapon and Physical skills are trainable. That is to say that they can be raised by practising them. Academic skills are not, and have to be raised whenever you go up levels. Thus my Monk and Ninja allocate skill points to Kirijitsu or their spellcasting skills like Alchemy and Theosophy during the early parts of their advancement.
Also note that I raised my Bard's Skullduggery skill to 10. In my experience, a minimum of 10 is needed to start picking the lower-level locks and traps. After that, it can be raised with practice.
The latter part of the video is where I come across two chests. One says "Open me First" and the other says "Open me Second". These chests are not trapped. The chest that says First will always yield a few healing and curative potions, as well as an Amulet of Life that can be used to resurrect a dead character. If you open the chest in the order indicated, the chest that says Second will yield a Sword of Striking, which my Valkyrie then equips.
The Entrance Level of the Castle
Now I explore the main level of the castle. Combat is frequent as there are usually monsters behind every door, sometimes now in multiple groups. If I encounter more than one group, my Bard will take out one group (usually the more numerous one) with her Lute, while the rest of the party goes to work on the other. And again, practice makes perfect. Everone practices their weapon skills. The Monk and Ninja practice hiding and martial arts. The Bard practices music and hiding. The Bishop casts healing spells when needed. She may also get off single-target spells if there's enough enemies. Get in as much practice as you can.
My Bard, with a Skullduggery of 10, can now begin to use his thieving skills. Whenever you have a chance to open a door or a trap, it represents a golden opportunity to up your Skullduggery skill. Always check to see if your skill has gone up after you have successfully picked a door or a trap. If it hasn't gone up, reload. If it has gone up, save your game. It is well worth your while to insist on progressing your Skullduggery skill in this fashion.
I disarm the "Vorpal Blades" trap on the chest at #3, and then unlock it. I get a Book of Directions, which Terra saves for later, and a Scroll of Terror. She uses the Scroll of Terror in her next fight. It fizzled, but that still means increasing my Scribe skill by 1.
Zarax reaches level 5 as I fight my way towards the southwest corner. I eventually use the stairs going down in the southwest corner.
Armory Dummy
Now I begin to explore the southwest portion of Lower Level 1 of the Castle.
I first go through the door leading into the southwest portion of rooms, only to find myself having to fight 3 Brigands, a Rogue Leader, and 6 Scallywags. Scallywags are basically Rogues who can use various magical powders during combat. Scallywags can be dangerous for lower-level parties, especially if they get off either Sleep or Blinding Flash. Try to get the jump on them as much as possible during combat, like for example with a Sleep spell of your own.
My Fighter and Lord and Bishop target the Rogue Leader, while my Bard uses her Lute on the Scallywags, and my Monk and Ninja go into hiding. The next round, the fighters and the Bard go all out for the Bushwackers that have advanced. The Mage targets the Rogue Leader with Energy Blast. Errol keeps using his Lute in successive rounds on either the Brigands or the Scallwags. I eventually manage to take out the Rogue Leader. Now that anybody left has been put to sleep, it becomes a matter of mopping up and getting in as much practice as I can.
I fight a few more Scallywags in a small room to the southwest.
At around 8:30 I fight some more Scallwags. Errol advances to his 5th level. I then press the button on the wall. Now I step ahead and fight several Slimes.
I finally find the Armory Dummy located at #1 of the Lower Level 1 Map. I get 300xp as well as a Bastard Sword (not great), a Heraldic Shield, and a Chain Hauberk. Zarax finds the latter two items to be welcome upgrades.
I then hunt for a little more experience in order to advance my Lord, Monk, Ninja and Bishop to their 5th levels.
Queequeg
At #2 on the Lower Level 1 map is Queequeg, who has a rather extensive if mundane inventory.
*NOTE* Be sure to buy the Mystery Oil from him when you get the chance, since it's needed to advance at a much later point in the game.
I also have a shopping list, not just as immediate upgrades, but also for importation in both Wizardry 7 and Wizardry 8. It includes:
Rotten Cheese and a Fat Rat
So now I head towards #3 on the Lower Level 1 map.
Now I fight my way through the rooms in the southeast corner of the Lower Level, including Rogue Leaders, Scallywags and Slimes. I find the Rotten Cheese at #3.
I make towards #5 on the Lower Level 1 map. Facing east in the southeast corner of the room leads to noticing a mouse hole. This is where you use the Rotten Cheese. It causes a Fat Rat, six Killer Rats, and five Rabid Rats, to burst out of the wall. The Fat Rat is dangerous, cause it has a fair amount of hit points and can attack multiple times. I direct all of my physical attacks against the Fat Rat first and foremost to take it out as soon as I can. Terra chips in with an Energy Blast spell on the Fat Rat in the first round, and then a Chilling Touch in the second round. The Bard puts the Killer Rats to sleep with his Lute, as they're the ones within striking distance of the party. He then puts the Rabid Rats to sleep in the second round when they advance. The net result is taking out the Fat Rat after two rounds, and cleaning up on several sleeping rats to close out the battles. My spellcasters also get in some healing spells for wounded party members. Zarax advances to his 6th level.
I then head towards #6 on the Lower Level 1 map, which is where a chest is located. I show the most reliable method for dealing with trapped chests, casting Divine Trap first to reveal as many letters of the trap's name as I can, then having the Bard inspect it to reveal more letters, then disarming the trap based on an educated guess. This chest holds a Feathered Hat, some Razor Stones, two Resurrection Potions, plus a Stuffed Beagle that will be needed to make progress. I thereafter return to the open space of the Lower Level.
The Wine Bottle
Now I simply head over towards #4 on the Lower Level Map, and find the Wine Bottle, which may come in handy down the road.
I stop off at Queequeg's to sell off a little excess loot, and then return to the stairs in the southwest corner.
The Southwest Tower
The stairs continue through a spiral, through the Entrance Level and beyond into the Southwest Tower.
Here is where I explore the Southwest Tower of the Castle, which includes a set battle against several Bats. The room at the top holds a Leather Cuirass.
L'Montes
I go to the stairs in the southest corner, and continue up the spiral through to the Southeast Tower. I follow the sounds of a man who's apparently anxious to avoid me, until I reached his locked door. He tells me to go away.
This is where I need the Stuffed Beagle that had been guarded by the Fat Rat. When you reach L'Montes' room at the top of the southeast tower, simply tell him either 'Snoopcheri' or 'Beloved', and he'll let you in. Now give him the Stuffed Beagle, and get the Silver Key in return, which will be needed later on.
I go back down the spiral of stairs until I'm on the Entrance Level.
2 Key of Spades
I make my way to the stairs that is a little west of #1 on the map of the Entrance Level.
Now I begin to explore the south rooms of the Upper Level of the Castle, the ones marked #3. Errol advances to his 6th level after one of the battles.
The particular point of interest is when I head to #2 on the Castle Upper Level Map, and find 2 Key of Spades, which I will need later on.
The Queen's Bedroom
Here the party makes its way towards #5 on the Castle Upper Level map. There's a secret button on the east wall, where the party discovers a couple of items that says something about the Queen's past.
The King's Bedroom
Now I head for the large room on the east side of the Castle Upper Level map. I go to the room at #6 on the Map, and Search in the southwest corner of the room. Stand back and pull the wire is the correct method to avoid taking damage. The chest will have a Gold Key, which I will use very shortly, and the King's Diary, which will not become pertinent until the game is almost over. Chun-Li and Rothgar advance to their 6th levels.
I go down the stairs just a little east of #10 on the map of the Upper Level.
That brings me to the stairs just a little west of #1 on the map of the Entrance Level. I go east and down the stairs that are a little east of #2.
Deadman's Log
I am now at #1 on the map of Lower Level 1. I make my to #8, and advance my Bishop and Ninja to their 6th levels after winning a battle when I enter the room. Now I search the northeast corner of the room to find the Jailer Key. I use it to open the gate at #7, as well as the gate at #9.
I Search at #9 and find the Deadman's Log. The Log holds the information that Queequeg wants on where the Captain's treasure was buried, but it is encrypted. You won't be able to make sense of it until you find another item later on.
I speak to #Queequeg at #2 and ask about "Captain's Treasure", which confirms he is excited about the prospect of finding the treasure. After that I make my north and west, and go down some stairs a little northwest of #9.
The Altar of Ramm
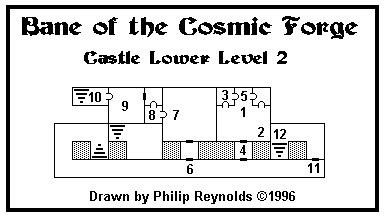
Now I head further downstairs, to the Lower Level 2 Map. I use the Golden Key from the King's Bedroom to open the gate at #4 of the Map. From about 0:24 onwards I show the sequence of buttons to be pressed in order to enable access to the chest here. The chest itself contains a Resurrection scroll, an Amulet of Night (which I'll use up sooner or later), an Anointed Cloak (which Rothgar will wear), and the Book of Ramm. I read the Book of Ramm, which provides a clue about a sequence.
Now I head upstairs. More specifically, I head for the gate near #4 of the Entrance Level Map. There is a button at #4, which when pressed will open the gate. Now that the gate is open, I 'Search' at #5, and find the Key of Ramm.
Now I head upstairs for the Upper Level. There will be a room just a little south and east of #8 on the Upper Level Map. On the west wall of the room will be a button. I press the button to open the wall. #8 itself will be barred by a gate that requires the Key of Ramm to open. The chest itself holds the Goat's Mask and the Dagger of Ramm, which are both quest items that will not become significant until much later on.
Now from #8, I go one square south, one square west, and then north up the corridor. The Key of Ramm will open this gate as well.
At #9 is the Altar of Ramm. If you read the Book of Ramm, it will provide clues as to the order in which the buttons need to be pressed. The order is Head, Head, Orb, Stave, Orb. You then have the option of jumping down the pit that has just opened, which is necessary to progress the game.
Once you do jump down, a Monstrous Snake opens the gate in front of you and attacks. The Monstrous Snake can be pretty tough. It attacks twice a round, and can inflict significant damage as well as poisoning with each attack. I don't bother having my Monk and Ninja trying to hide. My Ninja helped things along by casting Blinding Flash on it. I otherwise just have them attack without going into hiding. The reason is that if the Snake attacks my back three characters, it will likely kill one of my party members outright. So as much as possible, I prefer the Snake to target one of my more durable front three characters, while I steadily inflict damage over it. Ryu my Ninja also landed a Critical Hit on it to end things relatively quickly.
Now I head down the stairs, and wind up at the stairs in between #10 and #11 on the Lower Level 1 map. The open gate at #10 leads to the Hazard Zone.

