-

- Forums
- Chatrooms
- Gallery
- Gameplay Videos
- Upload
- Articles
- Mod Reviews
- Shop SP: Games, Movies, Books
|
|
The Castle | Hazard Zone | The Mines | The Mountain | The Pyramid | River Styx | Hall of the Dead | The Forest | The Temple of Ramm |
THE MINES
Maps
Mountain
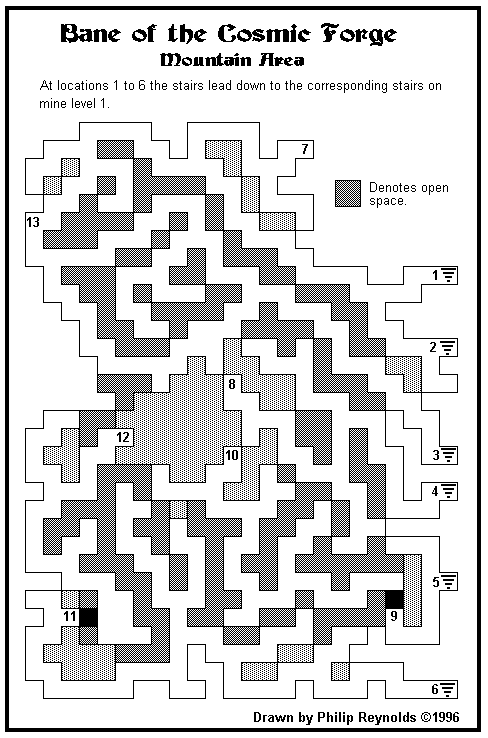
Level 1
Level 2:
Level 3 and 4:
Smitty
My immediate priority is to find a convenient store during this part of the game. I start off at #7 on the Mountain Area map, but make my way towards the stairs at #2.
Along the way, I run into a few new types of new monsters. One is Gelatin Vapors. Jelly type monsters tend to be able to attack back range characters, and their attacks can inflict either poison and/or paralysis. They are vulnerable to fire spells as Terra shows when she obliterates one group with a Fireball spell.
Another type is Miner Dwarves, who can use hammer attacks either in close-up melee, or at throwing range. I will use a Missile Shield spell if there are enough of them. They are also sometimes accompanied by Hill Giants or Miner Giants. Giants in this game don't hit very often, but score lots of damage when they happen to land a blow.
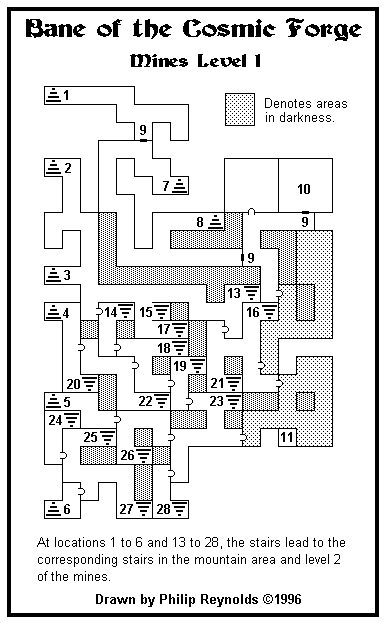
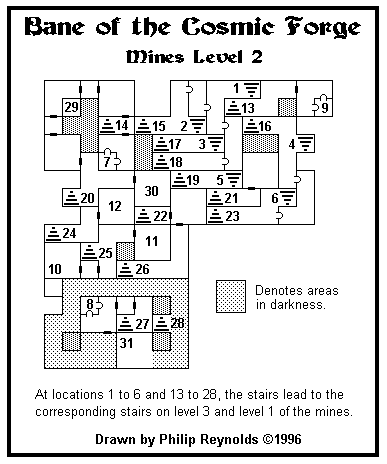
Once I descend the stairs, I end up at #2 on the Mines Level 1 Map. Then I head for the stairs at #20 on the Mines Level 1 Map. This brings me to #20 on the Mines Level 2 Map. From there I head to #30 on the Mines Level 2 map. Here I find a Dwarven Smith, Smitty. Smitty sells a lot of weapons, and will consistently try to pawn his Roasted Corn on you. I do buy some (more on this later).
There are three weapons that I buy from him. One is a Monstrance, which will be an improvement on Terra's Quarterstaff.
I also buy a Lance for Rothgar, which does a little more damage than the Halberd he had been using. It's also much cheaper than the Fauchard, which is functionally equivalent.
I also buy a Vulcan Hammer for Zarax, which makes for a very good interim weapon. Be careful only to use the 'Bash' attack option, and not the 'Throw' option, otherwise that will be quite an expensive throw-away.
First Rubber Beast
To progress the game, it will be necessary to find a number of Rubber Beasts and get a Rubber Strand from each of them.
From Smitty's, I go towards the NW corner. I soon have to fight a new kind of monster, Giant Ants, led by a queen ant called a Vaspess. The standard Giant Ants not especially difficult as long you can minimize their ability to land physical attacks. Fireball and the Bard's Lute are both reliable ways of dealing with them. The Vaspess can cause Poisoning or Paralysis with its attacks, so take it out first and foremost.
Trying to rest leads more than once to getting attacked by Giant Wyrms. They can make single attacks that can reach back rank characters, or use shrieking attacks that can damage multiple party members. The Silence spell can prevent a group of them from using their shrieks. This is also an instance of where spell duplication can sometimes be useful, as any of the Monk or Lord or Bishop can each silence one group of Giant Wyrms. I take quite a beating after those battles, so I make sure to rest up.
Another fight that interrupted my rest was against a Cold Slime. Cold Slimes are a little tougher than other slimes that you will have encountered. They can also paralyze with their physical attacks, and breathe cold at the party. Cast Ice Shield if you have the Water mana for it. Fortunately Terra managed to knock it out with her Monstrance before it did much damage.
There is a secret button leading to a treasure chest with random loot at #29 of the Mines Level 2 map. I get some Icicles and magic scrolls from it. I have Terra them up when opportunities present themselves in battles, as it will develop her Artifact and Scribe skills. And there will be steady streams of charged items and scrolls during the game anyway.
Then I head over to #7 on the Mines Level 2 Map, where I fight my first Rubber Beast. A Rubber Beast can attack multiple times, each attack having a chance to paralyze its target. The Beast can also spew a dark vapor that can paralyze anyone who fails to resist it. It also has a fair amount of hit points. It's a matter of keeping everybody healthy, and persistence. Each time you kill one, you get a Rubber Strand. You'll need at least four Strands to make progress.
I also spin around for monsters in order to advance Zarathos to his 9th level. He's already maxed out his Strength and Vitality, and his mental stats like Piety and Personality aren't really that important for him. So at this point I'm not hung up on increasing multiple stats during level-ups for him. Raising his Dexterity by +1 and getting 12 Hit Points is good enough for me.
Second Rubber Beast
Now the party starts to head back the way they came. They're only a danger if they come in significant numbers, in which case, crank out spells of your own to either kill them or debilitate them as quickly as you can.
Now I head back up the stairs at #20 on the Mines Level 2 map. I go down the stairs, and then to #9 on the Mines Level 2 map. I then kill a second Rubber Beast and get a second Rubber Strand.
Third Rubber Beast
Now I head back up the stairs at #13 on the Mines Level 2 map. I then go down the stairs at #15 on the Mines Level 1 Map.
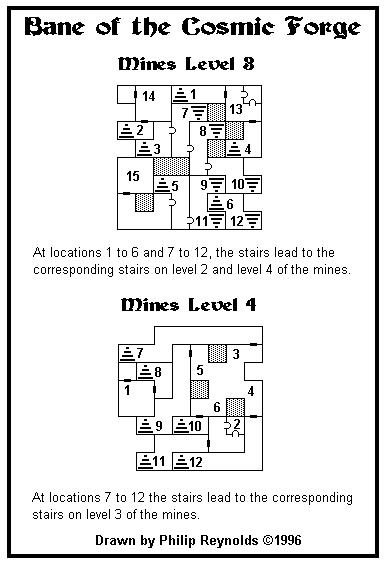
I then head for the stairs at #1 on the Mines Level 2 map. Once I'm down the stairs, I then kill my third Rubber Beast at #13 on the Mines Level 3 map. Of course, I also get a third Rubber Strand.
Key of A Minor
Now I head up the stairs at #4 of the Mines Level 3 map, and then up the stairs at #16 of the Mines Level 2 Map. From there, I head for the darkened portion in the southeast corner of the Mines Level 1 Map. For darkened areas like these, it is prudent to keep a Direction spell active so that you don't lose your bearings. As soon as I enter the darkened area, I have to fight a bunch of Tricksters. Tricksters are like Scallywags, with a slight upgrade in the spells they can use, like lower powered Magic Missiles or Fireballs. They're only dangerous in significant numbers, in which case incapicitate or blow them away with your own spells.
My next destination is #11 on the Mines Level 1 Map. An inaccuracy of the map is that it doesn't show a wall that is just one square east and one square north of #11. This means you have to go the northeast corner of the darkened area, then south till you hit the wall, and then west till you hit a wall again. Once you're just one square east of #11, use Search to press the button. Now you can go to #11 itself.
I open the chest to get a Night Wand, a Shadow Cloak for my Ninja, and the Key of A Minor.
Angel's Tongue
Now I head back out of the darkened area, then down the stairs at #19 of the Mines Level 1 map, and then down #5 of the Mines Level 2 map.
I then head for #15 on the Mines Level 3 map. I have to fight a couple of Jellyfish type monsters called Floaters that can cast spells like Fireball. So long as you can survive a lower-powered version of such spells, or better yet kill them off before they cast spells, you should be fine.
At #15 is a chest that holds a Steel Helm (which Zarax equips), a Claymore (which I don't need), and the Angel's Tongue, an instrument that allows my Bard to use Bless (for attack bonuses) without limit.
Fourth Rubber Beast
Now I head down the stairs at #11 on the Mines Level 3 map. From there, I head to #2 on the Mines Level 4 Map and kill my fourth Rubber Beast, and get another Rubber Strand.
Crystal Wand
Now I go back up the stairs at #11 on the Mines Level 4 map. Then I go up the stairs at #5 on the Mines Level 3 map, and then up the stairs at #19 on the Mines Level 2 map. Then I go down the stairs at #17 on the Mines Level 1 map, then down the stairs at #3 on the Mines Level 2 map, and then down the stairs at #8 on the Mines Level 3 map.
From there, I go to the room at #1 on the Mines Level 4 map. There I have to fight a new monster, a White Wyrm. It can cause significant cold damage to multiple party members with it breath weapon. The Ice Shield spell is often recommended. In this instance it went with physical attacks, and I killed it quite soon.
The gate requires the Key of A Minor to open. The chest will have random loot, mostly of the potions variety. In this instance I also got a Book of Mantras. Terra uses it to inscribe the Stamina spell into her spellbook.
Then I go back up the stairs at #8 on the Mines Level 4 map, then up the stairs at #3 of the Mines Level 3 map, and then up the stairs at #17 of the Mines Level 2 map. Then I go down the stairs at #15 of the Mines Level 1 map, then down the stairs at #2 of the Mines Level 2 map. Then I enter the room at #14 on the Mines Level 3 map. I encounter a Vaspess and four Foragers, a tougher version of the usual Giant Ants.
The gate also requires the Key of A Minor to open. The chest will have a Crystal Wand and some random loot.
Fifth Rubber Beast
From #14 I go back up the stairs to #2 of the Mines Level 3 map, and then up the stairs at #15 of the Mines Level 2 map. I then go down the stairs at #28 of the Mines Level 1 map. Now I'm in the darkened area at the south end of the Mines Level 2 map. I bend around and head for #8 of the map, where I fight and kill a fifth Rubber Beast and get another Rubber Strand.
Now the significance of the Strands will become clear. Merge two Strands together into a Rubber Braid, then repeat with another two Strands. Now merge two Rubber Braids together into a Rubber Band. I'll need this item later on. The fifth Rubber Strand was not needed, but I may as well have for the experience.
Magic Fountain in the Mines
At #31 on the Mines Level 2 map is a magic fountain that can replenish hit points, mana, and stamina, each time you drink from it. For anyone who's simply looking for experience points to advance themselves a level or two, this is the perfect spot for it since you can also cast spells with abandon. I spent a while here getting enough experience to advance everyone to the 10th level.
I made sure Ryu got enough skill points to reach 54 points in Alchemy during his 9th level-up. He takes Poison Gas as a 4th-tier spell so that he can begin accumulating Air Mana. Terra also bumps up her Thaumaturgy skill points in anticipation of her next level-up. She took Cure Paralysis as a 3rd-tier Priest spell in the meantime.
I compromised a bit on Ryu's 10th level-up. He got 5 Hit Points and 5 Skill Points, both lower than I'd usually like. But then he did get a lot of attribute points, and one of them was Vitality which ultimately means an investment in more Hit Points in future level-ups. The reason I compromised was because I wanted Terra to get enough Skill Points to reach 54 Thaumaturgy points and select Iceball as a 4th-tier Wizard spell. And she also got a +1 Vitality, which for her is also an investment for more Hit Points in the future. At that point I was willing to live with their 10th level-ups and save.
The next level-up won't for another 100,000+ xp, so I'm done with the Mines and resume exploring.
Also, Ryu has now obtained 100 skill points in Ninjitsu. So he doesn't need to practice it by going into hiding anymore. He'll just start using his Martial Arts from the very start of combat now.
Miner's Chisel
From the Magic Fountain, I head up the stairs at #27 on the Mines Level 2 map. I then go down the stairs at #24 on the Mines Level 1 map. There will be a chest with random loot, potentially including weapons and armor. I reloaded until Errol improved his Skulduggery skill. I got a pair of Steel Gauntlets. I can't import them, but they're an improvement for Zarax in the meantime. He holds onto his Cuir Gauntlets, which he can import.
I then go back up the stairs at #24 on the Mines Level 1 map, and then down the stairs at #25 on the Mines Level 2 map. At #11 is a chest with random loot.
I then head for #10 on the Mines Level 2 map. There's a hidden button in the southwest corner of the room. Pressing it reveals a chest that holds the Miner's Chisel, an item that will be used to make progress very soon.
Spirit of Xorphitus
You'll need to use the Miner's Chisel in order to free the spirit of the mad wizard, Xorphitus, in order to progress the game. What I describe below is the most efficient sequence for this.
I retrace my steps by going back up the stairs at #25, and then going down the stairs at #27 on the Level 1 Map. I next go up the stairs at #28 on the Level 2 Map.
From #28 on the Mines Level 1 map, I go down the stairs at #23 on the same map, then down #6 on the Mines Level 2 map, and then down #12 on the Mines Level 3 map. I then head to #4 on the same map, and use the Miner's Chisel to make a crack in the diamond crystal.
I retrace my steps. I then go from #23 on the Mines Level 1 map to the stairs at #19 on the same map, then down #5 on the Mines Level 2 map, and then down #9 on the Mines Level 3 map. From there, I go to #5 on the Mines Level 4 map, and use the Chisel to make another crack on the diamond crystal.
I retrace my steps. I then go from #19 on the Mines Level 1 map, and then down the stairs at #17 of the same map, then down #3 on the Mines Level 2 map, and then down #7 of the Mines Level 3 map. I then go to #3 of the Mines Level 4 map, and use the chisel to make another crack in the diamond crystal.
I then go back up the stairs at #7 on the Mines Level 4 map. From there, I now go down the stairs at #10 of the Mines Level 3 map, and then to #6 of the Mines Level 4 map. Now here is the key point. You need to use the Chisel on all four sides of the diamond crystal in order to shatter it, but it is also at #6 that the last use of the Chisel must be made. The spirit of Xorphitus then explains some of the background to me, and then fades away. Just ahead will be his skeleton, which yields some random loot, as well as a Wizard's Cone, the Key of Wizard Cave, and the Wizard's Ring. The latter two are quest items that will be needed later on.
I also got a Book of Fire Shield, which Terra scribes into her spellbook.
Mystaphaphas
Now I go to the stairs at #12 on the Mines Level 4 map. I then go up the stairs at #6 on the Mines Level 3 map. And from there I go up the stairs at #16 on the map of the Mines Level 2 map. That brings me to #16 on the Mines Level 1 map.
The Key of Wizard's Cave will open all of the gates designated by #9 on the Mines Level 1 map. I need to go through one of the dark zones on the east side of the map. At #10 of the Map is Xorphitus' former apprentice, Mystyphaphas, who ended becoming a snake due to a misguided use of the Cosmic Forge. If you give him some Roasted Corn, which can be bought from Smitty, he'll tell you that there's more to the Wizard's Lair than meets the eye.
I open the remain gates at points marked #9. The stairs at #1 lead back to the Mountain.


