-

- Forums
- Chatrooms
- Gallery
- Gameplay Videos
- Upload
- Articles
- Mod Reviews
- Shop SP: Games, Movies, Books
|
|
The Castle | Hazard Zone | The Mines | The Mountain | The Pyramid | River Styx | Hall of the Dead | The Forest | The Temple of Ramm |
THE RIVER STYX
Map
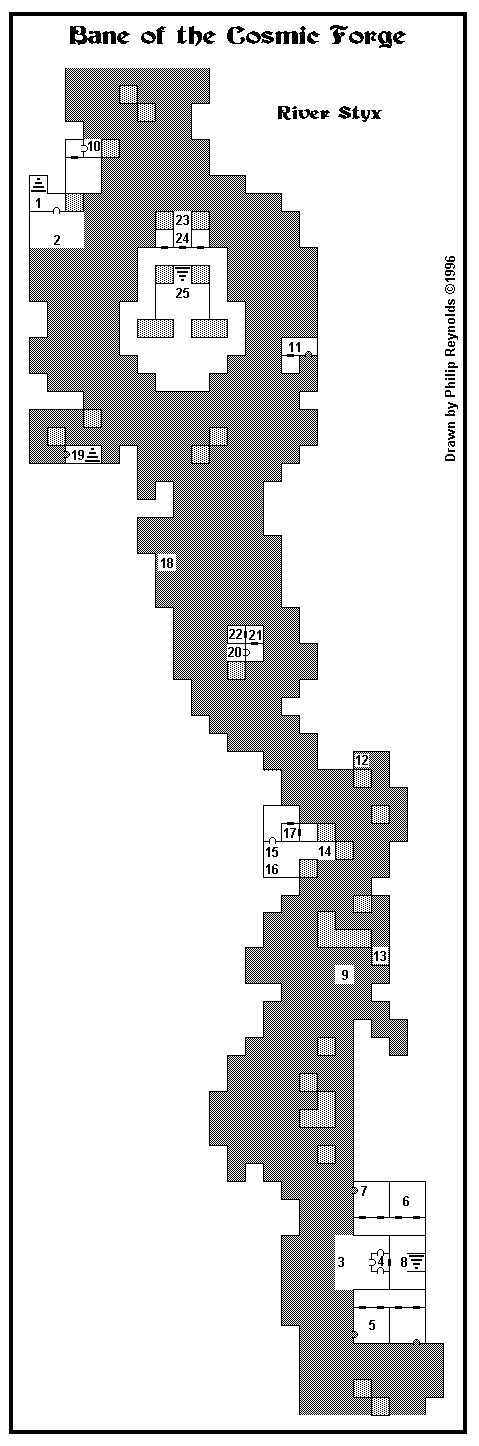
At #7 is a raft that leads to another part of the River, but I won't be using it just yet.
The Isle of the Damned
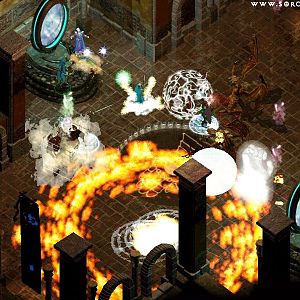
I start off at #1 on the map of the River Styx. I get attacked by several Siren Sorceresses. They can cast dangerous spells like Iceball and Asphyxiate, but are also worth a lot of xp if you can defeat them. Rotghar and Terra both used Silence spells just to make sure none of them could get any spells off.
I then make my way to #2 on the River Styx map. I then use the Horn of Souls. Charron the Ferryman shows up, and insists on 500gp as the price of giving me passage on his boat. He then brings me to #3 on the map, the Isle of the Damned.
I go to the gate at #4, which I can't open just yet. I do, however, find the Book of the Damned and the Key of the Damned, which will open the rest of the gates on this island.
Once I begin to explore the Island in earnest, I encounter a new foe, Nightgaunts. These guys can routinely cast spells like Sleep, Blinding Flash, Magic Missile, Energy Blast, and others. A small group won't be much trouble, but several groups can easily overwhelm a party if they're not done away with fast. Silence spells are recommended if you're faced with multiple groups.
At #6 is some random loot, as well as a Cylinder of Ash. I got a Chain Hosen, which Rotghar equips and will import to Wizardry 7. I then return to #3, use the Horn of Souls to summon Charron, and then give him the Cylinder of Ash for a 500gp finder's fee.
Curse of Minos
I explore the Isle a little more, fighting more Nightgaunts along the way. At #5 is the Mino-Daemon, whom I gang up on and take out in the first round. I get the Key of Minos, which is needed to open the gate at #4. Incidentally, I also found a Beastmaster that I have no use for, a Studded Hauberk that Zarax will import into Wizardry 7, and another Cylinder of Ash. I also return the Cylinder of Ash to Charron, and get rewarded with attribute bonuses for each character.
Isle of the Damned Fountains, First Time
There are two fountains on either side of the stairs at #8. The one north of it replenishes Hit Points and Stamina. The one south of it replenishes Mana. Together they provide another opportunity to spin around, farm xp, and go up a level or two. The fights are against groups of Nightgaunts. Now I have Errol begin training his Artifacts skill as well when chances for it arise, with things like Bottle Rockts and Sparklers.
Errol takes Magic Screen on his 12th level up. It's a good spell to have cast in place before I begin fights against magically powerful enemies.
Chun-Li is the one character who's lagging behind on her Oratory skill. So I have her use Silence in every fight, even if it's just against a single group of Nightgaunts. She and Rothgar advance to their 12th level. She takes Cure Paralysis in order to increase the amount of Water Mana she gets on each level-up. Rothgar takes Dispel Undead. A dungeon that is coming up soon has LOTS of undead, and Terra could sometimes use a spare hand in that regard.
I also notice that Terra has maxed out her Piety to 18. So I have Rothgar give her the Ankh of Sanctity that I found earlier. She invokes it to raise her Piety to 19.
And since she no longer levels up at the same time as Ryu, I'm more insistent with her level-ups. I'm ok with multiple attribute raises, an ok amount of Hit Points (+4), and 9 skill points on her 12th level-up. I raise Thaumatury to 63, within reach of the 72 needed for 5th-tier Mage spells. I also chose Conjuration, so I have a new summoning option available.
Ryu only got one attribute raise but it's the one that I wanted, maxing out his Vitality to 18. And can live with that as I got +10 Hit Points and +10 Skill points. He also takes Create Life on his 12th level-up, which provides another summoning option.
Errol gains his 13th level. He takes Air Pocket to round out his spells that defend against specific elements. Now I go down the stairs between the fountains.
Tomb of the Damned
There isn't a map provided for the tomb itself, but it is pretty straightforward. When you first step down, you'll notice a long corridor with a gate on either side. Go to the very end, where there's a chest. The chest holds a Tomb Key that is needed to open the gates.
I also got a Poignard, which Errol equips as an off-hand weapon, and a Heater Shield. Zarax now invokes his Heraldic Shield to raise his Strength to 20, and equips the Heater Shield.
The battle was against a few Zombie Guards. They're like other zombies, but they only appear in groups of one, meaning you can have as many as 3 or 4 of them sending their noxious breath at you out of your swords reach. You might want to run if it means if you're not up to taking out the back ones quickly. I feel no shame in going back up the stairs, drinking from the fountains to heal myself, and picking up where I left off.
There will be two large square rooms on the other side of each gate. Search each mini-room you come across. You'll occasionally run into a uniquely named ghost that is capable of both the Banshee's screaming ability, as well as spells. Take the ghost out before you do anything about any Zombie Guards that may be helping it out.
Of particular interest is Eila's Ghost, found in the northwest corner of the Tomb. She'll leave behind a Book of Sirens that may be helpful later on. In fact, I read the book to show the song. It is the last chorus of the song, "'Tis Madness makes us free", that provides a clue that may be helpful later on.
Sirens' Song of Woe
I use the Key of the Damned to unlock the gates in the northwest corner of the Isle of the Damned. Now the party takes the raft at #7 on the map. Along the way, they run into a new foe, Sea Serpents. They can attack back-rank characters, as well as breathe acid, but neither is especially devastating as long as you keep your health up and kill them quickly.
The raft then takes me to #9 on the map, which is a Siren cove. Sirens can use a singing ability that can cause party members to go insane. Insanity can result in characters not attacking at all, or even attacking other party members.
When you arrive at #9, a very large group of Sirens will want you to finish their song by providing the last chorus. If you flub this, you will get attacked by a LOT of Sirens, including Sorceresses. This may be more than can be handled. The safe route is provide the chorus as indicated in the Book of Sirens, "'Tis Madness makes us free". You will get the Water of Wings. The Water Wings make for pretty good foot armor for a non-warrior character. In my case, they're perfect for my Bard. He stows his Buskins in his swag bag in order to import them into Wizardry 7 later. Also, when a character has the Water Wings equipped, you can walk up to the water's edge on the River, 'USE' the Water Wings, and then the party can travel freely over the River.
Isle of the Damned Fountains, Second Time
Now I use the fountains again to grind for another level or two. But this time I farm my monsters and xp inside the Tomb of the Damned, and come up the stairs to use the fountains in between fights.
Nightgaunts and Zombie Guards will be among the random monsters here, but there a number of new foes that will appear as random monsters.
Banshees - These guys 'blink' in and out, and thus can make them harder to hit. They also use a scream that can cause fear. Silence will work to prevent the screaming, but Dispel Undead is even more to the point.
Skeletons - Not very dangerous, even when numerous. Skeleton Lords can be dangerous with spells like Fireball and Poison Gas, and thus should be either Silenced or Dispelled as quickly as possible.
Shadows - Capable of life draining with their touch attacks, but Dispel Undead won't work on them. They don't have that many Hit Points, so you should be able to overwhelm them with physical attacks.
Giant Tarantulas - They can use Webs, which can make them dangerous in numbers. Most spells, including Sleep, will work on them if you feel obliged.
Monstrous Snake - Only comes by itself. But its bite can leave behind an extremely strong poison on the victim that makes the use of the Cure Poison spell very urgent.
Chun-Li and Rothgar both get high Hit Points and high Skill Points on their 13th level-up, so I can live with Chun-Li only getting one attribute raise. I'm approaching the point where my characters are maxing out several attributes anyway. Chun-Li took Lifesteal, which can be a point single-target offensive spell and will also increase the Divine Mana she gets during level-ups. Rothgar takes Astral Gate, which provides a welcome out for getting rid of a group of demons instantly.
Terra manages to bring her Theology points to 54 on her 13th level-up, and takes Cure Poison.
Ryu gets +10 Hit Points and +9 Skill Points, and he takes Purify Air. It rid the party of damage over time spells like Poison Gas and Acid Bomb and Fire Storm.
Errol takes Astral Gate on his 14th level-up. Sometimes it can be good to have multiple characters who can cast it, especially when faced with multiple groups of demons.
I conclude after Zarax reaches his 16th level-up. I leave the Tomb of the Damned, and head for the shore of the Isle of the Damned facing north.
Mai-Lai
Now I start to journey up the river with the use of Water Wings. Along the way I encounter a new foes like Giant Mosquitoes and Dragonflies. Either monsters can attack with bites or stings, while the latter can breathe acid to inflict minor damage on multiple party members.
I go to the treasure chests at #13 and #12 for random loot.
Then I head for #20 on the map, which is where I'll find Mai Lai, who has quite an extensive inventory for sale.
My shopping list for now includes ...
For both my Fighter and my Lord: Helm&Coif, Studded Hauberk, Copper Gloves and Studded Chausses. They can be imported to Wizardry 7 after I finish this game. My Monk and Ninja hold them in their swag bags in the meantime, as they aren't encumbered by heavy armors.
For my Fighter: Dragon Kite, Full Plate (U), Full Plate (L), Silver Gloves, Silver Sollerets. I keep the Heater Shield in order to import it to Wizardry 7.
Also for my Fighter: Blade Cuisinart. It's an improvement over the Vulcan Hammer in that it has the Melee attack option, which scores double damage if you can overcome the penalty to hit.
For my Bard: Studded Hauberk, Chamois Gloves, Phrygian Cap, Skeleton Dagger. He also gets the Leather Leggings from Zarax when he gets the Full Plate (L).
For my Bishop: The Holy Basher. It allows my Priest to contribute meaningfully to combat from the back rank.
There is one more item that I'd like to buy but can't just yet, the polearm called Raven's Bill. I'll have to do some more fighting and treasure hunting. In fact, it prompts a decision not to use anymore charged items or potions or anything like that. I'm almost but not quite close to being able to afford it if I sell those things.
Fishing in the River
I head towards #14 on the River Styx map and fight several Island Giants, a slightly tougher version of the Mountain and Miner Giants that I fought earlier.
Now I go to #15 on the map, and press the button on the north wall. I go one square north and one square east and find a clue, "Red X 3E 1N".
I next go to #10 on the map, and open the chest to get a Fish Line, a Hook, and a Cork Bobber. I then merge the Fish Line and the Hook together.
Then I go to #11 on the map, and open the chest to get some random loot.
Now I go to #18 on the map, and "USE" the Fish Line w/ Hook to pull up a rusted box that provides a Lynx Ring and the East-West key.
The party now makes its way to #19 on the River Styx map. I fought a few Sirens on the way there. I couldn't completely Silence all of them, so a couple of them used their songs with the result of Ryu and Rothgar gong Insane. I take no chances, especially since Ryu is himself particularly capable of killing his own party members. Terra casts Sane Mind on Rothghar, and he in turn casts Sane Mind on Ryu.
I go up the stairs at #19, and climb a couple more flights of stairs. I then use the East-West Key to open the gate.
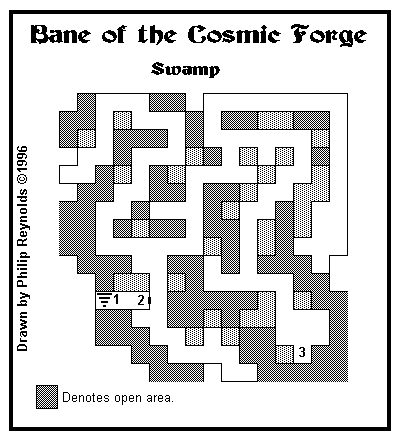
The Swamp
They now find themselves at #2 of the Swamp map. Foes here include:
Dragonflies and Giant Mosquitoes - Same as before.
Yuan-ti - They can attack several times with their spears, including back-rank characters. They shouldn't be difficult to defeat, although it may mean having to heal up your back-rank characters afterwards.
Drow Elves - These are the equivalent of Rangers, who can fire arrows at anyone in the party, and can cast Alchemy spells, the worst cases being Blinding Flash, Poison Gas, and Deadly Poison. Like party characters who can use Alchemy spells, they can't be Silenced. If you encounter any of them, take them out as quickly as you can manage. I will try straight physical attacks if there's just four of them. More than that and I'm likely to try some spells of my own like Psionic Blast and Blinding Flash. Missile Shield is often recommended as well. If you're faced with several groups of them, you may need a 'spell of massive destruction' like Asphyxiation or Nuclear Blast. One fight on the east side had one of them use Poison Gas on me, which can be really concerning. Fortunately only Rothgar got poisoned, so Ryu grabbed the opportunity to get rid of it the next round with a Purify Air spell.
Goblins - These guys can be numerous, but are not particularly dangerous in themselves. The ones that are dangerous are Goblin Shamans, who can cast a variety of spells, including Fireball. Silence or otherwise debilitate them if you can.
I now make my way towards #3 on the Swamp map, where I encounter a Caterpillar-like creature seated on top of a large mushroom. He apparently wants his Hookah Pipe back. The key to this is to ask him, "Where is your pipe?". He will then provide you with a clue word, "Reclamation", that you can use later on. By the way, I also buy Incense from him, since I'll need it later.
I conclude by spinning around for enough experience to bring my Monk to the 12th level, and my Valkyrie to the 13th level.
The Bottle Oracle
This quest leads to obtaining an item that you can use to make progress. It strictly speaking isn't necessarily as there is an alternative, but I'm including it here for the sake of completeness.
Now I head back to Mai Lai (#20 on the River Styx map).
I then say the word "Reclamation" to her, and she indicates that she needs a claim number first.
Now I head back to the Caterpillar, and tell him, "Claim Number". He now explains the Bottle Oracle and then gives me a Special Message. This is where the use of the Wine Bottle from the Castle Basement becomes apparent. I merge the Wine Bottle with the Special Message. I then merge the Bottle w/ Message with the Cork Bobber to get the Botl + Msg/Cork.
The location of the Bottle Oracle is not clearly indicated on the River Styx map. It is 7 squares west and 1 square north of #7. Once there, I "Use" the Botl + Msg/Cork.
After that, I go to #14 on the map and find the Botl + Ans/Cork. I "Use" the Botl + Msg/Cork to learn that the claim number is 38-23-36.
Bork
I then head back over to Mai Lai. If you want to go through with this, make doubly sure to buy any items you want from her before you do this, because she will flee from the Isle Keep permanently once she checks on the claim.
There is in fact one more item I want to buy from her, the Raven's Bill for my Lord. I sell off several of my items, including my charged ones, to be able to make the purchase. But it is worth it as it will definitely become a more damaging upgrade on the Spear of Death. Emphasis on "will". The present problem with using it now is that it drains Hit Points over time. And it's cursed, which means if I equip it I can only unequip it with a Remove Curse spell (which I don't have at the moment). Furthermore, I don't have a regenerative item that can negate the Hit Points drain, at least not yet. I purchase it largely with importing it into Wizardry 7 in mind. I may not be able to use it during Wizardry 6 if I don't find a regenerative item (e.g. Ankh of Life) in this game.
I go to Mai-Lai again and tell her "reclamation", and this time also provide the claim number, "38-23-36". She freaks out and swims away for good.
I head for #21 on the map. Now I have to fight Bork and three Island Giants. This fight is winnable as long as you do what you can to maximize your armor (e.g. Armor Plate) and keep an eye on your health. Bork will leave behind the Hammer +1.5. For any of you interested in dual-wielding weapons, this is probably the best off-hand weapon in the game since it has a 15% chance of knocking out its target.
Hookah Pipe
The chest at #22 has the Hookah Pipe. Now I bring the Hookah Pipe to the Caterpillar, who gives me a couple of Red Mushrooms in return. These mushrooms allow me one way of getting out of a certain predicament later on in the game.
Now I return to the Tomb of the Damned, at #8 on the map of the River Styx.
Isle of the Dead Fountains, Third Time
I have some more xp hunting and leveling up to do. Chun-Li takes Mind Flay on her 14th level-up. It's the ultimate offensive spell in the Psionic's spellbook, as it can hit every enemy in sight with mental damage and Insanity. It also increases the Mind Mana she'll get with each level-up. Rotghar doesn't quite make it to 98 Theology points on his level-up, so he takes Cure Stone which increases the Earth Mana he gets with each level-up.
Terra reaches 72 Thaumaturgy points on her 14th level-up, so she now takes Deep Freeze as a 5th-tier Mage spell. It's arguably the most damaging single-target spell in the game, besides Lifesteal.
Errol reaches 98 Thaumaturgy points on his 15th level-up, so he now takes Nuclear Blast as a 7th-tier Mage spell. It provides an option for ending those fights where you're up against several horders of enemies all at once. It also increases his Fire Mana during each level-up.
Chun-Li takes Ressurect on her 15th level-up. It increases her Divine Mana during her subsequent level-ups. She now also starts adding Skill Points to Kirijitsu, to increase her chances of landing critical hits.
Rotghar takes Death Wish on his 15th level-up. Other characters are taking Resurrect, so he goes with the more offensive option that also increases his Divine Mana with each level-up. He also begins adding Skill Points to Mythology. There's value in being able to properly identify the specific monsters you're fighting, and he's already maxed out his crucial skills.
It will be about 150,000xp until my next level-up, so now I make for the next dungeon.
Isle of the Dead
Now I return to the Isle of the Lost. At #15 on the River Styx map is the Key of the Lost. I then go to #17, kill the Island Giants there, and then use the Key of the Lost to open the gate.
The chest itself holds the last Cylinder of Ash. So now I travel north to #3 on the map, and use the Horn of Souls to summon Charron. Charron says that I must return this Cylinder of Ash to its proper place, so he gives me the Key of the Dead.
I head for #23 on the map, which is the entrance to the Isle of the Dead. The gate at #24 requires the Key of the Dead to open. The entrance to the Hall of the Dead is at #25.