-

- Forums
- Chatrooms
- Gallery
- Gameplay Videos
- Upload
- Articles
- Mod Reviews
- Shop SP: Games, Movies, Books

|
|
New City | Orkogre Castle | Nyctalinth | Munkharama | The Hidden Temple | Land of Dreams | Rattkin Ruins | The Funhouse | Giant Cave | Witch Mountain | Ukpyr | Sphynx Cave | Dionysceus | Return to Nyctalinth | Return to New City | Dragon Cave | City of Sky | Hall of the Dead | Hall of Gorrors | Hall of the Past | Tomb of the Astral Dominae |
THE HIDDEN TEMPLE
Rusted Keys
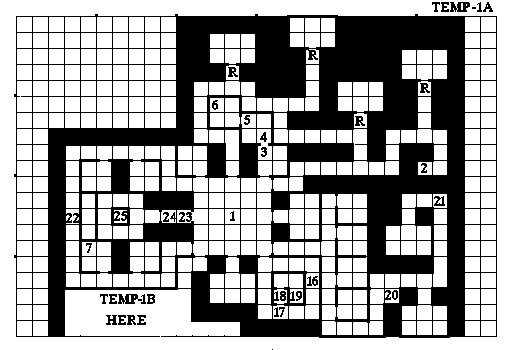
I am now at #1 on the Hidden Tample 1a map. I begin by fighting monsers in the room to the south, and in rooms on the west side.
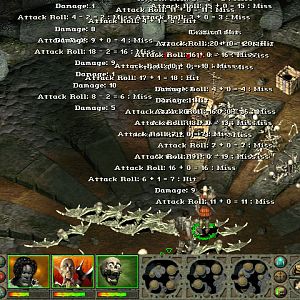
One of the battles was against a Mad Warder, 3 Munk Ninjas and another Munk Ninja. Terra used Silence on the Mad Warder. Errol used Stink Bomb, which can inflict Nausea, and Ryu used Blinding Flash on the group of 3 Ninjas. He also used Web in the next round against the lone Ninja. Remember, you need alternatives to Silence if you want to stop certain enemies from using Alchemy spells.
The chest at #7 has the Rusted Keys. However, I also regard the chest as the first opportunity to realize a certain objective. I want to accumulate a certain amount of Potions of Invisibility, as they will be valuable during one or two very difficult fights near the end of the game. So I reload and do the chest over until I get a Potion of Invisibility, plus the Rusted Keys. I get some Scroll and Potions and Dusts too along the way.
One of the fights after that was against several Ghosts. They can often be quickly killed with physical attacks, although you may have to occasionally deal with the bother of having Magic Missile or Terror cast on you after the battle is over. One of the perks about killing Ghosts as random encounters is that they always have a random chance of leaving behind either a Key of Crypts or a Key of Gorrors. Keep an eye out for these, and keep them when you get any. There are several gates in two of the last dungeons in the game that can only be opened with either type of key. Open one gate, and you will use up one of the keys you have, so you'll need multiple keys of each type to open all of the gates in the later dungeons. What if you don't seem to have enough keys by the time you enter the dungeons I'm alluding to? Don't worry, there will be plenty of opportunities within those dungeons to acquire more of the keys. But it can't hurt to make a head start when the opportunity presents itself earlier, can it?
I actually didn't get one of those keys when I fought several Ghosts. However, a single Ghost interrupted my attempt at resting up. So ironically I got a Key of Gorrors after killing that single Ghost. Nice.
The Rusted Keys can be used to open all of the gates that are marked 'R' on the 1a map. They're not essential strictly speaking, but monsters and experience wait on the other side of each of them.
Munk's Key
Now I go to #3 and press the button in the northwest corner of the room. I next go to #5 and pull the sconce. The chest at #6 yields the Munk's Key.
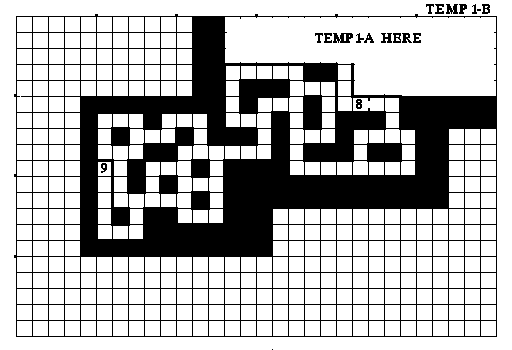
I go to towards the southwest corner of the 1a map. I used the Munk's Key to open the gate at #8 on the 1b map.
There are a LOT of fights at set points in between #8 and #9. Remember, if you run into opponents like Mad Warders or Munk Ninja, go all out for them to kill them as quickly as possible. I normally have my Monk and Ninja practice hiding, but not when I run into opponents who needed to be offed promptly.
Lord of Dark Forest
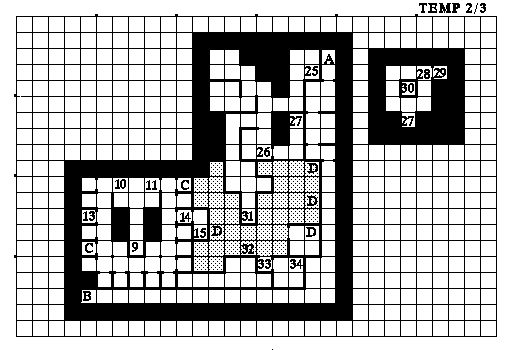
I begin by putting up Armor Plate and Enchanted Blade before I go down the stairs at #9. I end up at #9 on the Temple 2/3 Map. That begins a boss encounter with the Lord of Dark Forest, who will typically have several Munk allies with him. In this instance the enemies included a Gorn Ashigaru, two Mad Warders, and another Mad Warder. The Lord is the real threat here, since he can cast spells like Psionic Blast, and is a capable combatant. Errol puts up a Magic Screen. Chun-Li gets the Lord with a Silence spell. Rothgar and Terra do the same to each of the Mad Warder groups. Ryu attempts a Web spell on the Ashigaru. The battle is pretty much decided once the Lord goes down to sustained physical attacks.
The chest at #11 has the Key of the Temple along with scrolls and powders. I also got an Ankh of Sanctity. Rothgar invokes it to raise his Piety from 18 to 19.
The chest at #10 has the Key of Good Keep, along with potions and charged sticks. I normally would reload after Errol tripped a Psionic Blast trap, but I went with it since the loot included an Invsibility Potion. I healed up and rested until the Veggified condition of several party members wore off.
Notched Staff
The area surrounding #9 on the 2/3 Map has lots of monster encounters and treasure for the taking.
I go to #13 on the 2/3 Map, and press the button there. This open the wall at #14 leading to #15. At #15 is a chest that holds the Notched Staff. Now I head back up the stairs at #9.
At #22 on the 1A map is where I use the Notched Staff.
Onyx Key
I next go #16 and press a button there, which opens the wall at #17 leading to #18. The gate ahead requires the Key of Good Keep to open. Now I open go ahead to #19. The chest has the Onyx Key.
I then go to #23 and hit the lever, in order to open the gate at #24. Having used the Notched Staff at #22 means I can reach the stairs at #24 safely without hitting a pit. The stairs themselves lead to #25 on the 2/3 Map.
I'm on my way to the gate that the Onyx Key opens, and fight random monsters along the way. One encounter included Water Nymphs and Floaters. Water Nymphs love to cast water-based spells, and can be especially dangerous if they get off Iceball. It it's just one or two by themselves the warriors can usually kill them off quickly enough before they do any serious harm. Sometimes, during more intense fights, it's necessary to use Silence on them.
Now I use the Onyx Key to open the gate at #27 on the 2/3 map. I then go down the stairs at #27. This leads to the smaller room at the east side of the 2/3 map.
Wikum's Power Globe
First things first, I press the button at #28 to open the wall. I then hit the lever at #29. Before I go to #30, I cast my long-lasting buffs, Enchanted Blade, Armor Plate, and Magic Screen. There's a reason for this.
When I choose to take the globe at #30, I get hit with a gas that has a chance to paralyze each party member. Several Skeleton Lords will then attack. Usually I can handle this fight if just one or two party members are paralyzed. If it's more than that, I'll reload. Skeleton Lords can sometimes paralyze or cause disease with their touch attacks. Their real danger is their ability to cast spells from both the Mage and Priest spellbooks, thus why Magic Screen is needed. The fight where I won, as shown in the video, no one was paralyzed. Chun-Li, Rothgar and Terra each silence a pair of Skeleton Lords. I don't have a Silence spell to spare for the fourth pair that is closet to the party. But I figure chances are they'll make physical attacks, so I have Zarax and Ryu take them out as quickly as possible. I wear them all down after that.
The party now gets Wikum's Power Globe in their inventory. Hold on to this item, it will become important further down the road.
I use the lever at #29 again to open the gate, and go back up the stairs.
Crypt Map
I swim across the pool to #32 on the 2/3 map, which is a fountain that I can use to replenish both mana and stamina. Then I go to #33, and open the gate with the Key of Temple. At #34 is a chest that holds the Crypt Map and the Holy Covenant.
Now I go back up the stairs at #25.
Leaving the Hidden Temple
Now I go about fighting monsters in the southeast corner of the 1A map. Errol takes Crush, which can be a good option against single-targets, on his 11th level-up.
I use the lever at #20 to open the gate, and then go up the ladder at #21.
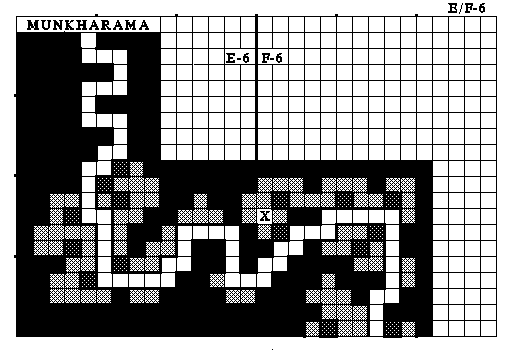
That brings me to 'X' on the E/F-6 map. I make as to leave the clearing when I fight a few more Munks. Rothgar advances to his 11th level. He got 8 academic skill points, just enough to bring himself to the 72 Theology points needed for 5th-tier Priest spells. He takes Healthfull, which heals Hit Points for the whole party.
The road going west and then north leads to the south side of Munkharama. And indeed, I'm not finished with Munkharama just yet. There's one part left that I need to explore, the Land of Dreams.

