-

- Forums
- Chatrooms
- Gallery
- Gameplay Videos
- Upload
- Articles
- Mod Reviews
- Shop SP: Games, Movies, Books
|
|
New City | Orkogre Castle | Nyctalinth | Munkharama | The Hidden Temple | Land of Dreams | Rattkin Ruins | The Funhouse | Giant Cave | Witch Mountain | Ukpyr | Sphynx Cave | Dionysceus | Return to Nyctalinth | Return to New City | Dragon Cave | City of Sky | Hall of the Dead | Hall of Gorrors | Hall of the Past | Tomb of the Astral Dominae |
ORKOGRE CASTLE
Lord Galiere
Now my next destination is Orkogre Castle. There are two reasons to go this way instead of the alternatives. One is that the enemies in the Castle will be comparatively easier than other parts of the game. The other is that you will need to get items / finish matters in Orkogre Castle before you can fully complete other areas of the game. The maps below show how to get from New City to Orkogre Castle.
First, go out the east exit from New City, and follow the road through as shown on the northwestern corner of Map D-5.
I of course fight random monsters along the way. Rotghar advances to his 8th level after a battle against several Glow Mothras. He takes Sane Mind.
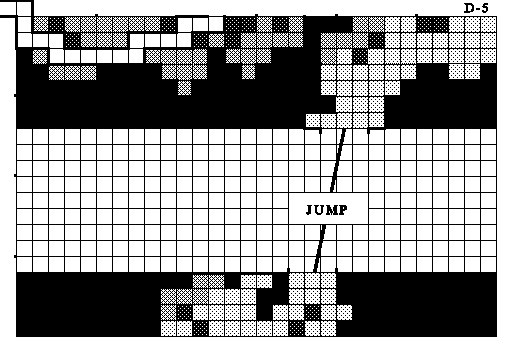
The road will take you north into D4. You will come to a fork in the road. Keep going north instead of east.
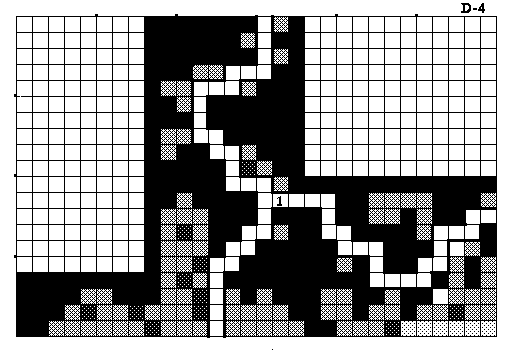
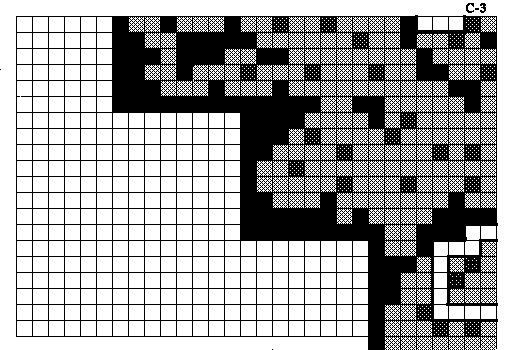
Keep going. The road will turn west, and briefly loop west into Map C-3, and then curl back east into Map D-3. For the rest of the way to the Castle, see the video just below.
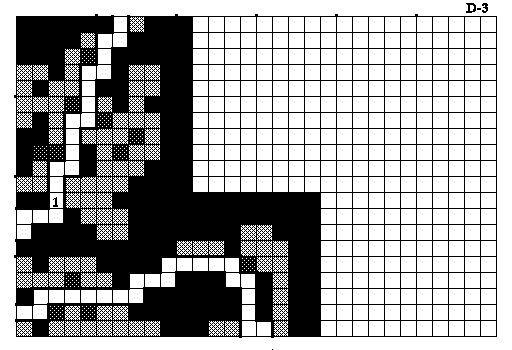
The video starts off at #1 on the D-3 map, where I meet Lord Galiere. You can choose to fight him if you want to. But for roleplaying's sake, I gave him Captain Beorigard's letter. He then allows me to pass through. *NOTE* By the way, anytime you run into an NPC, trade with him if for no other reason other than to check if that NPC has acquired one of the maps. Then you can choose to purchase that map.
Anyway, I now veer off to the left and deep towards the woods. The point I'm heading for is the forest path in the northwest corner, heading northwards. Along the way, I frequently run into Gorn enemies. These include Spearmen (easiest), and Lancers, who are slightly tougher versions of Spearmen. These guys can reach back-rank characters, but are also easily put to Sleep. More dangerous are Gorn Rangers, who can fire arrows from a long distance, and can cast lower-level Alchemy spells like Sleep, Blinding Flash, and Stink Bomb. Remember that anybody who uses Alchemy spells cannot be prevented from casting by Silence. Normally, I have my Monk and Ninja practice hiding during the early parts of the game. But I have them attack right away whenever facing Gorn Rangers, in order to kill them as quickly as possible. My Mage chips in as well with spells like Energy Blast or Chilling Touch.
Chun-Li takes Psionic Blast on her 8th level-up. It's an offensive spell that can both inflict mental damage on a whole group of enemies, and drive them Insane as well.
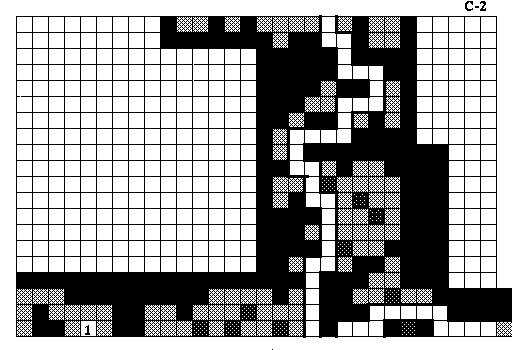
Eventually, I go north from the C-3 Map, and make my way towards #1 on the C-2 Map. This is the ladder entrance to Orkogre Castle.
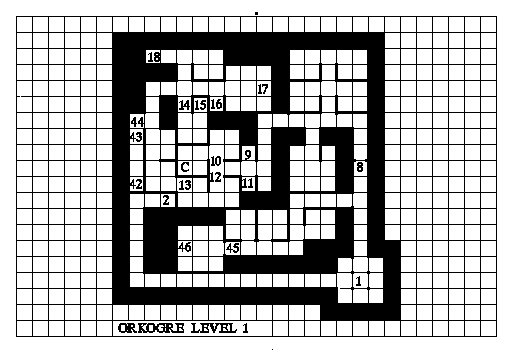
As for the Castle, the maps for it are just below. The ensuing videos show the relatively smoothest way to progress the game.
Orkogre Armor and Supply
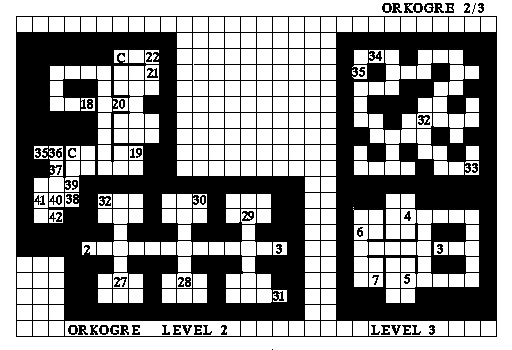
The gate at #8 on the Level 1 map cannot be opened just yet. So I go down the stairs at #2. Then I go from #2 on the Level 2/3 map, and down the stairs at #3.
Now I head for #4 on the Level 2/3 map. Waiting for me are 3 Gorn Ashigaru (Samurai) and 4 Gorn Rangers. Gorn Ashigaru can use their Naginata on back rank characters, and can sometimes inflict critical hits. They can also damage the whole party with spells like Fireball and Magic Missile. Terra takes their spells out of the equation by casting a Silence spell on them right away. Errol puts most of the Rangers to Sleep with his Poet's Lute. I take out the Ashigaru first, then the Rangers. I get an Armory Key at the end of the battle.
Ryu gets 10 hit points, and just enough academic skill points to push his Alchemy to 54 and access the 4th-tier spells. He takes Cure Poison. Terra got a good level-up too, and she takes Fireball so that she now has an offensive spell that can damage an entire group of enemies.
The Armory Key opens the westward gate leading to #6 and #7 on the Level 2-3 Map. #6 simply has mundane armors and weapons. #7 has both Salted Munkmeat and Munk Innards. Both of these items will be needed later on.
Crown Key and Gate
Now I go to #5 on the Level 2-3 map, and run into a rather large group of Gorn Lancers and Rangers. I attack the Rangers right away, without having Chun-Li or Ryu go into hiding. I reduce them to two, and I reason I can handle the odd Alchemy spell or two from them. I gradually wear them all down, and the Rangers only fired arrows during the battle. They leave behind the Crown Key.
Now I backtrack, and use the Crown Key to open the gate at #8 on the Level 1 Map.
Bone Combs and a Polished Steelplate
I hunt for monsters in the northeast corner of Level 1, and get enough xp to advance Zarax to his 9th level.
In the meantime, my party hits the lever at #9 in order to open the gate at #10, and the lever at #11 in order to open the gate at #12. On my way, I run into a new foe, Gorn Shamans. They fall easily enough when Silenced. The 'C' just west of #10 designates a chest that has a Staff of Blessing and some random magical loot. My Priest equips the Staff as an interim weapon.
Now the party goes down the stairs at #18 on the Level 1 Map. I then go from #18 on the Level 2/3 map to #19. I fight a group of Gorn Lancers, and several groups of Gorn Rangers. At this point the attacks of the Gorn Rangers aren't really enough to cause me serious damage, even after they use Blinding Flash. And that makes me more willing to tough in out in long slogs. Even so, Terra helps matters along by blowing one group of Rangers away with Fireball, and using an Acid Bomb she had found earlier on another group of Rangers. Even if my warriors have trouble hitting them while Blinded, the damage that the Acid Bomb inflicts with reach round does them in.
I hit the lever in the room, which opens the gate at #20. I then go past the gate, and then go to the room to the south. I then search just one square north of #19, and find two items.
One is Bone Combs & Brushes. This is a quest item, but one that will not be used until much later in the game.
The other is a Polished Steelplate. This will be used very shortly. I go back up the stairs at #18.
Murkatos Outer Sanctum
Now the party backtracks, and makes its way to 4 squares east and 2 squares north of #9 on the Level 1 map. Here the party "Searches" first while facing south, and then "Uses" the Polished Steelplate. This opens the gate to the south, leading to Murkatos' Outer Sanctum.
They then have to kill a couple of Gorn Shamans when go in through the door way. The party then "Searches" 4 squares east of #11. This opens up the spot at 2 squares west and 1 square north of #8. Here the party finds a letter that suggests Assassins have infiltrated the Castle, as well as a Ring of Steel Keys.
I make my way towards the original entrance when I run into a Rattkin NPC, Rattsputin. Rotghar negotiates with him, and gets a "pleased" reaction. He tries a second time, but Rattsputin becomes "angry" and leaves. I don't mind and save. Rotghar advances his Diplomacy by 1 everytime he gets a "pleased" reaction.
I continue on and go down the stairs at #2.
Orkogre Prison
I am now in the Castle Prison, the series of rooms in between #2 and #3 on the Level 2-3 map. The Ring of Steel Keys can open the gates to all of the rooms.
At #27 is several bunches of Bananas, as well as Bread Rolls. I take 1 bunch of Bananas, since they will be used as a quest item very soon.
After entering the gateway to #30, I get into a routine fight against Fungus Oozes. At #30 itself is a button that opens the way to #31.
After opening the gateway to #31 and entering through the doorway, I end up having to kill a Boar Weevil (a somewhat stronger beetle). I then hit the lever at #31.
I win a fight against several Rattkin and T'rang at #29. I try to rest but get interrupted by numerous Rattkin. I put up Missile Shield just to be safe, and wear them down.
I get enough xp so that both Rothgar and Errol advance to their 9th levels. Rothgar takes Cure Poison, while Errol takes Magic Screen. The latter spell will come in handy as a pre-buff against enemies who can cast spells.
I then open the gate leading to #32 and step through. I then have to kill a pair of Dragonlizards.
Jail Pit
#32 itself is a pit leading downwards. Going down it leads to #32 on the Level 2-3 Map. Falling down a pit before I can use the Levitate spell results in me taking some damage. Chun-Li and Terra regenerate automatically with their Diamond Rings without having to use any Divine Mana.
I then go to #33 and press the button.
Along the way, slimes of various sorts are expected to be the kind of monsters you find down here.
Pressing the button makes accessible the ladder at #35.
Murkatos Inner Sanctum
Once I go up the ladder, I find myself at #35 on the Level 2/3 Map. I hit the lever at #36 in order to open the gate at #37.
Once I go across, I have to fight a Spirit Guardian. If he kills a party member outright with something like Lifesteal, simply reload. Once he dies, the spirit of Murkatos will give a rather windy speech of regret, and direct me to seek a tomb in Nycatlinth. Chun-Li takes Armormelt on her 9th level-up.
At #38 I find a Bonsai Tree. This is a quest item, but one that will not be used for some time, so I tuck it into my Bag. I also find a fair bit more of random magical loot, including a couple of Acid Bombs. This will come in handy fairly soon.
At #39 is a button that opens the north wall. I put up all of Armorplate, Enchanted Blade and Magic Screen, and then saved my game. I'm going to have a fairly intense encounter. As soon as I step north, random party members are going to get Silenced. One point behind the Magic Screen is to increase the odds of party members not getting Silenced. And thankfully Chun-Li, Errol and Terra all avoid that. I then get attacked by several groups of Spectral Ravens. These monsters can paralyze with their bite attacks, can Blink in and out and thereby often avoid attacks, and can scream with a Terror effect. With enough party members consistently being kept Frightened, it can sometimes be difficult to take any action against the Ravens. This is what can make this fight dangerous, the sheer numbers, their ability to make repeated use of Terror, and the fact that some of your own party members will have been Silenced first, thereby preventing them from using Silence on the Ravens. One of my advantages is that they don't do a lot of damage. Another advantage is that Chun-Li and Terra are able to Silence multiple groups of Ravens during the first two rounds of combat. My other card is that I can use cloud-effect spells OR items that duplicate those spells, to inflict lingering damage on monsters. As such, Terra her Acid Bomb on one of the most numerous group of Spectral Ravens. This way, the most numerous group of Ravens takes ongoing damage round after round even when my own party has trouble attacking due to being frightened. Once that is in place, it is simply a matter of Errol putting Ravens to sleep whenever he can with his Poet's Lute, and the rest of the party going the distance and bringing the Ravens down one by one.
Ryu got 9 Hit Points and takes Fire Bomb on his 9th level-up. So he's starting to get some offensive options of his own.
Terra got 5 Hit Points. I would have liked at least 6. But I can live with it since she also got a +1 to Vitality, and I'm not exactly eager to do this fight over again. She takes Cure Poison.
There is a spot designated as 'C' just north of #39. This is a chest that will hold more random magical loot, as well as the Azure Key, Robes +1 (U), Robes +1 (L), and a Gem of Power (which I couldn't identify just yet and so appeared in the video as 'Jewellery?'). Terra equips the Robes, and transfers her mundane Robes to Chun-Li's bag for holding. Zarax temporarily equips the Gem of Power, and invokes its special power. He now has the Power Attack special skill, which allows him to penetrate her target's armor more often, and score more damage on each attack.
I return to the room to the south. There is a chest with random magical loot in the northwest corner.
I thereafter have an encounter with D'Ang T'Rang. Rothgar scores a couple of Diplomacy points before the T'Rang becomes angry and leaves.
Now I hit the button at #40 to open the gate at #41. I then go up the stairs at #42.
The Gorn King
Once the party goes up the stairs, they find themselves at #42 on the Level 1 Map. I then hit the lever at #43, which opens the gate at #44.
I then go to #14, the location of Gorkunga the Killer Ape. This is where I use the Bunch of Bananas that I found earlier. This prompts the Ape to open the glass window to the south, but then a lone Gorn Ashigaru and several Gorn Lancers attack me. I then press the button at #15, which opens the way to #16. At #16 is a lever that opens the gate to the Throne Room.
At #17 is the Gorn King, yet another morose and melodramatic personality. He gives me the Key of the Gorn King and is on his self-defeatist way.
I go down the stairs at #18.
Temple Map Chest
Now I head down the stairs at #18 on the Level 1 Map. From #18 on the Level 2/3 Map, I head towards #21 and press the button there, which opens the north wall. The gate at #22 is opened with the Key of the Gorn King.
There's no need to disarm chest and I just open it. It turns out that one of the NPCs beat me to it and has obtained the Temple Map. I go back up the stairs at #18.
Azure Fountain
Now I'm done with Orkogre Castle. I head to #45 on the Level 1 map. The gate here is opened with the Key of Azure. At #46 is a fountain that will replenish mana for spellcasters.
I fight numerous Gorn in a room to the east, and cast spells with abandon. I replenish myself at the fountain afterwards.
Now I leave the Castle by going up the ladder at #1.
My next stop is Nyctalinth.