-

- Forums
- Chatrooms
- Gallery
- Gameplay Videos
- Upload
- Articles
- Mod Reviews
- Shop SP: Games, Movies, Books
|
|
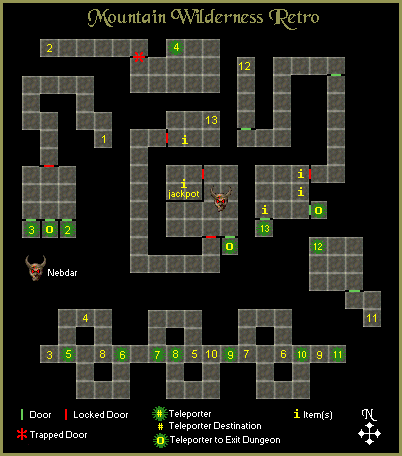
MOUNTAIN WILDERNESS RETRO DUNGEON
Anthracite Golem
No sooner have I arrived at #1 on the map than I run into an Anthracite Golem. But it's pretty easy to kill by now.
Undead Heads
Now I continue back and go through the door. There are several undead heads here, but they're easily blown away with a double shot of Banish.
Now there's three doors ahead of me. The one on the right leads to #3, but I'll get to that south hallway area at some point anyway. The one in the middle leads out of the Retro Dungeon, which I don't want to do just yet. I take the one on the left to go to #2.
Anthracite Golems and Plumed Serpents
I then move ahead and run into 3 each of Anthracite Golems and Plumed Serpents. Each of the Plumed Serpents leaves behind a Plumed Feather, which is the last ingredient I need for the Featherweight Armor.
I next go through the teleporter that brings me to #4.
Vampiric Wraith
I start by going through the teleporter that brings me to #5. I have to kill a couple of Anthracite Golems upon arrival.
I next go north to loop around a bit, and avoid the teleporter that goes to #8, and instead go through the teleporter that brings me to #7.
Now I use the teleporter that goes to #9. I then turn around 180 degrees and take the teleporter that brings me to #11.
I then go north through the door, and have to fight 6 Rapax Ghosts and a Vampiric Wraith. A Vampiric Wraith is a stronger version of Rapax Ghosts, and can inflict a lot of nasty conditions, like paralysis, hit point drain, insanity, etc. Again, repeated shots of Banish won't kill them outright, but it will soften then up so that they go down faster to physical attacks.
I take the teleporter to #12.
More Anthracite Golems and Plumed Serpents
Now I follow the long hallway, defeating more Anthracite Golems and Plumed Serpents along the way. I collect potions and other loot after picking the multi-tumbler door, and then take the teleporter to *13*.
I loot the potions and such in the room at #13.
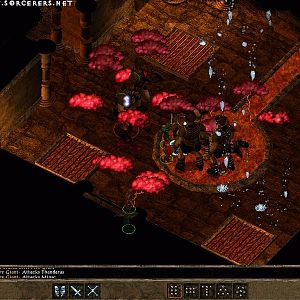
Nebdar
I follow the hallway and then go through the door. Now I have to fight a powerful sorceress named Nebdar, as well as several Vampiric Wraiths and a Gibbering Head.
Note that almost everybody starts off with a spell. Vi Domina casts Soul Shield and Terra casts Elemental Shield to protect everyone from Nebdar's magic. Ryu blankets everything with a Firestorm spell. Rothgar and Chun-Li issue a double shot of Banish, and Errol uses his Cornu of Demonspawn.
After that, the immediate priority is to kill of the Wraiths as they come through the door one by one. The Gibbering Head falls after multiple rounds of taking damage from the Firestorm. RFS-81 unfortunately got drained of hit points, but a Potion of Renewal will soon fix that.
Once they're gone, Nebdar will fall after I run up to her and sustain an all-out physical assault on her. Once she falls, she leaves behind the Amulet of Nebdar (+4 armor class, +1 health regeneration, +1 stamina regeneration, +1 mana regeneration, -5 Senses, +15 Power Cast, +10% fire and water resistance, +5% all other resistances). This item, along with the Ring of Power, allows my Bishop to recoup mana quite quickly. She won't regenerate enough mana within fights, but she often recoups it completely in between fights.
I loot the room for a number of items. An interesting one is a Sword of Fire, but it doesn't fit into my plans. The one item I do take is the Strong Bow (+2 intiative, +3 to hit, +40% damage, Kill 60%, requires 85 Strength and Bow 30) which will be Errol's bow for the rest of the game
.The last part of the video shows the other point behind wearing the Amulet of Nebdar. The Amulet allows Chun-Li to wield the Staff of Doom, since the health regeneration bonus of the amulet nullifies the health drain curse of the Staff. Now my Bishop can contribute to melee combat in a meaningful way in between when she does cast spells.
I then take the nearby teleporter at *o* in order to leave the Dungeon.

Sulfurous Scorcher
I go west in the Mountain Wilderness and run into two Sulfurous Scorchers, which are more powerful versions of Blistering Scorchers. I still cut them down one by one.
Setting a Portal near Ascension Peak
I continue west and defeat more Savant Berserkers and Drones led by a Savant Orb.
Now I go up the mountain trail until I reach the entrance to Ascension Peak, near where I killed Bela. Ryu casts Set Portal at this point.
Featherweight Armor Ingredients
Rothgar casts Return to Portal to return the party to Arnika.

I fight groups of Savant Slashers and Savant Gunners at both the Savant Tower and the Spaceport.
I also craft some Potions of Renewal after buying Potions of Cure Disease from Lord Braffit. But I keep these ones. Monsters who can drain hit points are becoming more frequent.
Now I give Antone the Djinni Eye, a Plumed Serpent Feather and a Tanto Wasp Wing so that he can begin crafting the Featherweight Armor.
I return to the upper room in He'Li's to rest up and buff up.
Jonin and Cardinal
I teleport back to the entrance to Ascension Peak. I rest up and buff up a couple more times until I wake up to three Bitter Wings attacking me. I kill them in rather short order.
Terra takes Tsunami on her 22nd level-up, which will be helpful against the Rapax hordes.
I continue down the fight, when a massive horde of creatures approaches. Two groups of Bitter Wings for a total of 13, several Plumed Serpents, and a couple of Sulfurous Scorchers. It would normally be insane to even think of a fight like this, but I go for it since it would be an awesome xp haul. What ended up working in my favor is that I fight them at a bend in the path, so they can't all attack me at the same time.
It still requires frequent and generous use of Errol's Renaissance Lute (often on himself to recover Stamina), Cure Poison and Restoration spells from other characters, determination, and admittedly some luck, especialy when Chun-Li was 6 hit points from dying and Errol used his Renaissance Lute on her in the nick of time. I also got in spells like Death Cloud, Toxic Cloud and Firestorm when I had the chance, which is to say everyone was more or less healthy and not poisoned. That certainly helped as the Firestorms whittled down their hit points, the Toxic Cloud sometimes incapacitated them, and I believe the Death Clouds killed three Bitter Wings outright.
Everyone in the party gets 560,000+ xp. Chun-Li takes Earthquake on her 22nd level-up, which provides another mass damage option that draws on Earth Mana.
I search the rest of the Mountain Wilderness. But no more monsters, so Rothgar casts Return to Portal to return to Arnika.
Featherweight Armor
I rest up in He'Li's, leave and then fight some Higardi Brigands.
I go to Antone's. The Featherweight Armor (+10 AC, 5.0 weight) is now ready. I purchase it and have Ryu wear it for the rest of the game. Many Samurai players believe that a Samurai is more likely to get off lightning strikes when he's wearing the very lightest of equipment, and therefore this armor piece is perfect for Samurai.
Ryu casts Return to Portal so that I can return to the Mountain Wilderness near the entrance to Ascension Peak.
I travel down the path and east to the entrance to Rapax Rift, which is my next destination. Vi Domina insists on leaving the party, but I have the usual way to get around that.