-

- Forums
- Chatrooms
- Gallery
- Gameplay Videos
- Upload
- Articles
- Mod Reviews
- Shop SP: Games, Movies, Books

|
|
NORTHERN WILDERNESS RETRO DUNGEON

Coal Golems
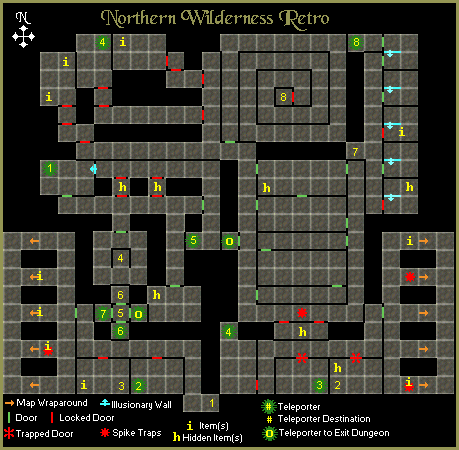
The party now enters the Retro Dungeon, and winds up at #1 on the map. The party heads north and then west along the hallway. They run into a Coal Golem, which can cause unconsciousness or blindness with its attacks. It is by itself, so I manage to chop it down rather routinely.
I then unlock the door leading to the teleporter at *2*, but I don't take the teleporter.
I then go west and unlock the door leading to the teleporter at *3*. I then have to fight another Coal Golem. My Ninja, Bard, and Bishop all then advance another level. Also in the room is a Book of Haste that my Monk uses.
Gibbering Head and Insects
Instead, I head westwards, and grab all the loot I can from the 'wrap around' portion of the map in the southwest and southeast corners.
I then leave west from the 'wrap around' portion, and go through the door leading to #2. I uncover a few hidden items there like a Cloak of Shadows and Bronze Greaves.
Now I open the door leading to the teleporter at *3*. I then have to fight a Gibbering Head. It is a fight easily won, since by itself it has few hit points. Its Insanity spell on Ryu and Zarax quickly wore off after the battle.
I head west and battle some Tiger Mosquitoes and Tse Tse Flies before stepping through the teleporter at #4.
Bat Vampires
I have to fight six Bat Vampires after I step though. They can drain hit points, and can be very dangerous. But I have an advantage in that they can only come at me one or two at a time. They're undead, so Errol freely uses his Cornu of Demonspawn against them as well.
Note also that there are a couple of places marked 'h' in between the teleporters at *1* and *5*. I 'search' these locations, and get a Plate Mail +2 (U) and a Plate Mail +3 (U) for Rothgar.
I then head south to the room east of the 'hub', you know, #5, #6, #7, and 'o'. At 'h' are a few Pandemonium Powders.
I then go through the teleporter at *5*. That brings me in the middle of the 'hub', at #5. *6* only leads to the close by #6. 'o' leads out of the dungeon completely, which I don't want just yet.
I instead take the teleporter at *7*, which brings me to #7.
Hoarder Slime
Now I explore the series of rooms along in the northeast corner of the map. Along the way I find a Plague Axe (-2 initiative, 4-12 damage, cursed, poison 5%, disease 70%, blindness 5%, nausea 5%, insanity 5%), an Enchanted Mace (-2 initiative, 4-9 damage, +10 to Mace & Flail skill, 8% knock unconscious), and some Death Stars (+1 to hit, +5 initiative, 7-15 damage, 100% poison, critical strike 5%).
I then take the teleporter at *8* to end up at #8. I then work my way through the hallway that circles around #8, and run into a Hoarder Slime.
The Hoarder Slime has 400+ hit points, can cause paralysis, disease, poison, nausea, or unconsciousness with its attacks. It also has significant damage resistance against physical attacks, and regenerates 4 hit points each round. As long as your characters can hit it consistently, you should be able to outpace its resistance + regeneration.
It will drop a Plate Mail +2 (L), a Plate Mail +3 (L), and a random item from the Hoarder Slime list.
Some of the more notable items from the Hoarder Slime list include Ebony Armor (U or L), Robes of Enchantment (U or L), the Sword of 4 Winds, the Sword of Fire, an Amulet of Healing, a Dragon Kite, a Garland of Roses (like the Amulet of Healing), a Cloak of Perception, an Estoc de Olivia, a Filcher's Band, or a Thieves Dagger.
The one I'm after is the Gem of Power (+2 armor class, +10 Power Strike, +5% to all resistance) for Zarax. The bonus to Power Strike is obviously very welcome for a Fighter that has the Power Strike Skill, and makes use of the Berserk ability. The Hoarder Slime is one of the rare, and relatively easiest, opportunities for me to get the Gem of Power, so I scum-save until I get it.
Note that cherry-picking for a specific item can take some time, and frustration in some instances. But if a specific item fits better into your overall character design plans than others, it is well worth it to exercise patience and get it while you can, especially when you make your way to the later stages of the game.
I follow the rest of the circular hallway through to its end.
Flying Snake and Rapax Ghosts
Now I begin to explore the rooms of the northwest corner of the dungeon. The room east of the teleporter at *4* has a few Hunter Quarrels, as well as a Cleaver, which is an ingredient for the Beastslayer Axe.
The room west of *4* has a Flying Snake, which can cause poisoning, hit point drain, or stamina drain, with its attacks. It is also helped out by a pair of Rapax Ghosts. But I don't have much trouble as they can only come to me one at a time through the door.
The room itself has a Spike Spear (+2 initiative, 9-17 damage, +10 Polearm skill, 10% drain stamina), as well as a Filcher's Band (+1 armor class, +15 pickpocket).
Rapax Ghosts
Now I start to explore the large series of rooms just east of center on the map. The 'h' a little south of #8 has a hidden bunch of Mystic Arrows (35% paralyze, 5% critical strike), which are the best arrows in the game. My Bard saves them for the last parts of the game.
As I progress through the rooms, I run into two Rapax Ghosts but I am able to dispatch them quickly.
Once I'm done here, I make my way towards the teleporter at *o* to leave the Dungeon.
Now I head for the Umpani Camp, which is north of the Northern Wilderness.


