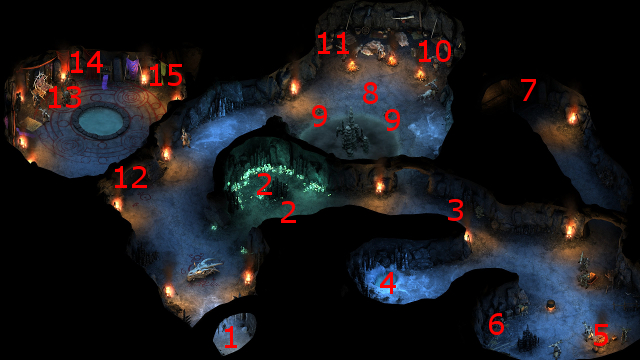
An ice chute is here. If you wish to take advantage of it, then you will have to expend a Rope and Grappling Hook during a scripted interaction. You will notice a gleaming light on a ledge during the scripted interaction.
If you attempt the to reach the ledge, the stalagmite holding the Rope and Grappling Hook will start to give. You can assign a character with a Dexterity of at least 16 to climb back up and secure the Rope and Grappling Hook. If you fail to make the Dexterity check, or don't even bother attempting it while trying to reach the ledge a second time, the party will fall down and sustain injuries that will linger until the party rests. If you make the Dexterity check and reach the ledge, you'll acquire a Rod called the Golden Gaze and an Emerald.
You can also simply climb down, in which case everybody should get down smoothly without any injuries as long as they have enough ranks in the Athletics skill.
If you simply climbed down, or made the Dexterity check to secure the Rope and Grappling Hook, the ice chute will then serve as a way to reach the Lower Caves at #32.
Here is the Eating Room. There will be a significant number of Crag Ogres to fight here.
There will be random food items in these containers.
These stairs will lead down the the Lower Caves at #13.
There will a large horde of both Crag Ogres and Winter Wolves here. The Crag Ogres will leave behind random items when killed, while the Winter Wolves will leave behind Wolf Hides.
Here will find Matron Beregan, who is central to The Ogre Matron quest.
This locked chest will have a Belt of Bountiful Healing and Archer's Gloves. Note that if you're on friendly terms with the Crag Ogres here, they will go hostile if they catch you trying to loot the chest.
These stairs lead to the Lower Level at #35.
These stairs lead back up to the Upper Caves at #8.
This chest will have random creature parts in it.
The crate here will have random potions in it.
This chest will have random creature parts and Camping Supplies in it.
Here is a part of the wall from which you can use a Hammer and Chisel to extract at least 7 Velunes, and possibly a couple of Topazes if your Watcher character can make a Dexterity check of 16.
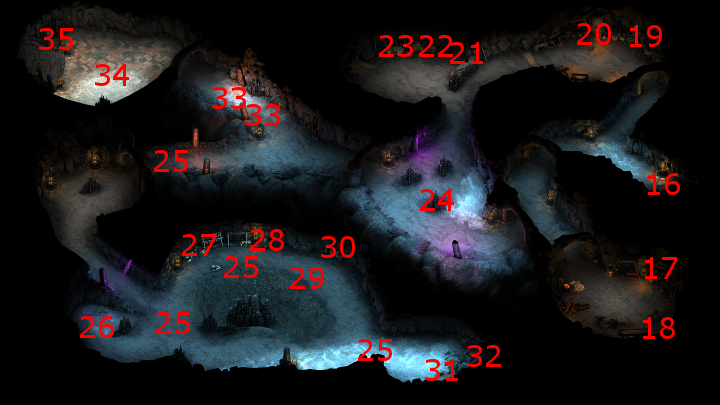
There will likewise be a very large force of Crag Ogres and Winter Wolves here as well.
There will forces of Lagufaeth at these points. Their chief danger is their ability to paralyze their targets with their projectile attacks. Any spells or buffs that raise Fortitude defense is welcome in such situations. Lagufaeth leave behind Lagufaeth Daggers, Lagufaeth Spears and Lagufaeth Livers when killed.
These spots will also often be around corpses that can be looted for minor random items.
There will be a corpse here that can only be discovered while in scouting mode. It can be looted for the Wayfarer's Hide, along with other random items such as potions, gems, and coins.
If you used a Rope and Grappling Hook at the ice chute at #5 of the Upper Level, it will create a way to come down to here at the Lower Level. Conversely, you can now also climb up to reach #5 of the Upper Level.
There will be cold traps at these spots.
There will be a couple of Greater Ice Blights and several Ice Blights here. They will leave behind Primal Winds and Primal Waters when killed.
Sorcerer's
Place is a project run entirely by fans and for fans. Maintaining
Sorcerer's Place and a stable environment for all our hosted sites requires a substantial amount of our time and funds on a regular basis, so please consider supporting us to keep the site up & running smoothly. Thank you!
Supporting Sorcerer's Place
Has Sorcerer's Place been useful? If you'd like to show your appreciation
for our hard work on the site, and help us pay the bills the site generates
every month, please consider helping support SP.
Thank you!