-

- Forums
- Chatrooms
- Gallery
- Gameplay Videos
- Upload
- Articles
- Mod Reviews
- Shop SP: Games, Movies, Books
CHAPTER 1 | CHAPTER 2 | CHAPTER 3 | CHAPTER 4 | CHAPTER 5 | CHAPTER 6 | CHAPTER 7 | CHAPTER 8 | CHAPTER 9 | CHAPTER 10 | |
SARADUSH
Arrival in Saradush
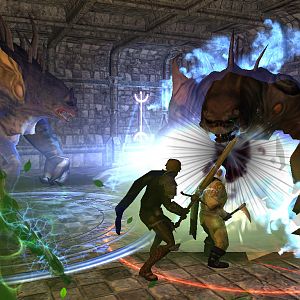
Now the party teleports just in time to stop several Il-Khan Soldiers from slaughtering innocent citizens. The fight is routine enough but as the video shows, the Soldiers are still dangerous enough to oblige my party members to put up defensive resources. Melissan then explains the situation to me.
The video concludes with me fulfilling a side quest. I have Anomen speak to Tizah so that he can use a Resurrection spell to bring Radzek back to life. Everybody in the party gets 1,000xp, and the party gets +1 reputation.
Elven Vagabonds
Now I head towards the north side of Saradush, and intimidate some thugs from bullying some vagabond Elves. I then speak with the Elves about their plight.
I then head south to the Temple, and Sister Farielle agrees to take the Elves in. Each party member gets 3,000xp, and the party gets another +1 to reputation after I pass on the good news.
Tankard Tree
Next I enter the Tankard Tree. I score a little xp and some sellable equipment by standing up for a bar maid against some Il-Khan soldiers.
The barkeep sells quite an assortment of magical weapons. My shopping list included:
I also buy the Boots of Speed. I then have Cespenar merge these with Anomen's Boots of Grounding to produce another pair of Stormlord's Heels (+50% electrical resistance, doubles wearer's footspeed). I want my whole party mobile.
I then speak with a Bhaalspawn named Veikang, the same one who 'teleported' as soon as he saw me in Trademeet. He'd like nothing more than to get his ability back. The solution is simple, to cast the Horror spell on him so that he teleports away from Saradush. Everybody in the party gets 3,000xp.
Arcana Archives
The party now heads for a building a little north of the Tankard Tree. Inside is Lazarus Librarus, who would normally be willing to make his inventory available for sale to me but for the fact that his spellbook has been stolen. He suspects somebody named Hectan to be the thief, and would like me to get it back.
I leave the Archives, and head a little east. I speak with a little boy named Squip. It won't take much (5 gp) to get him to fess up and admit that he stole the book for Hectan.
I then find Hectan at the north end of the Tree Tankard. Hectan wants a scroll of Teleportation in exchange for Lazarus' spellbook.
I then speak with Lazarus again. He gives me the scroll, but warns me that using it will likely be fatal due to the magical shields surrounding Saradush.
I then give the scroll to Hectan in exchange for the spellbook, but also relay the warning. *Evil* The evil party has no problem with not giving the warning and watching him chunk himself after using the scroll.
I then return the spellbook to Lazarus, and everybody in the party gets 3,000xp. Lazarus now opens his store to me. His store includes 2 scrolls for literally every arcane spell available in the game. Also, his store will appear in Amkethran later in the game.
I don't rush to buy everything I might have, because I want to save up gold for other things. But what I did buy at the moment was:
Countess Santele
Now I enter the Saradush Jail, which is towards the northeast corner of the city. I then witness Countess Santele accuse Mateo of letting enemy forces into the city. Captain Samand orders Mateo's arrest, and lets Kiser Jhaeri free. I then speak with Captain Samand, and get his permission to speak with Mateo.
I then head downstairs. Mateo urges me to speak with Countess Santele.
The Countess' house is towards the middle of the city, at the foot of the stairs. She explains that Kiser Jhaeri has kidnapped her son, Ardic, in order to coerce her into falsely testifying against Ardic. She then urges me to speak with Kiser Jhaeri.
Jhaeri's house is towards the southeast corner. He insists that I kill the Wizard named Errard before he lets Ardic free. I speak with the Countess again and she urges me not to kill Errard, but to instead enlist the Wizard's help. This is indeed the recommended path, as killing Errard will make the whole town Militia go hostile.
Errard an be found atop the city walls on the east side. He uses his powers of divination, once I've explained things to him, to discover that Ardic is alive and inside Kiser Jhaeri's home. I then head for its entrance.
Kiser Jhaeri
Now I enter the house itself. Imoen loots the various containers for treasure.
I then head downstairs. Keldorn's True Seeing suffices to keep Kiser and his thugs honest and unable to backstab. A Mage soon shows up, so Jaheira aims an Insect Plague near one of the Thugs so that it spreads to the Mage. This fight proves why Mages aren't completely helpless post-Insect Plague, they can still get off Spell Sequencers and Spell Triggers. Here I got hit with a triple Skull Trap, but managed to survive and bring down the Mage with missile weapons.
Kiser Jhaeri leaves behind a Key, a Shortsword +3, a Dagger +2, a Leather Armor +1, a King's Tear, and the Shakti Figurine (allows a non-Fighter to transform into a Hasted fighter that can dual-wield Shortswords as though specialized in them). Imoen puts this in her quick-item spot, in case I feel like having her go into melee. The King's Tear will also be used in an item upgrade fairly soon.
Imoen checks for traps and loots the containers. A niche at the north side holds the Storm Star Ore, which will be used for an item upgrade.
I use the key to open the door to the west, and find Ardic in the north hallway. Everybody in the party gets 7,000xp.
I then give Countess Santele the good news. Everybody in the party gets 5,000gp. The party also gets 2,000gp.
Cold Mistress
Now I'm ready to find my way to Gromnir. I speak to Sister Farielle in the Temple of Waukeen. Avastrian has little trouble convincing her to give him the key to the old prison of Saradush. In the evil party I have to have Jan do the talking to get it. I also buy a Vial of Elven Holy Water from her, since it will come in handy when I start exploring underground.
For anyone who's still interested in upgrading the Daystar under the Item Upgrade mod, the mod requires Daystar, 4 Scrolls of Protection from Undead, 2 Star Sapphires, 2 Vials of Elven Holy Water, and 15,000gp. The upgrade means that Daystar's bonus damage increases to +8, and the wielder will also enjoy a Protection from Evil effect. If anyone wants the upgrade but without having to lose any Holy Waters with which to weaken Bodhi, Sister Farielle has at least 20 Vials for sale, thus presenting an optimum opportunity during Throne of Bhaal to pursue the upgrade.
Now I head for the old Prison, which is southeast of the Temple. Except I run into a Bhaalspawn who calls herself the Cold Mistress and can cast arcane spells. Jaheira and Anomen cast Death Ward on themselves, since the Cold Mistress has instant death powers. She's easily killed after Keldorn gets rid of her buffs, first with a Dispel Magic, and then with his Carsomyr after she puts up more buffs.
Prison Beneath Saradush
Now I enter the prison. I have Keldorn switch out Carsomyr for Daystar + Holy Buckler of Amaunator +2. This Prison has a lot of Vampires, but it's a simple matter of having Avastrian, Anomen, and Keldorn go around hacking them down while immune to level draining.
As the trio heads north they come across a spirit that holds his head. A Skull is found nearby.
The trio then heads west and south. They come across a hallway that starts from middle-west, and heads east. The spirit appears again in front of the first cell east and holds its neck. The second cell east holds a Necklace.
There will be a door on the south edge of the prison. Here the trio fights Phlydian and a few other Vampires.
Avastrian then heads back to the cell where the spirit had appeared for the second time. He places the Skull and the Necklace in the bedding. The spirit then looks meaningfully at the ground of the cell. That's the cue for Avastrian to use Holy Water. The spirit then leads the party to another cell and opens the door. Inside will be a Bronze Ioun Stone (+1 7th level Mage spell), which Imoen will wear. Everyone in the party also gets 10,000xp.
I'm now ready to head out the south door.
Gromnir's Dungeon
The party descends into Gromnir's personal dungeon for those who await execution. Avastrian speaks briefly with another Bhaalspawn named Asmay Jahag.
I keep going until I see another doorway. The party hangs back. Avastrian opens the door and pokes his head out to set off the alarm and get the guards' attention. He then regroups with the party. The bulk of the dungeon guards will come after me, so Anomen grabs the chance to put a Fire Storm and a Storm of Vengeance over the doorway. The enemies have to come after me through the choke point, and are thus obliged to weaken themselves before getting cut down by my warriors.
I don't show it here but I always pick up their magical weapons, since collectively they'll sell for lots of gold.
The layout is that there's a large room to the west. An extended hallway loops around east of the room. Plenty of prisoner cells adjoin the extended hallway.
Imoen goes into hiding, and then scouts out alarm traps that can't be disarmed. By marking the traps, she allows the party to avoid them and make their way east and then south.
To the west will be more guards, as well as a powerful Mage. I use a tried and true strategy here. Keldorn summons an Astral Deva, and Anomen summons Skeleton Warriors, to force the Mage to expend her spells. She does come forward at some point, but by then her Spell Immunity: Abjuration has worn off. This means Keldorn can hit her with a Dispel Magic, allowing the rest of the party to take her down with ease.
The party then back tracks and then heads west along the north half of the hallway. I kill the lone Thief there, and rescue a prisoner named Vinke.
I then enter the large room to the west, and kill the guards there. Imoen checks for traps and loots the crates. One of the notable items is Captain Fflar's Scabbard, which can be used in an item upgrade.
The party continues to a smaller room to the west. The way down to the Sewers becomes apparent.
Sewers Beneath Saradush
The party descends even further into the Sewers beneath Saradush. I open a secret door to the south. I thereupon encounter several undead monsters, like Shadows, Devil Shades, and Shadow Fiends. They can be taken out in physical combat, although softening them up with a Sunray certainly doesn't hurt either.
There will be scattered at various points soldiers loyal to Yaga-Shura, and perhaps the odd Umber Hulk along the way. They're easy enough to kill in physical combat. I make sure to loot their magical weapons and armor, so I can sell them later.
The fight towards the end is against a few Yaga-Shura soldiers, and a Mage. I use a familiar theme here, having Jaheira aim an Insect Plague off one of the Soldiers so that it spreads to the Mage. Once the Insect Plague wears off, so does the Mage's Spell Immunity: Abjuration. This means Keldorn can bring down the Mage's spell buffs so that she can be killed.
Yaga-Shura Sappers
Now I head towards the central hub of the Sewers. I take a moment to put up a buff or two, and have Keldorn summon an Astral Deva as a rearguard.
I find some sappers loyal to Yaga-Shura trying to breach a way up into the city itself. They soon notice me and become hostile. Thing is they won't be by themselves. Many Shadows and Shadow Fiends are going to join in from all sides. Anomen grabs the opportunity to blanket the central hub with a Fire Storm, so that it will inflict steady damage on Sappers and Shadows alike. Imoen also grabs the opportunity to hit several of the Sappers with her triple shot of Skull Traps, and kills some of them outright. After that it's a matter of killing any who get close, helped along by my Astral Deva.
The party heads back up to Gromnir Il-Khan's dungeon.
Il-Khan Soldiers
Now I make my way through the rooms towards the northwest corner of the duneon. Here's where Imoen shows how effective the Robe of Vecna and the Staff of the Magi can be together. She sneaks into a room, positions herself, and then softens up the enemy with a Cone of Cold. She then switches to her bow, and then her staff, to safely go invisible. In one instance she even got in a second shot with a Skull Trap using the same process. There's nothing to stop her from using this kind of theme over and over again. In any event these tactics suffice to soften up my enemies for my warriors.
Now I head up the stairs, where I have to kill a bunch of Il-Khan Soldiers in view. I let loose immediately. Imoen unleashes her Spell Trigger, Jaheira bounces an Insect Plague off a Soldier so that it spreads to the Mage, and Avastrian casts Slow. After this it's a matter of cutting them down, although a Horrid Wilting from Imoen certainly doesn't hurt either.
Gromnir Il-Khan
I prepare to the max, including having Anomen guzzle a Potion of Agility. The party then goes upstairs, and witnesses an argument between Gromnir Il-Khan and Melissan, who is subsequently led away. Combat naturally ensues. Here's the line up I'm up against:
Phase One
Avastrian casts Spell Immunity: Abjuration on himself in order to keep his buffs up and in place. Keldorn casts True Seeing. Jaheira aims an Insect Plague at Gromnir himself so that it will spread to his Mages. Sarevok steps right up to Berena. He's not as reliant on buffs like other characters, so he's the natural choice to soak Berena's attacks. Anomen casts a Storm of Vengeance right over himself. Imoen retreats and casts Project Image, in case all those spells are needed over the long haul.
Phase Two
Imoen's Image casts Time Stop. The Image then unleashes two Horrid Wiltings that are carefully placed so as to catch as many enemies as possible. The Image then places a Planetar near the Mages in order to keep them occupied.
Phase Three
I have Keldorn charge Halbazzer Drin with his Carsomyr. Karun the Black begins his own Time Stop sequence, but it actually works to my advantage. One of the beauties of the Storm of Vengeance spell is that it continues to inflict damage even while a Time Stop is in progress. In this instance the Storm kills off the weakened Berena Elkan and Ramazith, as well as Las'Shara.
Phase Four
Keldorn kills off Halbazzer Drin. Jaheira summons one of the Elemental Princes. Avastrian uses his Vhailor's Helm to create a Simulacrum. Imoen's Image uses her Spell Trigger, which finishes off Eler Had.
Phase Five
Some of my warriors charge the remaining Il-Khan Archer. The Simulacrum begins an extended sequence whereby it uses its spammed Time Stop scrolls to first bring Gromnir to 'near death' and Slowed down by the Flail of Ages, then to kill Karun the Black, and then to kill the other Il-Khan Battle Mage. Note that these two Mages can prove to be pretty slippery fishes, and can use their illusion powers to hide and then drink Potions of Extra Healing to recoup their health. I want to nail them as soon as possible.
Phase Six
Gromnir can also be really hard to kill, thanks to his powerful attacks and regenerative ability. But now he's been brought to 'near death' and Slowed down by the Flail of Ages, so that party has little trouble surrounding him and finishing him off.
Gromnir leaves behind:
Eler Had leaves behind a Dagger +1 and the Grandmaster's Armor +6 (armor class 1, doubles wearer's foot speed).
Melissan arrives and counsels me to discover Yaga-Shura's weakness.
*Evil* Gromnir Il-Khan
The battle is quite similar for the evil party, but with a few differences. One difference is that I pre-buff Korgan with Protection from Petrification so that he can kill Las'Sharra right away. Another is that I have Jan Jansen pre-buff himself ahead of time with Spell Immunity: Divination. During the battle, he makes frequent use of Mislead so that he can backstab and lay traps on a continual basis.
Now it is time for the party to travel to the North Forest.