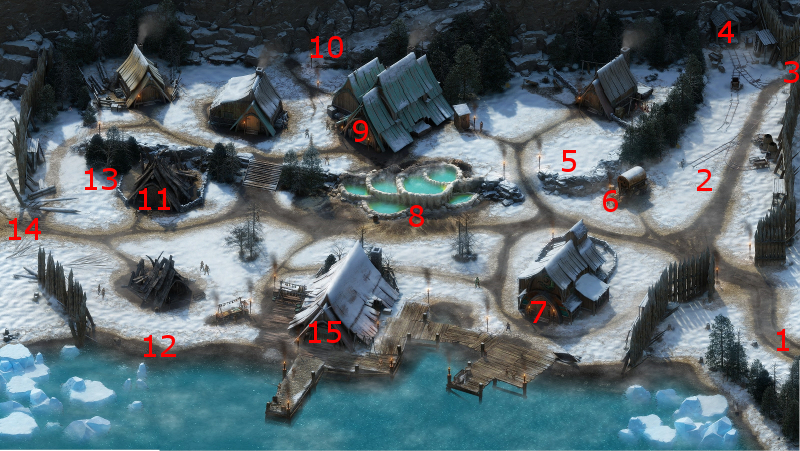
The party will witness Foreman Ismey placing Gamel under arrest for the murder of another miner named Sameth at #3. This event serves as the quest trigger. Aggressive and Diplomatic replies are available during the ensuing conversation with Imsey.
Foreman Imsey's office is at #4, where Gamel will also be held captive. You can question him about the murder accusation, during which Aggressive, Benevolent, Rational and Stoic replies are available at the outset. Another Aggressive reply becomes available later on when he strenuously denies the accusations. He will end up providing another name you'll need to follow up on, Teryc.
You will find Sameth's dead body at #6. Examining the corpse will advance the quest by revealing that he had a yellow power (i.e. sulfur) on his hands.
You will find a Confused Miner at #8, who will drop a relevant clue to the quest by making a vague reference to a crystal.
You will find Teryc at #9. A Stoic reply will be available early in the conversation. You'll gain the most benefit from this conversation for purposes of the quest if you had examined Sameth's body at #6 and come across the Confused Miner at #8 beforehand. Teryc will then reveal that miners who have been digging up sulfur in the east part of the mines have been exhibiting strange behaviour recently. He also mentions that somebody named Cillan maintains the use of Constructs in the east part of the mines.
A corpse at #11 can be looted for the Miner's Note, which provides a possible clue for how to navigate the tunnels at #16.
You will find a few Confused Miners at #14 who do little else besides stand around in a daze. A chest here has a Contract of Sale, which indicates that some Constructs were purchased to assist with the mining operation.
The party will encounter Cillan, and several of her pet Rotting Flesh Constructs at #15. You may be able to get some answers out of her, but she will lose control of herself and attack you just as the conversation ends. The Constructs will leave behind Vessel Flesh when killed. Cillan personally leaves behind:
At #16 is the entrance to the Luminescent Caves. Getting fully through the tunnels requires navigating them during a scripted interaction. If you have a Torch, you can follow the breeze according to a sequence of:
Frequent foes througout the Caves will be Vithracks Luminaries, Vithrack Brutes that can teleport, Radiant Sporelings (enhanced versions of your usual Sporelings), Crystal Eaters and Moon Spiders. The Vithracks will leave behind Vithrack Brains when killed. The Radiant Sporelings will leave behind Sporelings. The Crystal Eaters will leave behind Spider Venom Sacs. The Moon Spiders will leave behind Spear Spider Legs.
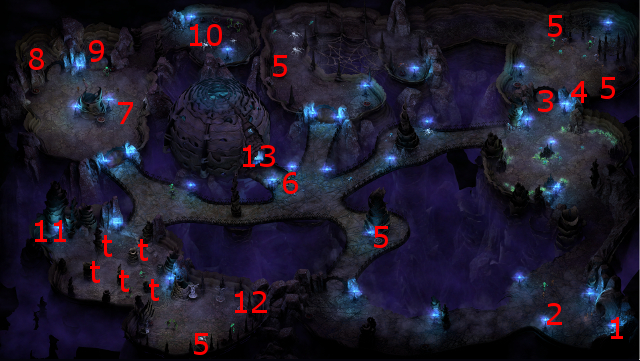
Spots with tripwire traps will be marked with a 't'.
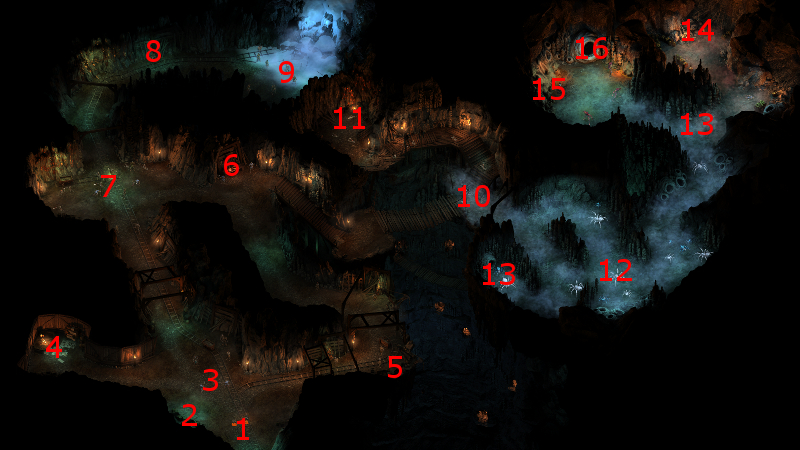
You will encounter a Vithrack Luminary at #2, along with two Miners under its control. There's no getting around killing all three of them. The Luminary will leave behind a Vithrack Brain when killed, while the Miners leave behind Dyrwoodan Clothing.
You will find an imprisoned Vithrack named Terenat at #9. A Benevolent reply is available during the conversation. He will indicate that a monstrosity called a Radiant Spore is responsible for the troubles besetting both the Vithracks in the Luminescent Caves and the Miners above. He will also indicate that you will need to find a resonance crystal to reach the Radiant Spore.
At #12 is a small niche where you will find the Vithrack Crystal, which will open up the entrance to the Vithrack Common House.
At #13 is the entrance to the Vithrack Common House. It is blocked by an energy barrier, but that barrier will dissipate if you approach with the Vithrack Crystal from #12 in your possession.
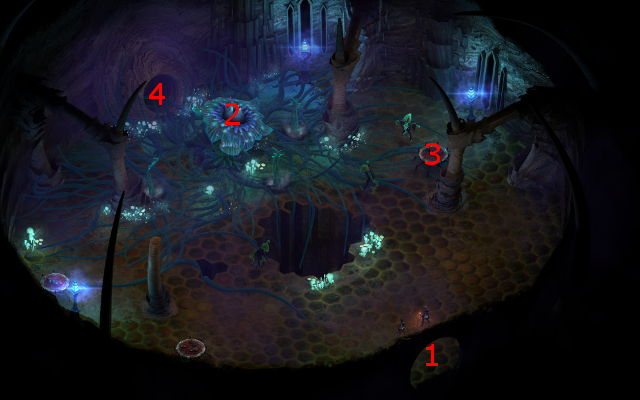
The Radiant Spore will be at #2. There will be some dialogue to begin with. If you can make either a Constitution check of 18, or a Resolve check of 13 followed by a dialogue choice to resist its influence and in turn followed by another Resolve check of 15, then you can sever the Spore's connection to its Vithrack thralls. That leads to the Vithrack fleeing the Common House, which can make the battle signficantly easier since you will only have to face the Spore along with its Tendrils and a few Radiant Sporelings.
If you are unable to make any of the checks that can sever the connection, or choose the attack dialogue option as soon as the Spore speaks to you, then the Vithrack will attack you as well along with the Spore and its Tendrils.
A Prayer Against Treachery spell, or any spells that can raise your Will defense, are highly recommended to avoid your party members become helpless. The Vithrack, if they remained and attacked, will leave behind Vithrack Brains when killed. The Spore, the Sporelings, and the Tendrils, will leave behind Dank Spores and/or Sporelings when killed.
The table at #3 will have a Blunderbuss called the Silver Flash on it.
Clicking on the cave opening at #4 leads to a scripted interaction whereby you can return to the Luminescent Caves at #1 or the Stalwart Mines at #16.
Inform Foreman Imsey of your success. One of the dialogue options at the outset can earn Stoic disposition.
She will look to you for advice on what to do with Gamel. You have three basic options:
Counsel her to punish Gamel. One of the dialogue options to this effect can earn Cruel disposition. This option leads to a minor positive reputation increase with Stalwart Village.
Counsel her to spare Gamel. This option leads lead a minor decrease in reputation with Stalwart Village.
Tell her, "Not my problem." This option has no reputation repercussions.
Foreman Imsey will reward you with 2,000cp, regardless of your choice.
Sorcerer's
Place is a project run entirely by fans and for fans. Maintaining
Sorcerer's Place and a stable environment for all our hosted sites requires a substantial amount of our time and funds on a regular basis, so please consider supporting us to keep the site up & running smoothly. Thank you!
Supporting Sorcerer's Place
Has Sorcerer's Place been useful? If you'd like to show your appreciation
for our hard work on the site, and help us pay the bills the site generates
every month, please consider helping support SP.
Thank you!

 You start off at #1 on the map of the Vithrack Common House.