-

- Forums
- Chatrooms
- Gallery
- Gameplay Videos
- Upload
- Articles
- Mod Reviews
- Shop SP: Games, Movies, Books
|
|
Brecilian Forest | The Camp | Circle Tower | Denerim | The Final Battle | Haven | Landsmeet | Lothering | Orzammar | Ostagar | Redcliffe | Ruined Temple Areas available as Downloadable Content: Honnleath | Return to Ostagar | Warden's Keep |
Sulcher's Pass | Village of Honnleath | Wilhelm's Cellar |
Wilhelm's Cellar
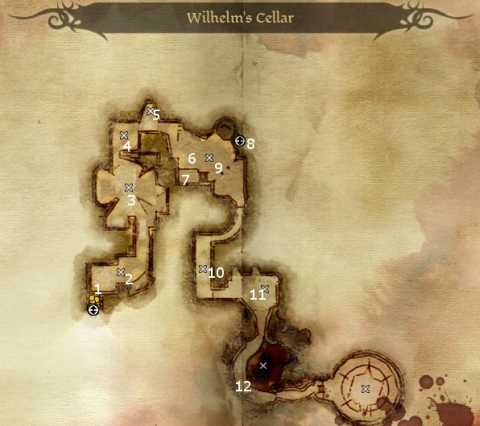
 Here is Wilhelm's Study. You'll get attacked by a Dust Wraith and several Lesser Shades. The Dust Wraith leaves behind the Harvest Festival Ring and a Remarkable Greenstone.
 Here you will find a cat named 'Kitty', that is apparently possessed by a Desire Demon. The Demon is also in control of Matthias' daughter, Amalia. Kitty will propose a deal, you let her take full possession of Amalia, and she'll pose as Amalia long enough for you to get the password from Matthias. How you play this one is up to you. One option is to try and kill Kitty outright. Another is to go along with it, using a Persuade (Lie) check, and then kill her after solving the puzzle. Another is to lure Matthias back to Kitty, resulting in Matthias' death. Another is to take up Kitty on her offer. Note that options involving Matthias' death or leaving Kitty in possession of Amalia will involve losing approval, and sometimes a large hit of approval, from companions such as Alistair, Leliana, and Wynne. Also, if you do want to save Amalia from Kitty, it is better to lie and pretend that you're going to make a deal with Kitty. Provoking Kitty before the magical ward has been broken will result in Kitty taking possession of Amalia and then attacking you. Killing Kitty then will also mean killing Amalia as well.
 If you are going to make a deal with Kitty, or pretend that you are going to make a deal with Kitty, the catch is you have to break the wards holding her prisoner. You'll notice a tiled puzzle floor with fire going from some of the tiles to others. Note that each tile has an arrow pointing in a certain direction. The arrow indicates in which direction it will send fire, that is if the tile is itself connected to a neighbouring tile that is sending fire. Now notice that there are four corners. Two of them have about three censers set about them, while the other two corners have only one censer nearby. Now notice that one of the corners with three censers is where the chain of fire starts. So the puzzle should be apparent. Connect the tiles so that a stream of fire goes from one three-censer corner to the other three-censer corner. To get a sense of this, look at the screenshot provided. Notice how the tiles have been arranged, and all that is left to do is to click on the indicated tile to move it over one, with the result that the stream of fire will travel from one corner to the other.
 Now that you have the proper password, go back to the Golem standing in the middle of the Village of Honnleath. Once you do, the Golem, Shale, becomes a joinable companion. You have the option of either having her join immediately, or having her go back to the Camp.