-

- Forums
- Chatrooms
- Gallery
- Gameplay Videos
- Upload
- Articles
- Mod Reviews
- Shop SP: Games, Movies, Books
|
|
HAVEN APPROACH
Construct Command Word
Once I leave the inside of the Keep, a cutscene ensues whereby Bishop tricks Grobnar into revealing the command word for the Construct. It is this fact that provides an incentive to obtain good influence with Grobnar.
Black Garius and the Shadow Reavers
Leaving for the Approach prompts another cutscene where it becomes apparent that Black Garius has returned from death as the leader of the Shadow Reavers.
Jerro Guardian
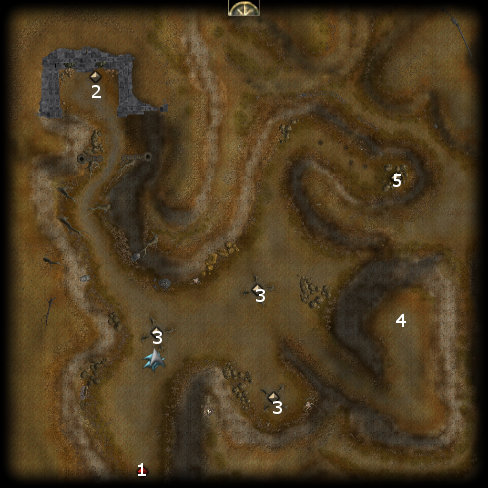
I start off at #1 on the Approach map. Elanee can now access the Elemental Wild Shape ability, and I show how to make the most of it. Valeria and Elanee buff everyone up with Barkskins and Stoneskins. Valeria also adds Greater Magic Weapon for herself and Weapon of Impact for Casavir. Elanee can free cast defensive buffs on herself prior to using Wild Shape, and indeed she adds Bear's Endurance, Cat's Grace, and Premonition for herself.
It is the weapon enhancing buffs that will have to wait until after Elanee uses Wild Shape. She turns herself into an Earth Elemental, which has the greatest attack damage. She then casts an Extended Flame Weapon on everybody, including herself. Valeria also casts another Greater Magic Weapon on Elanee so that her Earth Elemental fists now also have a +3 enhancement bonus to boot. If I were so inclined, Elanee could also cast Storm Avatar on herself in anticipation of a particularly intense battle, making her elemental form extremely powerful. And of course, her Natural Spell feat allows her the option of casting spells while in elemental form.
The foes here include Gargoyles and Shadow Mastiffs. A properly prepared and buffed party should have little trouble taking them down in straight physical combat.
I make my way to the end of the tunnel leading to #2. There will be more Gargoyles to kill along the way. One of them leaves behind a Gargoyle Horn that can be distilled into a Weak Earth Essence.
One of the advantages of having run into Guyven multiple times is that he'll take up residence in Crossroad Keep, and thereafter I can get 100xp anytime I run into an interesting location that he'll want to hear about. The entrance to the Haven itself is one such place.
In front of the entrance is the Jerro Guardian, who explains the three paths that must be taken in order to gain entry into the Haven.
Path of Sight
Now that the Jerro Guardian has explained the Paths to me, there will be Large Fire Elementals scattered throughout the Approach. Be sure to kill all of them, as well as any other monsters that may still be around. Three of the Elementals will each drop a Fiery Heart and a Glowing Fire Essence.
A Brazier will be located at each of the spots marked as #3 on the map. It's a matter of clicking on each one with one of the Fiery Hearts in my inventory, and then killing off the Greater Shadows and Shadow Mastiffs that then attack me. Note how Elanee can get the job done either with offensive spells or the physical attacks of her Earth Elemental Form.
Once I do this at all three braziers, I report my success to the Jerro Guardian and get 1,000xp.
Path of Righteousness
Now I head for the top of a hill at #4. I buff up to the max beyond my usual daily buffs, including an Extended Haste and Mirror Images for Valeria. The reason is that there is a tough fight for me very shortly.
I speak with the Barbarian Shaman, who presents himself as a threat to overrun the lands with a Barbarian Horde. I select the implicitly good choice, which is to let him go.
I get attacked by several Barbarian spirits. I start off by putting up additional defensive resources. Valeria leads off with Greater Invisibility. Elanee now begins to make use of her Storm Avatar spell, which will give her +3d6 electrical damage to her weapon in addition to the +1d8 fire damage that she already put in place beforehand. Casavir activates his Divine Shield. Shandra activates her Parry ability. Neeshka activates the Displacement power from her Robe of Shimmering. The spirits individually can hit for tremendous damage, and it can really add up in a hurry.
Once I'm set up defensively, Valeria casts Firebrand and Elanee casts an Empowered Call Lightning Storm, which in conjunction with the other party members' physical attacks is enough to win the battle.
I inform the Jerro Guardian of my success and get 500xp.
*Evil* Path of Righteousness
The implicitly evil choice is to kill him then and there. I immediately select the dialogue option of how it's good that the Shaman is by himself since that means he'll be easier to kill for it. That dialogue option earns +2 influence with Bishop, but loses -2 influence with Shandra. I would also have lost -2 influence with Casavir had he been present.
And the Shaman is indeed easy to kill since he's by himself and already within arm's reach. He leaves behind behind Eberond's Flail (Flail +2, 14 spell resistance) and the Uthgardt Holy Shield (Heavy Shield, +2 Strength, +2 Taunt, -2 Charisma). I'll just sell both items.
Path of Determination
Now I head close to the sulfur springs that clot the tunnel leading to #5. I choose the response to indicate that I know the geysers ahead are poisonous in order to increase my influence with Elanee.
Valeria commands everyone to stay back, and heads on by herself. Even if she loses all of her hit points, she can get back up and press on. Once I reach #5, I make a Dexterity check to get the Vial of Burning Water. Neeshka is impressed, and I increase my influence with her by +2. Indeed, one of the reasons I brought her to the Haven is that it's filled with opportunities to increase my influence with her.
I inform the Guardian of my success and get 500xp.
*Evil* Zarathos cannot make either the Dexterity or Tumble check. He can still get the Vial after a failed check, but it means he won't gain any influence with Neeshka either.
Shandra's Blood
The Jerro Guardian now informs me that a drop of Jerro blood on the altar is needed to enter the Haven itself. That will be Shandra's cue to oblige, which she will no matter what I say. *Note* Don't worry about losing any equipment she had on her. The joinable companion who will take her place (i.e. Ammon Jerro) will have her equipment in his inventory once Act III starts.
Even so, Valeria chooses the nice dialogue option to increase her influence with Shandra.
*Evil* Shandra's Blood
Zarathos chooses the "hurry up or I'll cut you myself" option in order to lose another -1 influence with Shandra.
The way into Ammon Jerro's Haven is now open.