-

- Forums
- Chatrooms
- Gallery
- Gameplay Videos
- Upload
- Articles
- Mod Reviews
- Shop SP: Games, Movies, Books
|
|
Tavorick Manor

To the Tavorick Estate
Now I bring along Grobnar and Neehska instead. The next few fights will feature plenty of Demons and Devils to fight, and both will often have hefty elemental resistances so Qara and Sand may be less useful than usual. Grobnar's buffs will be useful as always, plus there's a chance to score some more influence with him. Neeshka's sneak attacks will really come in handy, plus her Anagry's Mindmaze will protect her against Charm spells by the Succubi.
I inform Lord Nasher of Aldanon having been kidnapped, for which I get 2,000xp (including the bonuses for keeping Aldenon's house staff alive). He then assigns me the task of protecting Tavorick. The entrance to Tavorick Manor is at #14 on the Blacklake District map.
14th Level
The 2,000xp bonus was enough to bring Valeria and companions to their 14th level of experience. I advanced everyone as a side trip before actually making my way to the Tavorick Estate.
One highlight is Neeshka getting the Improved Evasion ability at her 13th level. The other is Shandra getting the Two-Weapon Defense as a bonus feat on her 14th level as a Fighter.
Tavorick's Shard
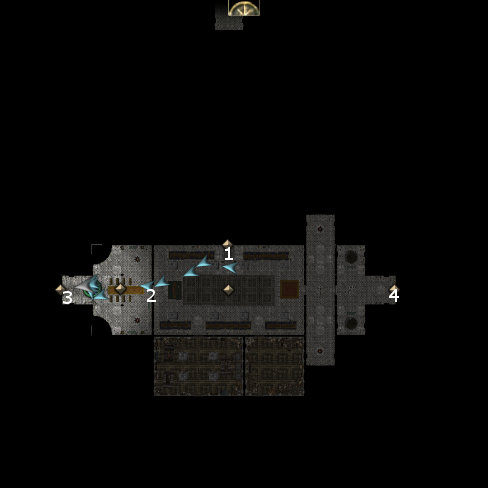
A corner room will have two barrels that contain Blastglobes. I take the opportunity to gain influence with Grobnar by suggesting that they can be used for the defense of the Estate. Not that they actually have to be, I just need to make the dialogue choice to gain the influence. I could actually gain even more influence with Grobnar by trying to pry open the Barrels, but that will cause damage to the party that will handicap me during the coming battles. And I can't rest inside the Tavorick Estate either.
I speak at length with Black Ballard and Lord Tavorick about preparing against the coming attack. As far as I can tell, decisions about deployment and barricades and such don't really have much significance. The coming battles will just be all around chaotic.
There is one exception though. I go up to see Lord Tavorick after telling him to go upstairs. Assigning both Comely Finn and Deorwin Graylocks the task of sticking near Lord Tavorick and defending him will significantly improve the noble's chances of surviving. And there's a good xp bonus for keeping Lord Tavorick alive.
Defending Lord Tavorick
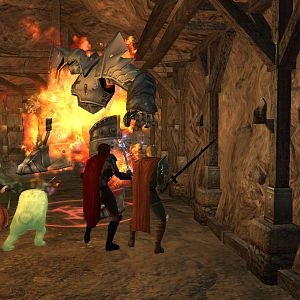
The fight begins once I head downstairs. Fire Mephits, Succubi and Erinyes are going to come in multiple waves. My overriding objective is to win the next series of battles with Lord Tavorick and all of Black Ballard's squad still alive at the end. Grobnar uses Cure Critical Wounds on Wetherly, while Casavir uses his Lay on Hands on Guff, in order to bring their hit points back up. After that, Grobnar looks for opportunities to catch enough enemies with his Curse Song, and keeps an eye out for when he needs to use Cure Critical Wounds for any of Black Ballard's squad members. If any party members are themselves getting low on hit points, they'll use a cure wounds potion on themselves. I want to save Grobnar's healing spells for when a member of the squad needs it. The rest of the party is hacking away up close at the Mephits and Fiends. Note that Qara would not have been ideal for this situation, as the Mephits and Fiends have various elemental resistances or even immunities that can dent her effectiveness. Grobnar's Curse Song by comparison will still have full effect, and he brings the useful Cure Critical Wound spell as well.
I hear a scream from upstairs, which means I need to return to the upper floor. The party charges in and kills off the Mephits. Lord Tavorick gives me the Tavorick Family Crypt Key.
I return back down, and this time have to lead a break for #2 on the main floor map. Note also that at one point the Erinyes or Succubi managed to Charm Shandra, which means other party members will attack Shandra. The solution is simple, issue a 'follow me' command and keep the party away from Shandra until the Charm spell wears off. I take the time to loot the dead bodies I've left behind while waiting for the Charm effect to wear off. Once the Charm does wear off, I have wounded party members gulp down multiple healing potions in order to bring their hit points back up.
The door at #2 requires the Tavorick Family Crypt Key to open.
Qaggoth-yeg
Once across the door, I have to fight a Succubus and a few more Fire Mephits and Fiends. The party continues on to #3.
Now I have one last battle on my hands. A Hezrou demon named Qaggoth-yeg arrives leading more Fire Mephits, plus a Succubus and an Erinyes. I immediately pause and designate Casavir to charge right in, alongside Valeria with her sneak attacks and holy damage. She then casts Haste on the party with the intention of bringing the Hezrou and his servants down as quickly as possible. The day is soon won, but then Lord Tavorick informs me that the demons' master is likely making a move towards Melia, who is in the Moonstone Mask.
The fiends on this level will have left behind plenty of Demon's Blood, Devil's Blood, and Fire Mephit Hides, all of which can be distilled into crafting essences. I collect all the treasure I can on the way out, the more I sell the quicker I can afford some items that I'll soon want to purchase. I also get 1,000xp for keeping all of Black Ballard's squad alive.
Melia's Death
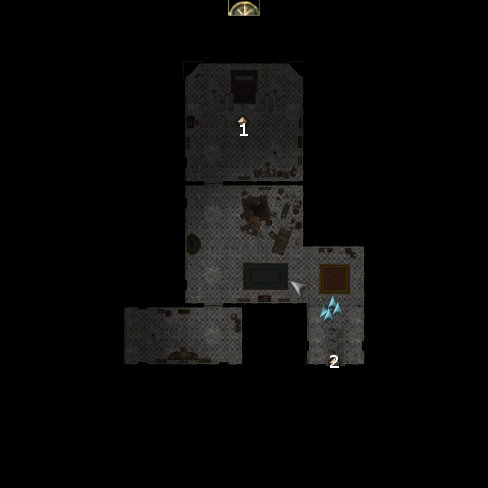
Now I head over to the Moonstone Mask, and up the stairs to its second level. It is more of the same. Grobnar picks his spot for a well placed Curse Song, while the rest hack down the Mephits and Fiends.
I enter one of the side rooms. The warlock has apparently killed Melia and taken the shard she was carrying. He summons two Nessian Warhounds, which are like uber-Hell Hounds. They can breathe fire in a cone, and their bite attacks not only inflict a lot of physical damage but also extra fire damage to boot. Grobnar and Valeria defend themselves with Greater Invisibility, while Neeshka activates her Robe of Scintillating Colors. Neeshka takes a risky decision by positioning herself behind the Hounds to look for sneak attacks. It's only a matter of time before I wear them down.
It is now time to take action against the Master of the Fifth Tower.