Dragon Age logo

BioWare


Dragon Age: Origins Online Walkthrough by David Milward


INTRODUCTION  |  GETTING STARTED  |  NPCs  |  ORIGINS  |  RECIPES |  ITEMS   
Areas in the original game:  
Brecilian Forest  |  The Camp  |  Circle Tower  |  Denerim  |  The Final Battle  |  Haven  |  Landsmeet  |  Lothering  |  Orzammar  |  Ostagar  |  Redcliffe  |  Ruined Temple  
Areas available as Downloadable Content:  
Honnleath  |  Return to Ostagar  |  Warden's Keep 
About the Walkthrough  |  About the Maps  |  About the Author  |  About Playing the Game  |  Where to Begin
Disable all ads!

Brecilian Forest: 
Dalish Camp  |  East Brecilian Forest  |  Brecilian Ruins, Lower Level  |  Brecilian Ruins, Upper Level  |  Brecilian Ruins, Werewolf Lair  |  West Brecilian Forest  

Brecilian Ruins - Werewolf Lair

Brecilian Ruins - Werewolf Lair

  1. Here is the way back to the Brecilian Ruins - Upper Level. Once here, you'll notice a few Devoured Corpses from whom you can get Corpse Galls that will be significant when you travel to the city of Denerim.

  2. When you open the door to this room, you'll get swarmed by Werewolves, including Shadow Wolves than can go invisible and then sneak in for a surprise attack. Try to set up a crowd control spell or two to keep as many of the Werewolves as you can on the other side of the door. Then send offensive spells through the door while mopping up anything that happens to come through. About the room you'll find chests with various random items, and the odd Leg Hold Trap.

  3. Here is where you'll run into Gatekeeper and a few other Werewolves. He offers a chance to parley on behalf of the Lady of the Forest. If you refuse, a lot of werewolves are going to swarm you from the nearby rooms. If you are going to go about things this way, keep in mind that this can be a tough fight even for high level parties, partly because of the sheer numbers, and partly because your placement is such that you can't find a safe spot to prevent getting swarmed from all sides.

    If however you are agreeable to a parley, Gatekeeper will bring you to the Lady of the Forest at #8.

    Keep in mind that the plot line for this area can take you straight to a resolution of the conflict between the Elves and the Werewolves, and an impromptu departure from this area. It is always open to you to come back here and explore this area more thoroughly.

  4. Here you'll a few containers with random items in them.

  5. Here you'll find a container with a random item, as well as a Scroll of Banastor that is part of a quest on behalf of the Mage's Collective.

  6. Here is a chest with a random item. There is also a Glass Phylactery here. Take it, and you'll be forced to battle another Revenant. Once it falls, it leaves behind a Scrap of Paper that adds a Codex Entry, making it clear that this is part of a larger quest to hunt down several Revenants as punishment.

  7. Here you'll find a couple of containers with random items in them.

  8. Lady of the Forest
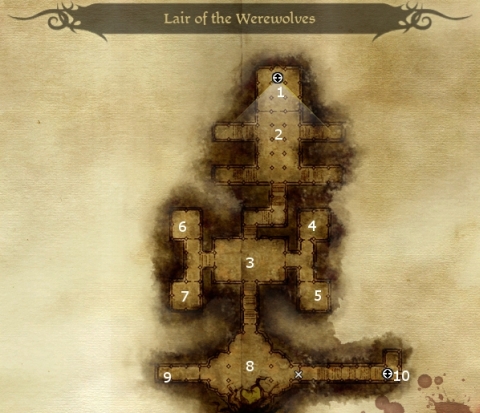
Here is where you'll meet the Lady of the Forest if you agree to a parley. She provides some info on how the Werewolf curse came to be, and Zathrian's role in it. She wants you to try and persuade Zathrian to end it.

    If you want to try and kill her here and now, she'll transform into Witherfang then and there. She and the remaining Werewolves will then attack you en masse. This can be a difficult fight, even for high level parties, because the sheer numbers and your location make getting swarmed from all sides inevitable. Witherfang is also capable of an Overwhelm attack that is pretty much certain death.

    Whatever you want to do, it is advisable to at least for now fall in with her request to talk to Zathrian. Proceed through the door at #10. You will find Zathrian a short ways ahead. Speak to him, and one thing is inevitable, a three way meeting between yourselves, Zathrian, and the Lady of the Forest. The Lady will plead with him to end his curse, but nothing she or you can say will persuade him to do it. You will then be faced with a fundamental choice: 1) Side with Zathrian against the Lady and the Werewolves 2) Side with the Lady and the Werewolves against Zathrian.

    If you side with Zathrian, he will also summon Greater Shades and Wild Sylvans to your aid, which makes this preferable to attacking Witherfang at the first opportunity. You're still going to get swarmed, so come prepared with powers for this, like Captivating Song, Waking Nightmare, Sleep, etc. When you win, you can loot Witherfang's corpse for the Heart of Witherfang. Zathrian will also pledge the allegiance of the Dalish to the upcoming war against the Darkspawn. He will also give you Griffon's Helmet, and the Griffon's Beak (Silverite) as a reward. Together, these form an item set whose bonus is an immunity to getting flanked. Zathrian will also be an ally that appears during the end fight. Your more good aligned party members will disapprove of this though.

    If you side with the Lady and the Werewolves against Zathrian, you'll not only have to fight against Zathrian, who is a powerful mage, but also against several Greater Shades and Wild Sylvans. Witherfang and the Werewolves will also be under a paralysis effect when this fight starts. If Alistair is in the party, he can make things much easier by using Cleanse Area to remove the paralysis effect. Witherfang and the Werewolves can then join the fight. If you don't have this option though, I recommend finding a corner to put your backs to, in order to avoid getting swarmed and minimize the number of attacks against you. Have your tanks hold the front, and your spellcasters and archers go to work from behind. When you win, Zathrian will then be agreeable to ending the curse, though this means the end of his life as well. The Lady disappears, and the Werewolves revert to human form. When the former Werewolves express their thanks, you have the option of pressing for a reward. This will get you Swiftrunner's Shield (Whitewood). Back in the Dalish camp, Layana as the new Keeper will also pledge the allegiance of the Dalish to your war against the Darkspawn. If you head back towards the West Brecilian Forest, Panowen and a few other Elven Hunters will want to know where the Werewolves have gone, with a view towards tracking them and killing them. If you relate the truth, they will attack you. This is not a particularly difficult fight, and they won't drop anything notable either. Alternatively, you can Persuade (lie) Panowen that the Werewolves have slunk off elsewhere. She'll then leave peacefully and give you the Silverleaf.

    Attacking the DalishAnother alternative is for you to persuade the Lady to help you attack Zathrian and the Dalish. The idea here is that you can get an army of Werewolves on your side for your confrontation with the Darkspawn. This takes the maximum Coercion skill rank to pull off though. If you succeed, the game takes you straight back to the Dalish Camp. The Lady and Zathrian have words with each other, but it all comes down to one thing. The Lady transforms into Witherfang, and combat begins. Zathrian will be conveniently very close to your party, so by all means go for him first and take him out as quickly as you can to minimize his spellcasting. Let the Werewolves go to work on the surrounding Elves. Once the fighting is done, the alliance is cemented, and the Lady and Swiftrunner will pledge their allegiance to you. Zathrian's body can be looted for the Staff of the Magister (Silverite) and the Keeper's Ring. Varathorn's body cane be looted for the Varathorn's Dar'Misu (Veridium) and the Elfrope. If you head back towards the West Brecilian Forest, you'll get attacked by Panowen and a few other Elven Hunters. This is not a particularly difficult fight, and they won't drop anything notable either. You can also persuade Panowen that the end of the Dalish Clan was Zathrian's fault. If you do, Panowen will give you Keeper's Ring.

    As an aside, once the conflict between the Dalish and the Werewolves is resolved, you can come back here and explore further. In this room are two sarcophagi with random items.

  9. Here is a pile of rubble with a random item.

  10. Here is a treasure pile with a random item in it. Here is also a doorway that leads to the Brecilian Ruins - Upper Level at #3.


Amazon.com
Amazon.ca
Amazon.co.uk
Sorcerer's Place is a project run entirely by fans and for fans. Maintaining Sorcerer's Place and a stable environment for all our hosted sites requires a substantial amount of our time and funds on a regular basis, so please consider supporting us to keep the site up & running smoothly. Thank you!

Disable all ads!