Dragon Age logo

BioWare


Dragon Age: Origins Online Walkthrough by David Milward


INTRODUCTION  |  GETTING STARTED  |  NPCs  |  ORIGINS  |  RECIPES |  ITEMS   
Areas in the original game:  
Brecilian Forest  |  The Camp  |  Circle Tower  |  Denerim  |  The Final Battle  |  Haven  |  Landsmeet  |  Lothering  |  Orzammar  |  Ostagar  |  Redcliffe  |  Ruined Temple  
Areas available as Downloadable Content:  
Honnleath  |  Return to Ostagar  |  Warden's Keep 
About the Walkthrough  |  About the Maps  |  About the Author  |  About Playing the Game  |  Where to Begin
Disable all ads!

Circle Tower: 
Apprentices' Quarters  |  Burning Tower  |  Darkspawn Invasion  |  Great Hall  |  Harrowing Chamber  |  Lake Calenhad Docks  |  Mages Asunder  |  The Raw Fade  |  Senior Mage Quarters  |  Templar Quarters  |  Templars' Nightmare  |  Weisshaupt  
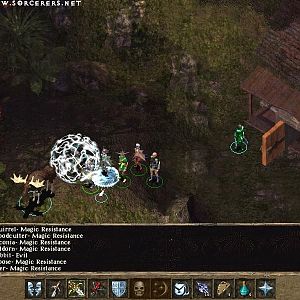
Mages Asunder

Mages Asunder

  1. Here is where you start out, just a little to the north is a Fade Pedestal that you can use to move to another part of the Fade. Fighting Mages will be a common thing in this part. If you have a quick area effect spell like Fireball, or it's available through the Burning Man form, get the jump on them with that. If you're a Fighter or Rogue type, you can try sneaking up on them with the Mouse form and then revert back once you're in melee range.

  2. Here is a Font of Strength that will give your character a permanent +1 to Strength.

  3. More Mages in this room. There is an Essence of Magic here that will give your character a +1 to Constitution, but you need the Spirit form to be able to click on it. There will also be a paper that gives you the Codex entry for 'History of the Circle'.

  4. Here you'll have to fight 4 Lesser Rage Demons. They come in separate pairs of two, so be careful not to expend all of your resources at once.

  5. These stairs connect to the stairs at #6.

  6. Golem
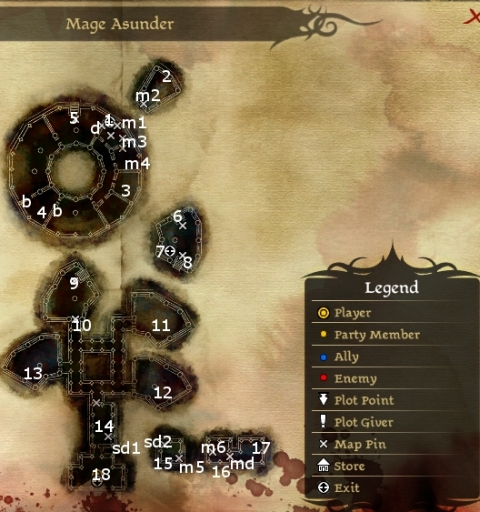
Here you'll have to fight the Cursed Dreamer, 2 Chantry Priests, and 2 Stone Golems. If you defeat them, the Cursed Dreamer is then willing to share with you knowledge of how to transform into the Stone Golem form that will allow you to open massive doors.

  7. Here is a Fade Pedestal that allows you to travel to another part of the Fade.

  8. These stairs connect to the stairs at #9.

  9. Here you'll have to fight a couple of Mages and a Golem.

  10. Past this door you'll have to fight a couple of Chantry Priests. You will also find the odd Stone Golem wandering around the halls to the south.

  11. Here you'll have to fight a few Mages and Chantry Priests. In this room you'll find a Codex entry for 'Creation Magic."

  12. This room has 3 Stone Golems. There is also a Font of Strength in here that will give your character a permanent +1 to Strength.

  13. Here is a Chantry Priest and 2 Stone Golems. There is also in here an Essence of Will that will give your character a permanent +1 to Willpower.

  14. Here you'll have to fight a pair of Arcane Horrors.

  15. Here is another Stone Golem. There is also in here an Essence of Dexterity that will give your character a permanent +1 to Dexterity.

  16. Here are 2 Stone Golems. There is also an Essence of Cunning here that will give your character a permanent +1 to Cunning.

  17. Here is an Essence of Constitution, and an Essence of Dexterity, that will each give your character +1 bonuses to Constitution and Dexterity respectively.

  18. SlavrenHere is one of the servitor demons that you must defeat to reach the Sloth Demon, Slavren, a Hunger Demon. Once he's defeated, there will be a Fade Pedestal here that allows you to travel to another part of the Fade.


Amazon.com
Amazon.ca
Amazon.co.uk
Sorcerer's Place is a project run entirely by fans and for fans. Maintaining Sorcerer's Place and a stable environment for all our hosted sites requires a substantial amount of our time and funds on a regular basis, so please consider supporting us to keep the site up & running smoothly. Thank you!

Disable all ads!