Dragon Age logo

BioWare


Dragon Age: Origins Online Walkthrough by David Milward


INTRODUCTION  |  GETTING STARTED  |  NPCs  |  ORIGINS  |  RECIPES |  ITEMS   
Areas in the original game:  
Brecilian Forest  |  The Camp  |  Circle Tower  |  Denerim  |  The Final Battle  |  Haven  |  Landsmeet  |  Lothering  |  Orzammar  |  Ostagar  |  Redcliffe  |  Ruined Temple  
Areas available as Downloadable Content:  
Honnleath  |  Return to Ostagar  |  Warden's Keep 
About the Walkthrough  |  About the Maps  |  About the Author  |  About Playing the Game  |  Where to Begin
Disable all ads!

Ostagar: 
Korcari Wilds  |  Ostagar  |  Ostagar - The Battle  |  Tower of Ishal - First Floor  |  Tower of Ishal - Second Floor  |  Tower of Ishal - Third Floor  |  Tower of Ishal - Fourth Floor  

Tower of Ishal - Second Floor

Tower of Ishal - Second Floor

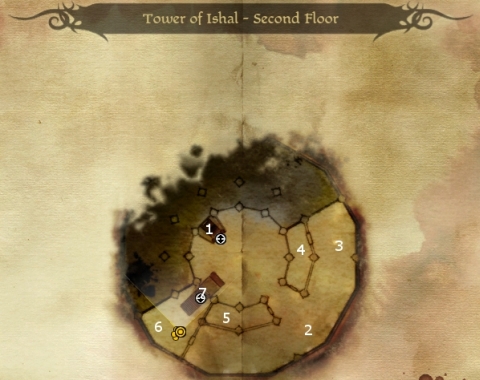
  1. Here is the stairs down to the Tower of Ishal - First Floor.

  2. Around here, there are a lot of Hurlock and Genlock soldiers, and also quite a few Genlock Archers around the bend to the west. The drawing out technique should work to at least get rid of the foot soldiers. Once they're gone, if you have a mage, you can then hit the Archers with an area effect spells. If you don't, you can try nailing them with the Ballistas that are nearby.

  3. Here you'll find a book that gives you the journal entry for History of the Chantry: Part I.

  4. A crate in this room has a random item.

  5. Crates in his room have random items.

  6. Again, the Darkspawn will be packed into this small room, so if you have area-effect spells, use them.

  7. Here is the stairs up to the Tower of Ishal - Third Floor.


Amazon.com
Amazon.ca
Amazon.co.uk
Sorcerer's Place is a project run entirely by fans and for fans. Maintaining Sorcerer's Place and a stable environment for all our hosted sites requires a substantial amount of our time and funds on a regular basis, so please consider supporting us to keep the site up & running smoothly. Thank you!

Disable all ads!