-

- Forums
- Chatrooms
- Gallery
- Gameplay Videos
- Upload
- Articles
- Mod Reviews
- Shop SP: Games, Movies, Books
|
|
Brecilian Forest | The Camp | Circle Tower | Denerim | The Final Battle | Haven | Landsmeet | Lothering | Orzammar | Ostagar | Redcliffe | Ruined Temple Areas available as Downloadable Content: Honnleath | Return to Ostagar | Warden's Keep |
Redcliffe Castle - Main Floor
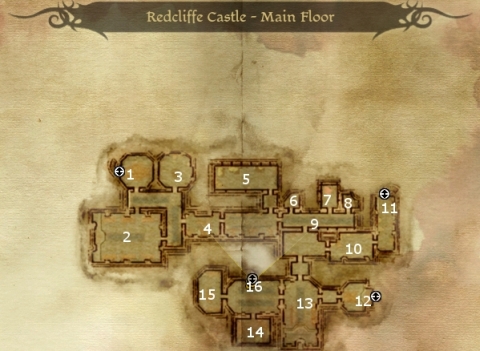
 Here are more undead for you to fight. In these kinds of battles, a commendable strategy is to use a doorway as a choke point where you can plent crowd-control spells (e.g. Glyph of Repulsion, Earthquake) and then shower the room with area-of-effect or storm spells. Then let them come to you singly or a few at a time.
 Here is the Smith's daughter, Valena. If Owen has you a quest to look for her, telling her to get back through the way that you've cleared out should be sufficient to complete the quest. Then make your way back to Owen for your reward. A nearby chest has a random item.
 When you stride into this hall, it becomes apparent that Connor Guerrin is possessed by a Demon from the Fade. Connor uses his powers to oblige the nearby guards and Bann Teagan to attack you. Once the fight is finished, both Bann Teagan and Isolde want to find a solution, preferably without killing Connor. If you opened the gate in the Courtyard outside, Ser Perth will help you in this fight if you told him to help you.
 Another solution is to have Bann Teagan fetch Jowan from the Dungeon. Jowan can cast a Blood Magic ritual that will send a Mage into the Fade to pursue the Demon possessing Connor. The problem is that this requires somebody to sacrifice all of his or her life force. As it turns out, Isolde is the willing volunteer.


