Dragon Age logo

BioWare


Dragon Age: Origins Online Walkthrough by David Milward


INTRODUCTION  |  GETTING STARTED  |  NPCs  |  ORIGINS  |  RECIPES |  ITEMS   
Areas in the original game:  
Brecilian Forest  |  The Camp  |  Circle Tower  |  Denerim  |  The Final Battle  |  Haven  |  Landsmeet  |  Lothering  |  Orzammar  |  Ostagar  |  Redcliffe  |  Ruined Temple  
Areas available as Downloadable Content:  
Honnleath  |  Return to Ostagar  |  Warden's Keep 
About the Walkthrough  |  About the Maps  |  About the Author  |  About Playing the Game  |  Where to Begin
Disable all ads!

Redcliffe: 
Redcliffe Village  |  Redcliffe Castle - Basement  |  Redcliffe Castle - Courtyard  |  Redcliffe Castle - Main Floor  |  Redcliffe Castle - Upper Floor  |  Redcliffe Village - After the Battle  |  The Fade  |  Village Chantry  

Redcliffe Village - Post Battle

Redcliffe Village - Post Battle

This is Redcliffe after the battle with the undead. If you left the town without helping, it will now be only a ghost town save for Bann Teagan inside the Chantry, and possibly a despondent merchant without any goods to sell. If you did save Redcliffe, much will be the same as before, subject to certain individuals still being alive (e.g. Lloyd must still be alive if he is to still run the tavern). There will however be new additions to the town, which are noted below.

  1. Here is the entrance to the Village Chantry. There are now two noticeable differences.

    One is that you will find a representative of the Blackstone Irregulars here. His quest is for you to pass Letters of Appreciation on to various Hooded Couriers in the City of Denerim. The Hooded Couriers can be found at locations marked 'hc' on the maps of the Market District, The Pearl, the Dark Alley, the Rundown Back Street, and the Elven Alienage. Note that the Elven Alienage will not be available until much later in the game, after you've completed all of the Grey Warden treaty missions.

    Another one is that Sister Farrah will run a Chanter's Board just outside the Chantry. The available quests are:

    Caravan Down: Taking this quest on will make an area labelled 'Caravan' show up on your World Map. Travel to it, kill the Darkspawn that you find there, and then report back to Sister Farrah for your reward. Be warned that the Darkspawn group will include two Genlock Emissaries.

    Brothers and Sisters - The quest is to discover the fate of the Easthill Company. This makes a place labelled 'Battlefield' available on your World Map. When you go there, a bloody corpse will yield a Soldier's Diary that makes it apparent that they were all slaughtered by Darkspawn. As you investigate the area, and the various sacks for random items, you'll get attacked by 2 packs of Wolves, and then an enormous Bear. Report back to Sister Farrah for your reward.

    Desperate Haven: Help rescue a group of refugees from a band of Darkspawn. An area labelled "Refugees" will appear on your World Map. When you go there, you'll notice two distinct waves of Darkspawn. One on the right, and one on the left that is lead by a Hurlock Emissary. You want to waste your way through the troops as quickly as you can, so first set things up with crowd-control spells that are meant to keep the Darkspawn from swarming you en masse. Now be generous in pelting them with area-effect or storm spells. Once the ranks have thinned enough, go straight for the Emissary and take him out as quickly as you can since he can pelt you from afar with his magic staff.

    Skin Deep: Bring in as many Corpse Galls as you can to the Chantry for study. These can be found among the undead that you will frequently encounter throughout the game.

    Unintended Consequences: For this quest to be available, you must first have freed the Trickster Whim as part of the Summoning Sciences quest in the Circle Tower. After that, you'll get this quest to track down the Trickster Whim and kill it, since it is preying on travellers along trade routes. Heading for Denerim usually works to bring out an encounter with the Trickster Whim and his servitor clones. The Trickster Whim himself will leave behind the Magus War Boots (Drakeskin). Report back to Sister Farrah for your reward.

  2. Here you will find a representative of the Mage's Collective. The quests that are available are:

    Gift of Silence: Deliver 10 Lyrium potions to Ser Harrith.

    Scrolls of Banastor: Bring 5 Scrolls of Banastor to the Collective for further study. Two can be found during the Circle Tower quest. Another two can be found in the Ruined Temple. One can be found in the Werewolf Lair at #5. Once you've collected all 5 scrolls, bring them back to a Mage's Collective representative for 5 gp.

  3. Here is the Blacksmith shop. Owen will be here, and if you rescued his daughter he'll still sell the same goods as he did before the battle started. There is a remarkable exception though. Remember that he will still hold you to your promise to look for his missing daughter. Once you do rescue his daughter, he will sell a much better selection of goods, including the recipe for Poisoned Caltrop, as well as armor and weapons made from high-grade materials such as Red Steel, Silverite, and Dragonbone. Some of his more notable wares include:

    Pyromancer's Brand (Grey Iron)
    Boots of Diligence (Silverite), which is part of the Armor of Diligence item set
    Warpaint of the West Hills
    Expert Flame Rune
    Expert Frost Rune
    Grandmaster Hale Rune
    Expert Silverite Rune

    However, if you resolved the Connor situation without ever encountering Valena, then Valena will be deemed missing and dead. When you bring the bad news back to Owen, he'll end up hanging himself afterwards. When you come back here after the suicide, it will be a different blacksmith instead of Owen. There are two perks to this route. One is that you can Persuade (Lie) to the new Blacksmith and claim that you were a relative of Owen's. This will result in the blacksmith giving you the Faulty Amulet. Second, the new blacksmith will have the Far Song (Dragonthorn) in his inventory, which is easily the best bow in the game. I personally didn't go this route when I was a good guy, because I wanted to rescue Valena and there's still decent enough bows out there. It's up to you.

  4. Here is the Tavern. If Lloyd is still alive after the battle, he'll offer Lloyd's Magic Ring in gratitude.

  5. Isolde
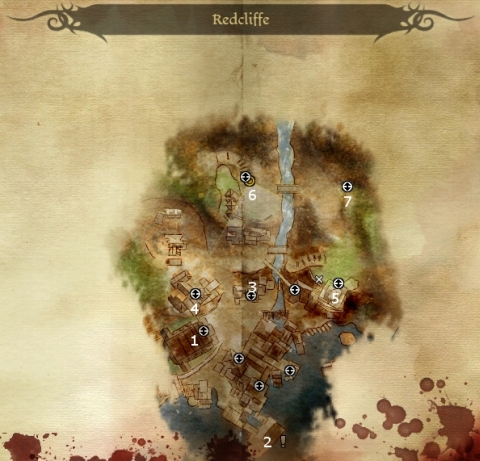
Here is the Mill. It holds a secret passageway to the castle. You cannot access it though without the help of Bann Teagan, as he will himself explain. The Bann's sister-in-law, Isolde, will drop by. With some prodding, she is willing to explain some of the background of what has happened. Bann Teagan resolves to go and see his nephew, Connor, and he'll give you a Signet Ring. Now enter the nearby mill. Inside the mill will be a crate that holds a Love Letter and a random item. There will also be a trap-door on the floor that you can click on to get to the basement of Redcliffe Castle at #1.

    If you left the villagers to die without helping them, make your way to the Village Chantry to find Bann Teagan. He will lead you here, and then after conversing with Isolde, will then give you the Signet Ring in order to access the secret route to the castle.

  6. Here is the exit to the World Map.

  7. Here is the way to the courtyard of Redcliffe Castle. You won't be able to reach the castle this way until you've opened up the gate to the courtyard from inside.


Amazon.com
Amazon.ca
Amazon.co.uk
Sorcerer's Place is a project run entirely by fans and for fans. Maintaining Sorcerer's Place and a stable environment for all our hosted sites requires a substantial amount of our time and funds on a regular basis, so please consider supporting us to keep the site up & running smoothly. Thank you!

Disable all ads!