Dragon Age logo

BioWare


Dragon Age: Origins Online Walkthrough by David Milward


INTRODUCTION  |  GETTING STARTED  |  NPCs  |  ORIGINS  |  RECIPES |  ITEMS   
Areas in the original game:  
Brecilian Forest  |  The Camp  |  Circle Tower  |  Denerim  |  The Final Battle  |  Haven  |  Landsmeet  |  Lothering  |  Orzammar  |  Ostagar  |  Redcliffe  |  Ruined Temple  
Areas available as Downloadable Content:  
Honnleath  |  Return to Ostagar  |  Warden's Keep 
About the Walkthrough  |  About the Maps  |  About the Author  |  About Playing the Game  |  Where to Begin
Disable all ads!

Denerim: 
Map of Denerim  |  Dark Alley  |  Deserted Building  |  Dirty Back Alley  |  Genitivi's Home  |  Gnawed Noble Tavern  |  Market District  |  Rundown Back Street  |  The Pearl  |  Wade's Emporium  

Denerim - Market District

Denerim - Market District

  1. Here is the entrance to the Market District. Leaving through the Gates allows you to access both the World Map and the Map of Denerim.

  2. Here is Chanter Rosamunc, next to the Chanter's Board, from which you can get more quests. They are as follows:

    Back Alley Justice: Clear the alleyways of Denerim of criminals. This involves defeating 3 groups of thugs in the Dirty Back Alley, the Dark Alley, and the Rundown Back Street.

    Missing in Action: Discover the fate of one of Loghain's soldiers, Rexel. You won't be able to find him until significantly later in the game, after you've completed all of your treaty missions and begin quests involving a Landsmeet to call Loghain to task.

    Fazzil's Request: Help recover a missing sextant for its owner, Fazzil. Again, you won't be able to find him until significantly later in the game, after you've completed all of your treaty missions and begin quests involving a Landsmeet to call Loghain to task.

    Loghain's Push: Treat Loghain's soldiers with courtesy and respect. Once you accept this quest, an area labelled "Civil War" will appear on your World Map. The quest is actually to help a Bann resist the efforts of Loghain's men to take his land away.

    Desperate Haven: Help rescue a group of refugees from a band of Darkspawn. An area labelled "Refugees" will appear on your World Map. When you go there, you'll notice two distinct waves of Darkspawn. One on the right, and one on the left that is lead by a Hurlock Emissary. You want to waste your way through the troops as quickly as you can, so first set things up with crowd-control spells that are meant to keep the Darkspawn from swarming you en masse. Now be generous in pelting them with area-effect or storm spells. Once the ranks have thinned enough, go straight for the Emissary and take him out as quickly as you can since he can pelt you from afar with his magic staff.

    Skin Deep: Bring in as many Corpse Galls as you can to the Chantry for study. These can be found among the undead that you will frequently encounter throughout the game.

    Whenever you complete any of these tasks, come back to Sister Rosamund for your reward, which will usually consist of some gold and xp.

  3. Here are a couple of Templar Guards, who explain how they come to their abilities, thus adding the Codex entry for Templars. They also explain why the Cathedral behind them is closed.

  4. Here is Sister Justine, who is a curator of ancient relics. She expresses the view that her job is to authenticate to a strict standard any object that is claimed to be a relic before it can be kept as such by the Chantry. If you happen to find the Ancient Encrypted Scroll in the Ruined Temple, bring it back to Sister Justice for xp and gold.

  5. Here is the Liason from the Mage's Collective. Click on the sack near him for these quests:

    Blood of Warning: Give the warning to evacuate to four individuals who will be wrongly accused by the Chantry by smearing goats' blood on their doors. This involves r-clicking on the doors signified by 'bd' on the map above.

    Have you seen me?: Discover the whereabouts of Renold, last seen to be heading towards the Brecilian forest. This can be easily found if you travel between the Dalish Camp and the Circle Tower. Renold will then show up as a random encounter. The problem is, he's just been slain by an Abomination. Kill the Abomination, and then loot Renold's body for Renold's Journal. This enables you to return to the Mage's Collective for a reward.

    Scrolls of Banastor: Bring 5 Scrolls of Banastor to the Collective for further study. Two can be found during the Circle Tower quest. Another two can be found in the Ruined Temple. One can be found in the Werewolf Lair at #5. Once you've collected all 5 scrolls, bring them back to a Mage's Collective representative for 5 gp.

    As soon as you've completed any of these tasks, you can return to any Mage's Collective representative for your reward, which will usually consist of some gold and xp.

  6. Here is Sergeant Kylon, who also has a few jobs for you.

    The first one is to convince a group of mercenaries to peacefully clear out of a nearby brothel known as The Pearl. Note that he prefers that they be left alive instead of killed.

    The next job is for you to clear the nearby Gnawed Noble Tavern, which is located here at #11, of the Crimson Oars mercenaries. This time, the Sergeant gives you a license to kill them if it comes to that.

  7. Here is the entrance to Wade's Emporium.

  8. Here is Knight-Commander Tavish, who apparently doesn't have much of anything to say to you.

  9. Here is the central square of the market district. There are a number of characters that will appear around you. One is a merchant named Cesar, who has a fairly diverse inventory of poisons, crafting components, weapons, and armor. He sells recipes for Mage Bane Poison, Soldier's Bane Poison, Demonic Poison, and Concentrated Crow Poison. Some of his more notable wares include:

    Ash Warrior Axe
    Saw Sword (Red Steel)
    Barbarian Mace (Steel)
    Enchanter's Staff (Iron)
    Barbarian Helmets (Red Steel)
    Qunari Infantry Helmet (Red Steel)
    Tevinter Shield

    Another is Master Ignacio, who hails from Antiva, and who hints that he may have work for you in the future. After this conversation, when you head towards the city gate, a young boy will stop you and tell you that Master Ignacio wants to see you in the nearby Gnawed Noble Tavern.

    If you end up completing all of Master Ignacio's assassination contracts, he'll indicate that Cesar has special stock available for you. Simply speak to Cesar and choose the dialogue option that involves "special stock". He'll sell recipes for Concentrated Mage Bane Poison, Concentrated Soldier's Bane Poison, Concentrated Demonic Poison, and Quiet Death Poison. He'll sell some weapons with higher end materials, like melee weapons made out of Dragonbone and bows made out of Dragonthorn. Some of his more notable wares include:

    Executioner's Helm
    Knight-Commander's Helm
    First Enchanter Robes
    Grandmaster Dweomer Rune

    Here you'll find a number of different characters, though sometimes they won't appear until you've taken on an appropriate quest. One is Fayd the Apprentice, who is part of the Notice of Termination quest on behalf of the Mage's Collective.

  10. Here is a Dwarven merchant named Gorim. He sells a varying assortment of items, as well as pieces of Dwarven armor usually composed from either Red Steel or Silverite or Dragonbone (if your level is high enough). Some of his more notable wares include:

    Chasind Great Maul (Dragonbone)
    Thorval's Luck (Silverite)
    Diamond Maul (Veridium)
    Camenae's Brute (Silverite)
    Rocker-Knocker
    Katriel's Grasp (Drakeskin)
    Meteor Sword (Silverite)
    Sword Belt
    Grand Silverite Rune


  11. Here is the entrance to the Gnawed Noble Tavern.

  12. Here is the entrance to Genetivi's Home. You must visit this home if you want to further your quest to find the Urn of Sacred Ashes.

  13. Here is the Wonders of Thedas shop. If you look around, there's plenty of books and scrolls that will yield Codex entries for Geography of Thedas, Denerim, History of the Chantry: Part 4, and Qunari.

    When you step inside, you'll find a Tranquil Proprietor who sells a large variety of items of an arcane or alchemical nature. He sells recipes for Greater Ice Salve, Greater Warmth Balm, Shock Coating, Greater Lyrium Potion, Potent Lyrium Potion, Overpowering Lure, Swift Salve, and Shock Balm. Some of his more notable wares include:

    Tome of Arcane Technique
    Wintersbreath (Dragonbone)
    Torch of Embers (Steel)
    Lightning Rod (Grey Iron)
    Magic Staff (Iron)
    Lend of the Lion (Hardened)
    Reaper's Vestments
    Robe of the Witch
    Tevinter Mage Robes
    Enchanter Cowl
    Apprentice Cowl
    Mabari Dog Chain
    Apprentice's Amulet
    Hearthstone Pendant
    Archivist's Sash
    Dreamsever
    Ring of Ages
    Twitch
    Master Dweomer Rune
    Expert Flame Rune
    Journeyman Frost Rune
    Grandmaster Flame Rune
    Expert Cold Iron Rune
    Master Cold Iron Rune
    Master Hale Rune
    Expert Hale Rune
    Ancient Map of the Imperium
    Manual: Spirit Healer

    Incidentally, here is Sheth the Apprentice, who is part of the Notice of Termination quest on behalf of the Mage's Collective.

  14. Here are the Friends of Jenny. If you find the Small Painted Box during the Circle Tower quest, bring it here for 3 golds and some xp.

  15. Here is a warehouse that has a few chests with random items. If you take on the Solving Problems quest for the Bartender in the nearby Gnawed Noble Tavern, you'll also find one of the Body Bags in here.

  16. Goldanna
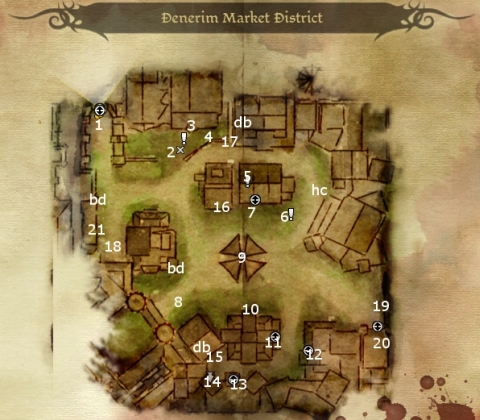
Here is the house of Alistair's sister, Goldanna. If Alistair spoke about his familial situation beforehand in Redcliffe, he'll want to find and visit Goldanna. Your willingness will win approval from him, and vice versa. When you actually do visit, she'll be bitter and resentful over her lot in life which she blames on the circumstances of her birth, and will project it onto Alistair. At some point, Alistair will leave the house and express disappointment that it wasn't quite what he expected. This is the point where can 'harden' Alistair's personality, if you consistently choose dialogue options that emphasize that everybody looks out for themselves and he should realize this. This will make Alistair both more tolerant of less moral actions on your part, and also more assertive. This may mean that he has a greater willingness to assert a future claim to the Throne of Ferelden down the road. As an aside, if you are playing a female character with an Origin other than Human Noble, 'hardening' Alistair is the key to remaining Alistair's consort and queen during the game's epilogue.

  17. Here, tucked in a corner behind the wall surrounding the Chantry, is a well where you can dump the Body Bags if you've taken on the Solving Problems quest for the Bartender of the Gnawed Noble Tavern.

  18. Here is Sara. She is one of the widows that the Blackstone Irregulars want you to deliver a Letter of Condolence to as part of the Notice of Death quest.

  19. Here is a poster involving Grey Wardens. If you read the 'poster', you'll notice the words, "At the hidden pearl the entrace lies. The Griffons will rise again." If you're on a quest to kill somebody named Paeda, this is actually a clue you'll need. The hidden pearl is a reference to a nearby brothel called The Pearl. "The Griffons will rise again." is actually a pass word you'll need once you're at the Pearl.

  20. Here is the entrance to the Elven Alienage, which is closed off for the time being.

  21. Here is where you can find Majorlaine, if you're involved with Leliana's personal quest. Note that you can only enter once Leliana's quest has gone far enough. Also, once you leave, there's no coming back here.


Amazon.com
Amazon.ca
Amazon.co.uk
Sorcerer's Place is a project run entirely by fans and for fans. Maintaining Sorcerer's Place and a stable environment for all our hosted sites requires a substantial amount of our time and funds on a regular basis, so please consider supporting us to keep the site up & running smoothly. Thank you!

Disable all ads!