Dragon Age logo

BioWare


Dragon Age: Origins Online Walkthrough by David Milward


INTRODUCTION  |  GETTING STARTED  |  NPCs  |  ORIGINS  |  RECIPES |  ITEMS   
Areas in the original game:  
Brecilian Forest  |  The Camp  |  Circle Tower  |  Denerim  |  The Final Battle  |  Haven  |  Landsmeet  |  Lothering  |  Orzammar  |  Ostagar  |  Redcliffe  |  Ruined Temple  
Areas available as Downloadable Content:  
Honnleath  |  Return to Ostagar  |  Warden's Keep 
About the Walkthrough  |  About the Maps  |  About the Author  |  About Playing the Game  |  Where to Begin
Disable all ads!

Denerim: 
Map of Denerim  |  Dark Alley  |  Deserted Building  |  Dirty Back Alley  |  Genitivi's Home  |  Gnawed Noble Tavern  |  Market District  |  Rundown Back Street  |  The Pearl  |  Wade's Emporium  

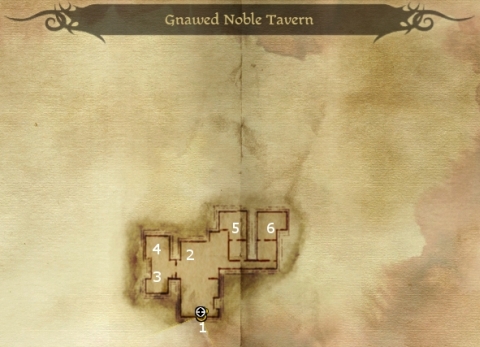
Denerim - Gnawed Noble Tavern

Gnawed Noble Tavern

  1. Here is the exit back to the Market District.

  2. Here is the Bartender. He sells a wide variety of crafting components, and also recipes for Small Grease Trap, Injury Kit, Greater Health Poultice, Lesser Injury Kit, and Health Poultice.

    When you speak to him, you also have the option to inquire if he has any quests of an illegal nature for you. This then makes three quests available:

    Correspondence Interruptus: Bring back 12 Love Letters to him.

    Dump SiteSolving Problems: Basically 3 situations went deadly when they weren't supposed to, and your help is needed to clean up the dead bodies so that the unwitting perpetrators don't fall under suspicion. The places where the dead bodies can be found are marked by 'db', two in the Market District, and one in The Pearl. Once you find the dead bodies, go the Chantry in the Market District. Go east behind the wall that surrounds the Chantry. At the corner, at around #17, is a well where you can dump the bodies. Come back to the Tavern Keeper for your reward.

    Negotiation Aids: Bring him 15 Toxin Extracts for an xp and gold reward.

    If you do 2 of these quests, two more become available:

    Untraceable: Bring back 10 Garnets for an xp and gold reward.

    Sign of Safe Passage: Before you take this on, you'll need to bring along a bow that your Grey Warden Character can use. And yes, that can mean shopping around for a low-grade bow just for the occassion if your Grey Warden character normally doesn't use bows and arrows. Look for the spot at #7 of the West Brecilian Forest. Use the tab key if you have to. You're mouse pointer will be as an eye when its over the right spot. Make sure your Grey Warden character has a bow equipped before clicking on it. Once you do, select the option of shooting an arrow over the trees. Once that happens, you'll get ambushed by a band of Denerim Mercenaries. Once that's done, go back to the Keeper for your reward.

    Once you've finished these two, two more become available:

    False Witness: Basically assassinate witnesses who have plans of falsely incriminating client 'D'. Cam of Redside can be found inside the Wonders of Thedas shop, the entrance to which is at #13 of the Market District. Skinny Frank is near #5 at the Lake Calenhad Docks. Lowly Brian will be found near the central plaza of the Frostback Mountain Pass.

    Dead Drops: Drop off payments of gratitude at various places for client 'K'. One is at the center of the Market District around #9. Another is in the Spoiled Princess Tavern at the Lake Calenhad Docks Another is near the merchant at #6 of the Frostback Mountain Pass. Another will be at #8 of Redcliffe - Post Battle at #8.

    If you complete these quests, the last one will be:

    KHarsh Decisions: Client 'D' wants you to kill off client 'K', who has become annoying competition. He'll arrange it so that K's minions find you during your travels. Basically, travel to somewhere else within Denerim, and you'll have a back alley encounter with K's Lieutenant and his henchmen. Once you're done, loot K's Lieutenant's body for a map that will indicate the location of K's Hideout on your Map of Denerim. Now head there, and you'll have to fight K and his henchmen. K himself is an Assassin who can take quite a bit of damage, and two of his henchmen are archers that are capable of Scattershot. Once you're done here, head back to the Tavern Keeper for 10 gold.


  3. Here are the Crimson Oar mercenaries, whom both Sergeant Kylon and the Innkeeper want you to clear out. You can choose to let them stay, but this means no reward for you. You can resolve this either by using Persuasion to convince them to leave willingly, or killing them. Then go back to Sergeant Kylon for your reward.

  4. Here is a representative of the Blackstone Irregulars. The following quests are available for you.

    Notice of Death: This involves being given 4 Letters of Condolence and delivering them to the wives of Blackstone Mercenaries who have fallen in battle. They are Sara, who can be found in the Market District, Taria, who can be found in the Dirty Back Alley, Larana, who can be found in the Spoiled Princess Tavern at the Lake Calenhad Docks, and Irena, who can be found in the Village Chantry of Redcliffe.

    Restocking the Guild: Bring back 20 Health Poultices to help the Irregulars prepare for war.

    Once you've completed any of these tasks, speak to any Blackstone Irregular representative for your reward of gold and xp.

  5. Master IgnacioOn your way here, there will be a book that gives the Codex entry for "Legend of Calenhad: Part 3". Just past the door you will find Master Ignacio if you spoke to him earlier in the Market District. There will be a certain tension between Zevran and himself over Zevran's failed attempt on your life, but it will ultimately prove not big enough a deal to get in the way of Master Igancio wanting to do business with you. Basically, Master Igancio is himself an Antivan Crow and wants to sub-contract to you to carry out assassinations.

    His first job for you is to assassinate a thug in the employ of Arl Howe, Paeda. To find Paeda, read the poster concerning Grey Wardens in the Market District at #20. The poster reveals that Paeda can be found in The Pearl, and the phrase "The Griffons will rise again." is the password you will need. Even if you already killed Paeda, you can simply speak to Master Ignacio again for your reward and the next job.

    He'll then have two jobs for you. One is to kill a group of Qunari mercenaries known as the Kadan-Fe. Once you get this quest, an area labelled "Kadan-Fe Hideout" will appear on your World Map. When you go there, the Qunari will be gathered around a campfire at a distance. None of them cast magic spells, so take the initiative by setting up crowd-control spells and then peppering them with damaging spells.

    The other is to assassinate Ambassador Gainley in Orzammar. He can be found at #9 of the Royal Palace. You may have to progress matters in Orzammar to some degree, and it takes longer if you ally with Lord Harrowmount instead of Prince Bhelen, before you can make your way to the Ambassador. Once you have completed these two contracts, the chest by Master Ignacio will have a Precision-Geared Recurve (Sylvanwood) as a reward.

    Your next contract is to take out men loyal to Arl Howe who are trying to ransom a young boy. Their leader is Captain Chase. The area will be marked on your Map of Denerim. Once you get there, keep in mind that Captain Chase will be supported by a lot of Howe Soldiers, so try to immobilize or crowd-control as many of them as possible at the outset. None of them will have anything special in the way of loot. When you return, a pair of Red Jenny Seekers (Drakeskin) will be in the chest next to Master Ignacio as a reward

    This marks the end of jobs that Master Ignacio has for you. You can choose to attack him. Keep in mind that his two thugs aren't anything special, but he himself can inflict some pretty powerful attacks, and can use the full range of abilities from the Assassin specialization. He also won't leave any special loot behind. However, if you choose to end the association peacefully, he'll leave for good and indicate that Cesar in the Market District will have some special stock for sale now.

    Incidentally, another side benefit to you is that you will have another vote in your favour when the game progresses towards an assembly of Ferelden's nobility, called the Landsmeet.

  6. This room is locked, but the door can be picked. There will be a few containers in here with random items.


Amazon.com
Amazon.ca
Amazon.co.uk
Sorcerer's Place is a project run entirely by fans and for fans. Maintaining Sorcerer's Place and a stable environment for all our hosted sites requires a substantial amount of our time and funds on a regular basis, so please consider supporting us to keep the site up & running smoothly. Thank you!

Disable all ads!