Dragon Age logo

BioWare


Dragon Age: Origins Online Walkthrough by David Milward


INTRODUCTION  |  GETTING STARTED  |  NPCs  |  ORIGINS  |  RECIPES |  ITEMS   
Areas in the original game:  
Brecilian Forest  |  The Camp  |  Circle Tower  |  Denerim  |  The Final Battle  |  Haven  |  Landsmeet  |  Lothering  |  Orzammar  |  Ostagar  |  Redcliffe  |  Ruined Temple  
Areas available as Downloadable Content:  
Honnleath  |  Return to Ostagar  |  Warden's Keep 
About the Walkthrough  |  About the Maps  |  About the Author  |  About Playing the Game  |  Where to Begin
Disable all ads!

Orzammar: 
Aeducan Thaig  |  Anvil of the Void  |  Assembly Chamber  |  Cadash Thaig  |  Caridin's Crossing  |  Carta Hideout  |  Dead Trenches  |  Deep Roads  |  Diamond Quarter  |  Dust Town  |  Frostback Mountain Pass  |  Hall of Heroes  |  Harrowmount's Estate  |  Ortan Thaig  |  Orzammar Commons  |  Proving Grounds  |  Royal Palace  |  Shaperate  |  Tapster's Tavern  

Royal Palace

Royal Palace

  1. Here is the exit to the Diamond Quarter.

  2. Here a large group of Tunneling Thieves will have burrowed from the ground and attack you on sight.

  3. Here is a chest in which you'll find a Love Letter and another random item.

  4. Here are a couple of containers with random items in them. There is also a Glass Phylactery here. Take the Phylactery, and you'll be forced to fight a Revenant. A Revenant is an incredibly powerful opponent in its own right. It can swing its sword in an arc, causing lots of damage to multiple nearby enemies. It can also use Telekinesis to pull opponents within melee range. To defeat a Revenant, it helps to have a healthy mix of 2 or 3 types of talents. One type of talent is spells that can hold the Revenant still. Spirit Prison, Cone of Cold, and Petrify qualify. Another type is spells that while not immobilizing the Revenant, will reduce its ability to fight. These include Misdirection Hex, which can cause the Revenant to miss its blows, and Curse of Mortality, which will negate its regeneration ability. Another type is abilities that will increase the parties capacity to inflict damage on the Revenant. These include Critical Strike, Deadly Strike, Death Hex, Flaming Weapons, and Telekinetic Weapons. The idea is to keep his actual participation in the battle to an absolute bare minimum if you can manage it.

    If you do kill the Revenant, it will leave behind a Scrap of Paper that reveals a Codex entry involving a quest to visit overdue retribution on several Revenants.

  5. Here is the Throne Room.

  6. Prince Bhelen
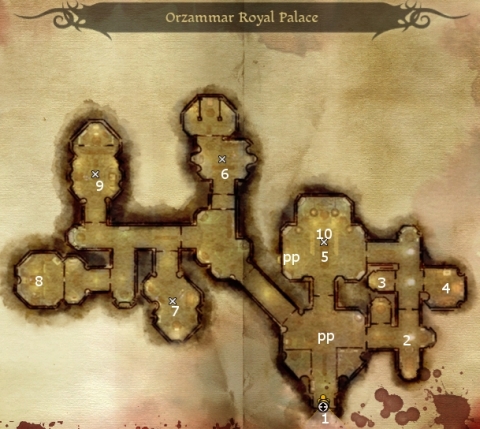
This is the Royal Bedroom. If you decided to ally yourself with Prince Bhelen, this is where Vartag will bring you after doing some initial tasks. Bhelen now has a job for you, to take down a criminal cartel led by Jarvia in Dust Town.

    Once you've finished this task, Bhelen's next job for you is to find the Paragon, Branka, in the Deep Roads. His hope is that Branka will back, and assure, his bid for the throne of Orzammar. This will mean an expedition into Caridin's Crossing.

  7. Here is Prince Bhelen`s Bedroom. On a table is a note that provides the Codex Entry for ``Letter from Rica``.

  8. Here you will find Lady Broden lying sick on a bed, as well as Herbalist Widron at her side. He needs specific ingredients to help her, and gives you the recipe for Dwarven Regicide Antidote. The recipe calls for 4 Elfroots, 2 Lifestones, 2 Concentrator Agents, and a Flask. Once a character has made the antidote using the Herbalism skill, simply click on Lady Broden to get an xp reward.

  9. This is the Ambassador Suite. If Master Igancio in the Gnawed Noble Tavern of Denerim has given you a quest to assassinate Ambassador Gainley, then here is where you will find him and his retinue of bodyguards. The door provides a perfect bottleneck for setting up crowd-control spells, followed by area-of-effect and storm spells.

    Incidentally, a book in this room provides a Codex entry for ``Trian`s Journal``.

  10. Here is the actual Throne itself. There is a quest and an item to be earned here, but only if you have not resolved the political situation in Orzammar so that there's a new King of Orzammar. If either Bhelen or Harrowmount become available, this quest is no longer available . First, toggle a button on the left-side of your screen so that your party is set to 'Move Freely', meaning they won't follow each other around all the time. Now look for two distinct looking tiles along the west wall of the Throne Room. These are marked by 'pp' on the map. Have two characters stand on top of those tiles. You should hear a distinct click when this happens. Now have a third character leave the Throne Room and go south. The third character should stand on top of the distinct circle in the middle of the room south of the Throne room, which is also marked by 'pp' on the map. Now have a fourth character click on the Throne itself.

    A young dragon will now appear and attack the party. Be warned, despite the smaller size, this Dragon can still be a formidable opponent for lower level parties. Its roar can temporarily stun party members, it can breathe fire, and its Overwhelm attack can easily kill a single party member (depending on your level when you happen to get here). The most reliable strategy is to try and hold it in place with immobilizing spells (e.g. Cone of Cold, Winter's Grasp, Paralyze, Spirit Prison, etc.) and pound away. In fact, you may want to hold such a spell in reserve for when you notice that the Dragon is about to charge a party member with its Overwhelm attack. Once you've killed it, loot is corpse for the Ageless (Silverite).


Amazon.com
Amazon.ca
Amazon.co.uk
Sorcerer's Place is a project run entirely by fans and for fans. Maintaining Sorcerer's Place and a stable environment for all our hosted sites requires a substantial amount of our time and funds on a regular basis, so please consider supporting us to keep the site up & running smoothly. Thank you!

Disable all ads!