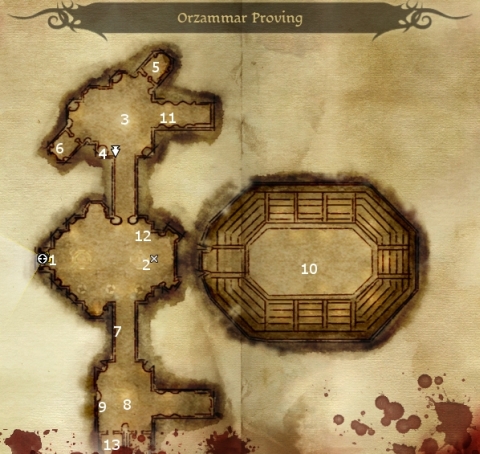
If you enter here without having made progress with either Prince Bhelen or Lord Harrowmount, you'll only be able to access the main room. The doors to the north and south will be locked. You also won't be able to participate in any Proving fight. So try to get in the good graces of either candidate for the throne before coming here.
Here is the Proving Master. The Proving Master will ask whether you're willing to participate in a series of Proving fights. They are as follows:
Seweryn, a one on one fight.
Myaja and Lucjan - A warrior and a rogue who are allowed to fight 2 on 1 because they are natural twins. If you can, take out Lucjan first because he has less health, and to prevent his backstabbing.
Roshen - A warrior who specializes in using a Greatsword.
Lord Darvianak Volney & Olaniv - A paired fighting, if you can, use a mage that can use spells to damage them or immobilize them, in conjunction with a warrior.
Piotin and his Henchman - 4 on 4 team combat, take out the Henchmen first to minimize the number of attackers, since Piotin himself can take a lot of damage before going down.
Once you finish all these fights, you are declared the Champion of the Orzammar Proving.
About this room are some of the fighters that you may have to face in the Arena, including Roshen, Lord Darvianak Volney, and Wojech.
Here is Fixer Gredin. If you have a quest from Shaper Milldrate from the Shaperate to retrieve a tome for him, you'll have to first encounter the original thief in Dust Town and retrieve the Proving Receipt from his corpse. You can then confront Fixer Gredin, who will attack you. Once he's dead, you can get A Volume of Shaper History from his body. You can bring it back to Shaper Milldrate, or ...
Nearby is also Jertin. You can apparently sell the tome to him for extra gold, and apparently without any consequence.
Here is the Proving Armsman. He can set you up for a series of four fights with other 'parties of four' with various compositions. Win all four, and you'll get the Blood Ring as a reward.
Here you'll find Hannashan and Farinder. Hannashan explains that Farinder is a member of a Dwarven womens' warrior society that requires a vow of silence that is realized by having their tongues removed.
Here is a wall carving that yields a Codex entry for "The Proving".
In this room are some of the fighters you may end up facing during the Proving, like Myaja, Seweryn, and Piotin.
Here is a Write of Censure that provides a Codex entry that is relevant to "The Key to the City."
If you've sided with Lord Harrowmount, your first quest will involve discovering why some of Harrowmounts fighters have backed out of the Proving. Here is one of the fighters, Gwiddon. A successful Persuasion or Intimidation check can persuade him that Harrowmount is not dropping out of the race for the throne and to rejoin the Proving.
Here is another of Lord Harrowmount's fighters gone quitter, Baizyl. His problem is that Myaja has his correspondence indicating a scandalous love-affair with a woman of noble caste, which Bhelen can use to expose him if he fights on Harrowmount's behalf. In order to get him to fight for Harrowmount, you have to get your hands on those letters. So basically head to the room at #8. Have a Rogue pickpocket Myaja for Myaja's Key.
The door to this room can be opened by Myaja's Key. Open it, and you'll see Myaja's chest. Open the chest and you'll find Baizyl's Love Letters. Give the letters to Baizyl, and he will be willing to fight for Harrowmount again. All that is left for your first task for Harrowmount is to speak to the Arming Master in order to fight in the Proving as Harrowmount's champion.
Sorcerer's
Place is a project run entirely by fans and for fans. Maintaining
Sorcerer's Place and a stable environment for all our hosted sites requires a substantial amount of our time and funds on a regular basis, so please consider supporting us to keep the site up & running smoothly. Thank you!
Supporting Sorcerer's Place
Has Sorcerer's Place been useful? If you'd like to show your appreciation
for our hard work on the site, and help us pay the bills the site generates
every month, please consider helping support SP.
Thank you!

 Here is the Proving Master. The Proving Master will ask whether you're willing to participate in a series of Proving fights. They are as follows: