Dragon Age logo

BioWare


Dragon Age: Origins Online Walkthrough by David Milward


INTRODUCTION  |  GETTING STARTED  |  NPCs  |  ORIGINS  |  RECIPES |  ITEMS   
Areas in the original game:  
Brecilian Forest  |  The Camp  |  Circle Tower  |  Denerim  |  The Final Battle  |  Haven  |  Landsmeet  |  Lothering  |  Orzammar  |  Ostagar  |  Redcliffe  |  Ruined Temple  
Areas available as Downloadable Content:  
Honnleath  |  Return to Ostagar  |  Warden's Keep 
About the Walkthrough  |  About the Maps  |  About the Author  |  About Playing the Game  |  Where to Begin
Disable all ads!

Orzammar: 
Aeducan Thaig  |  Anvil of the Void  |  Assembly Chamber  |  Cadash Thaig  |  Caridin's Crossing  |  Carta Hideout  |  Dead Trenches  |  Deep Roads  |  Diamond Quarter  |  Dust Town  |  Frostback Mountain Pass  |  Hall of Heroes  |  Harrowmount's Estate  |  Ortan Thaig  |  Orzammar Commons  |  Proving Grounds  |  Royal Palace  |  Shaperate  |  Tapster's Tavern  

Caridin's Crossing

Caridin's Crossing

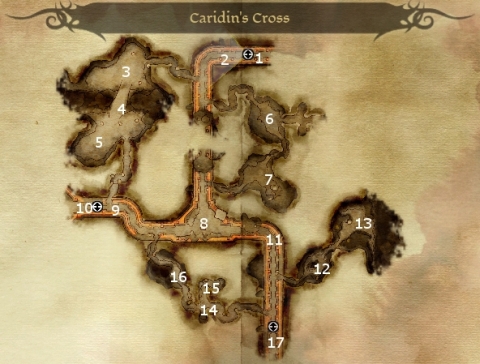
Throughout this Thaig you will find two types of enemies. One type are packs of Deep Stalkers. They aren't particularly tough, and don't have a whole lot of health. But what they have going for them are sheer numbers, and long distance spit attacks that can stun or slow you down. This makes taking them out quickly advisable. The other type will be hordes of Darkspawn, usually Genlocks, but also the occasional Hurlock, Shriek, or Ogre.

  1. Here is the way back to the Deep Roads.

  2. Here you will get attacked by a couple of Goons and an Elven Mercenary (Mage).

  3. Throughout this large cavern you will have to fight several Darkspawn spread throughout, including a Hurlock Alpha and a Hurlock Emissary. In the northwest corner of this cavern is a firepit that yields an entry for "The Blights".

  4. Be careful when crossing this bridge, because you'll not only have to fight the Darkspawn in front of you, but several will try to sneak up on you from behind. These will include a Shriek, a Darkspawn that can use invisibility and a screech that can stun your party members.

  5. Here you'll have to fight several Darkspawn, including an Ogre and a Shriek. Rubble in this cavern will yield a Codex entry for "The Crosscut Drifters".

  6. You'll have to fight a lot of Deep Stalkers in here. There will also be a Bloody Sack that contains a Head in a Bag, which is part of the "Asunder" quest.

  7. In here you will fight a lot more Deep Stalkers. There will also be a runstone that provides a Codex entry for "The Shaper's Life."

  8. Here you will have to fight a lot of Genlocks, led by a Genlock Emissary. Try to take them out at a distance with spells and missile weapons, since this cavern is littered with traps that you should deal with only after combat. A chest here holds a Totem that Sten will appreciate as a gift.

    There will also be rubble that provides a Codex entry for "The Crosscut Drifters".

  9. Here you will have to fight a few Genlocks and a Bronto. A Statue at the side of the road also provides a Codex entry for "Orzammar History: Chapter One."

  10. Here is another way back to the Deep Roads. Nearby is some rubble that provides another Codex entry for "Crosscut Drifters".

  11. Here is a glass phylactery. When you take it, you'll have to combat a Revenant as part of a larger quest to visit retribution on six Revenants returned from the dead.

  12. Here you'll have to fight several more Genlocks. A bloody sack in here will have a Torso in a Bag in it as part of the "Asunder" quest.

  13. Deepstalker MatriarchIn this cave, you'll have to fight off 3 waves of Deep Stalkers, the last one led by the Deep Stalker Matriarch. A nearby Sarcophagus will have a random item or two. In the southeast corner of the cavern, you'll find some rubble that provides a Codex entry for "Drifter's Cache".
  14. Here you'll get ambushed by several Shrieks, and an Ogre Alpha.

  15. Here is the Drifter's Cache. To find this, you will need to have found all the Codex entries for "The Crosscut Drifters" and the "Drifter's Cache" in this area. Once you find the cache, it holds the Thorn of the Dead Gods (Silverite), Effort's Gloves (Silverite), the Ring of the Warrior, and possibily another random item or two.

  16. Here you'll have to fight a few Genlocks, a Shriek, and a Genlock Emissary. The Emissary leaves behind the Topsider's Hilt.

  17. Here is another exit to the Deep Roads.


Amazon.com
Amazon.ca
Amazon.co.uk
Sorcerer's Place is a project run entirely by fans and for fans. Maintaining Sorcerer's Place and a stable environment for all our hosted sites requires a substantial amount of our time and funds on a regular basis, so please consider supporting us to keep the site up & running smoothly. Thank you!

Disable all ads!