Dragon Age logo

BioWare


Dragon Age: Origins Online Walkthrough by David Milward


INTRODUCTION  |  GETTING STARTED  |  NPCs  |  ORIGINS  |  RECIPES |  ITEMS   
Areas in the original game:  
Brecilian Forest  |  The Camp  |  Circle Tower  |  Denerim  |  The Final Battle  |  Haven  |  Landsmeet  |  Lothering  |  Orzammar  |  Ostagar  |  Redcliffe  |  Ruined Temple  
Areas available as Downloadable Content:  
Honnleath  |  Return to Ostagar  |  Warden's Keep 
About the Walkthrough  |  About the Maps  |  About the Author  |  About Playing the Game  |  Where to Begin
Disable all ads!

Orzammar: 
Aeducan Thaig  |  Anvil of the Void  |  Assembly Chamber  |  Cadash Thaig  |  Caridin's Crossing  |  Carta Hideout  |  Dead Trenches  |  Deep Roads  |  Diamond Quarter  |  Dust Town  |  Frostback Mountain Pass  |  Hall of Heroes  |  Harrowmount's Estate  |  Ortan Thaig  |  Orzammar Commons  |  Proving Grounds  |  Royal Palace  |  Shaperate  |  Tapster's Tavern  

Dead Trenches

Dead Trenches

Archdemon
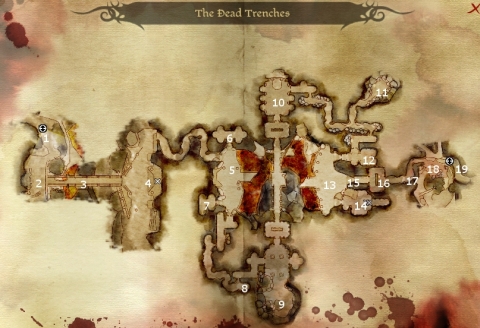
When you first enter here, you'll be treated to a cutscene in which the Archdemon leads his Darkspawn troops forward for an impending war, much in the style of Frodo and Sam overlooking a similar display by the Witch King. This area, needless to say, is crawling with Darkspawn, who are often teamed up with other creatures as well, such as Brontos and Corrupted Spiders.

  1. Here is the way back to the Deep Roads.

  2. Legion of the DeadHere is where you'll find several Legionnares of the Dead battling Darkspawn. You can help them of course. Also nearby is a statue that provides a Codex entry for "Orzammar History: Chapter 2"

  3. This bridge is crawling with several packs of Darkspawn. Proceed slowly and deal with as few at a time as you can manage.

  4. Here are the Gates to Bownammor. There won't be any going past them though. They'll also be guarded by a large group of Darkspawn that includes a few Shrieks, and an Ogre.

    Also nearby is a runestone that provides a Codex entry for "Stalata Negat".

  5. Around here will be several Darkspawn, including Genlocks, Hurlocks, Shrieks, as well as a Bronto and a Genlock Emissary.

  6. Here you will have to fight several Genlocks. When you're done, there are several sarcophagi in this room. Most of them have random items, but one of them has the Boots of the Legion (Dragonbone). There is also a runestone here that provides another Codex entry relevant to "The Shaper's Life".

  7. There will be several Genlocks in this room. When you're done, most of the sarcophagi in here will have random items. One of them however will have the Gloves of the Legion (Dragonbone).

  8. Ancient DarkspawnHere you will have to fight an Ancient Darkspawn, who is simply a Hurlock that can score more damage and take more damage before going down. Simply apply spells or abilities that decrease his ability to fight, and then gang up on him. Loot the Topsider's Blade off his corpse.

    Note that the Ancient Darkspawn won't actually appear unless you have clicked on the Topsider's Grave at #2 in the Ortan Thaig.

  9. Genlock Forge MasterHere are a massive horde of Darkspawn, and the Genlock Forge Master. The Forge Master is a powerful opponent, who can use both archer talents at long distance like Scattershot, and can pack a powerful maul in close quarters. My advice is as much as possible to lead the other Darkspawn northwards and away from the Forge Master and kill them in the nearby rooms. The idea is as much as possible to minimize the Forge Master's support when the time comes to go for him personally. He'll leave behind the Forge Master's Hammer (Red Steel), and the Spear-Thrower (Sylvanwood). There will also be several containers around this cavern with random items.

  10. In this room are many Devouring Skeletons as well as a Hurlock Emissary. Most of the sarcophagi in here will have random items. One however will have the Armor of the Legion (Dragonbone).

  11. Here you'll have to fight several Genlocks and Corrupt Spiders. A chest in here will have a few weapons of Darkspawn make.

  12. Here you will encounter a former companion of Branka, Hespith. Hespith is apparently suffering from the Darkspawn taint, but she has it together enough to relate that Branka's obsession with an artifact known as the Anvil of the Void has caused a great deal of harm to those who followed her. Hespith then flees the room.

  13. Here you will get attacked by a pair of Ogres.

  14. Here is a shrine of the Legion of the Dead.

    At the east end of the shrine is an altar. The Altar itself has the Helm of the Legion (Dragonbone) and the Legionniare Key. Taking any of these items will cause several Legionnaire Spirits to attack you.

    The other thing of note is a Legion of the Dead Relic in the middle of the floor. Click on it once with a character who must be dressed up in the complete set of the Legion of the Dead armor. You'll then get a Codex entry, titled "The Gangue Shade", and then you'll have to fight the Gangue Shade.

  15. Here is an Ominous Door that you will need the Legionnare Key to open.

  16. Here is a runestone that provides another Codex entry on "Stalata Negat".

  17. Here is a sarcophagus that has a Dead Caste Insignia in it. Bring it back to the Shaperate, and click on the book labelled Memories at #6. This means that the Legion of the Dead may become recognized as a caste or a noble house in their own right, as well as some xp for you.

  18. Here is one of the tougher boss battles, the Brood Mother. She will use some of her tentacles to seal off the adjoining passageways. This makes firing at her from a safe distance impossible. She also has several attacks at her disposal. One, her basic attack is to sweep one of her tentacles in front of her. This can damage multiple attackers and push them back. She can spit poison that can damage multiple characters in a cluster. She can periodically spread her tentacles out, which will basically appear as separate creatures that attack the party. She can also periodically call Darkspawn to her aid. Finally, she has a constrict attack that can inflict massive damage that can outright kill a single character.

    The key to this fight is to come prepared with a single character that occupy the Brood Mother up close, with either minimal or no chance of getting nailed with her constrict attack. Shale and the Mabari War Wound qualify. Another good candidate is an Arcane Warrior who can bolster him or herself with Combat Magic and Shimmering Shield.

    As for the other characters, keep them at a distance. Whenever Darkspawn or Brood Mother Tentacles appear, have your other party members go to work on these. Whenever the Brood Mother is otherwise by herself, spread your other party members out so that her poison spit attack will damage only one character at a time. Have them hit her with missile weapons. Keep in mind that she resists most spells, so save them for when she calls in allies.

    Once she falls, she'll leave behind the Rock Knocker (Red Steel), Effort (Silverite), and the Ring of Selection.

    Incidentally, once this battle is finished, Hespith will arrive to provide a somewhat fuller explanation.

  19. Here is an exit to the Deep Roads. Taking this exit will now make the Anvil of the Void accessible.


Amazon.com
Amazon.ca
Amazon.co.uk
Sorcerer's Place is a project run entirely by fans and for fans. Maintaining Sorcerer's Place and a stable environment for all our hosted sites requires a substantial amount of our time and funds on a regular basis, so please consider supporting us to keep the site up & running smoothly. Thank you!

Disable all ads!