-

- Forums
- Chatrooms
- Gallery
- Gameplay Videos
- Upload
- Articles
- Mod Reviews
- Shop SP: Games, Movies, Books
|
|
Severed Hand, Level 1 | Severed Hand, Level 2 | Severed Hand, Level 3 | Severed Hand, Level 4 | Four Towers | Ilmater Ritual | Final Battles
We have left the madness of Dragon's Eye and the Fields of Slaughter behind us, thank Tempus. Upon our arrival in the Fields of Slaughter we found ourselves in the midst of a clan of dead orcs, apparently brought back from the world beyond by the wizard Saablic Tan. Were that not strange enough, the orcish undead were locked in a conflict of some sort with a powerful lich named M'Darfein. After much difficulty, we finally managed to defeat the lich by completing an elven purification ritual.
Then, attempting to leave the fields behind us, we were once again confronted by the legion's head wizard, Saablic Tan. This time, however, he stayed to fight! Enraged by the destruction of his pet orc zombies, the fool wizard attacked us there on the fields. For all his boasting, he fared no better than his orcs. Now, finally, with nothing more to block our way, we make our assault on the Severed Hand to bring an end to this misbegotten Legion of the Chimera.
Alia Shield-Maiden, the Annals of Halgren
CHAPTER 6: THE SEVERED HAND, LEVEL 1
 You arrive just outside the Severed Hand, where you will be greeted by the Guard Commander, two guards, and two Chimera. You will not have any control over who speaks to the guard commander; the dialogue will launch as soon as Chapter 6 begins. Depending on who speaks to her, you can try to bluff your way past. If you succeed, you learn that you need a delegate pass to move freely through the building and are allowed to go get one. If you fail, you will have to fight them. There is a third option, which is partial success: you have to fight them, but you at least discover that there is a Minister of Affairs for the Severed Hand. The Impaler spear is propped up against the exterior of the building; pick it up on your way into the building. There are two entrances but it doesn't matter which one you take as they both lead to the same foyer.
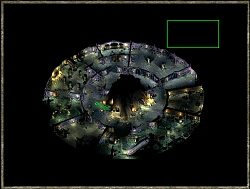
Inside, the hallway is shaped like a ring around a spiral staircase. The first thing you will see is a handful of guards that are being told to keep out a group that sounds a lot like your party. When they see you, they reach the same conclusion and attack. The toughest opponent in this fight is Zigma so take her out first. On her, you find a note by the captain of the guard, Pudu, and a Cloak of Protection +2.
 There's a glabrezu guard near the entrance. You can talk to it without having it attack you, although it will be somewhat rude to an aasimar party member, but at this point it doesn't have much of value to tell you. In a nearby workshop- approximately in the 7 o'clock position in the circular tower- you'll find the slave foreman, Jerre Stoh. Tell him you are here to end the war and he will try to help you, by telling you that the glabrezu in the hall is immortal and that there are others like it that guard Isair and Madae (750 xp). You will therefore need to understand the secret of their immortality, and destroy its source, in order to defeat Isair and Madae. Jerre asks you to also destroy the glabrezu just outside the door, when you learn how to do so, in order to free the slaves. He will also tell you, if you ask, that the demon's purpose is to keep the slaves under control (750 xp). You can confirm this, and the demon's immortality, by talking to the Glabrezu for another 750 xp.
In the next room clockwise from Jerre Stoh, you'll find a young lady named Ysha who is very anxious. She delivered incorrect plans for repairs to the fortress, and the stair-room repairs were completed incorrectly as a result. She wants to alter or destroy the correct plans so no one will learn of her mistake, but can't find a way to do so. You can take them and offer to help her for some additional experience points later on, but this is an optional quest. The solution to her problem is provided by Kav Latham on the second floor.
 The next room clockwise is deserted but for a silent worker. Loot the nearby urn for some spell scrolls, ammunition, and the Rage of Chaos sword. Between about the 11 o'clock and 3 o'clock positions, there are a number of small closed doors. Go through any of them to find a long hallway, within which is another room. Inside that smaller room, you will find Xavier Torsend, the Minister of Foreign Affairs for the Severed Hand. Obtain a delegate pass so that you can move freely through most of the building (750 xp). Ask him about the war, to learn the names of the mayor and priest who started the war by insulting Isair and Madae with gifts of holy-water pastry (750 xp). He tells you that if you'd like to speak with the imprisoned envoy, you can ask Captain Pudu on the fourth floor of the Officer's Tower. In fact, Pudu will not be there to ask until the end of the game, but you get 750 xp for learning of the imprisoned envoy. If you have spoken to Jerre Stoh by this point, tell Xavier that the purpose of the demons is to guard the slaves. He will be very upset to learn he has been a party to slavery, and will resign his position and leave the Severed Hand (750 xp).
At this point, you have the delegate pass and all the information you need to proceed directly to the fourth floor of the Tower and start to break down Isair and Madae's defences. However, if you would like to pick up some additional experience points first, you can probably level up several characters by completing the Primary Tower optional subquests that originate on the second and third floors. It would be helpful to do so as you will need to find a few items hidden on those floors to complete the main quests. There is also one more optional first floor quest- The Food Thief - which is described in the paragraph below. When you are ready to proceed with the main storyline, head up the stairs to the fourth floor.
 Just outside the room on the first level where you met Xavier, you will find Vashti Zerran standing amid many workers. She is frantic because there is not enough food to feed all the slaves, and she realises there must be a thief but has not been able to catch anyone approaching the food stores. The cook won't give any additional rations. If you wish to help, you can offer to speak to the cook, who is on the 4th floor of the primary tower. Once you have done so- in vain- and return to give Vashti the bad news, she will ask you to watch over the food stores and see if you can catch the thief.
As you wait near the barrels of food, you'll see a blurry creature approach, take something, and retreat to the next room clockwise from the kitchen. When you follow, you will see a creature that looks something like an elemental huddled miserably in the corner. He calls himself "Zaem" and says he is hungry because his creator, who promised to hide and feed him, has failed to bring food for some time now. If you have already visited the second floor and learned of Zaem Astyr's death, you will quickly identify him as the creature mentioned in Zaem's diary. Tell him of Zaem's death for some additional experience points. You will easily be able to convince him to stop stealing if you promise to find another way to feed him. There is a Ring of Nourishment hidden on the second floor, in Kav Lathram's room; when you find it, you can give it to the creature. You will get 1000 xp for ending the food shortages and another 1000 xp for finding a food source for the starving creature. Alternately, an evil party can just kill him, which will solve the problem of the food shortages but you will get 1500 xp less in total for this solution. Be sure to report back to Vashti to notify her that you've secured the slaves' food supply. You will get 1500 xp for solving the problem peacefully, 1000 if you solved it by killing the creature.