-

- Forums
- Chatrooms
- Gallery
- Gameplay Videos
- Upload
- Articles
- Mod Reviews
- Shop SP: Games, Movies, Books
|
|
Port Llast
Pirate Cove
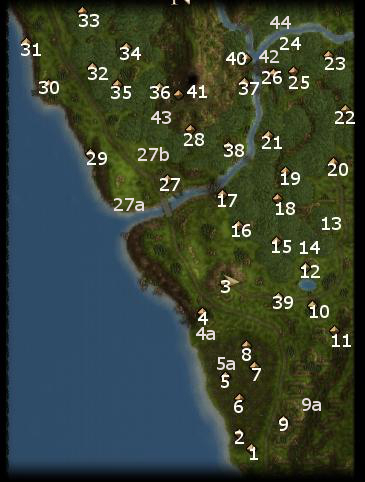
I travel north to the Pirate Cove located at #29 on the Overland Map. I enter and arrive at #1 in the Pirate Cove map.
I buff up to the max, and then slaughter a few Pirates that are scattered throughout the Cove.
At #2 is an Arcane Attenuator, which I cannot make use of until I take on a different quest later on.
At #3 will be the leaders of the Pirates, Captain "Blunderbuss" McGant, Chaplain Alessa, Chef Gronk, and Buff "The Navigator". Buff can be convinced to leave with either a Bluff or Intimidate check, with me doing the former in the video. The rest are easy to cut down in melee combat. Some of the items they leave behind include a Shortbow +2, a Rapier +2, and Talos' Fury (Spear +1, +1d4 electrical damage). Buff would have left behind Bracers of Armor +2 had I killed him. A nearby chest has some random treasures and a Rapier +1.
At #4 are some Pirate Wenches, who don't respond to any attempt to speak to them. Oh well.
Under New Management
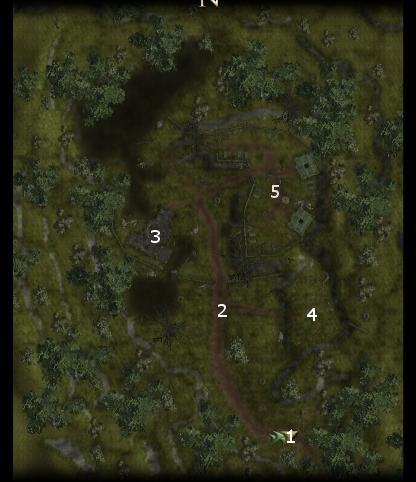
Now I travel to Port Llast, at #30 on the Overland Map.
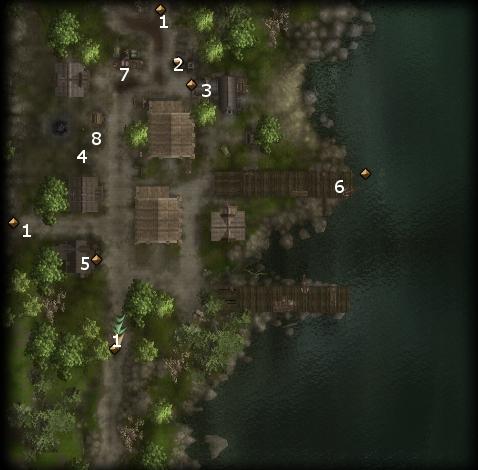
I start off at #1 on the north side of the Port Llast map. At #2 is a Blacksmith's Bench that I can use for crafting armors and weapons.
At #7 is a merchant named Parzeeche. His unique items include a Padded Armor +2, Arrows +1, Arrows +2, and Arrows +3. He also sells several recipes for armors and weapons made from Darksteel.
I head south. Note that undead, such as Ghouls or Skeletons, will occasionally make their way into town and attack. Whether you kill them yourself or let the Luskan guards do it for you is entirely up to you.
I enter the Armed Alliance Inn at #5. Inside will be a man named Eommar, who tells a story of Andreus that may be helpful during another part of the game called the Gothaladreum. I take the chance to speak to Falgor and rest up for 20gp.
I now approach the building at #3. I buff up to the max before entering.
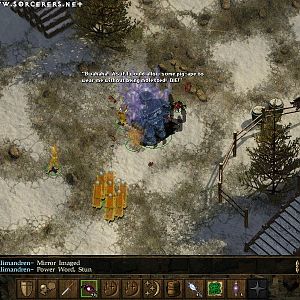
Once I enter, I witness a brief argument between Rynne Shepherd and Septimund. Septimund leaves thereafter. I am now at a crucial juncture, whereupon I have to make a choice between letting the Luskans stay in power or killing them and returning Port Llast to Neverwinter control. And the cartel you may have aligned yourself will have a stake in your choice. If you chose the Circle of Friends, they'll want you to liberate Port Llast from the Luskans. The Forgotten Lords won't care what choice you make, as long as you resolve things one way or another. The Fated Winds, the cartel I aligned with, want me to leave the Luskans in power. Any of the cartels will reward 1,400xp however things are resolved. The Circle of Friends and Forgotten Lords will also pay 1,000 trade bars no matter which choice is made. The Fated Winds will pay 1,000 trade bars only if I leave the Luskans in control of Port Llast.
If I had chosen to leave the Luskans in power, then Rynne Shepherd would be giving me the Army of Undead and The Wrath of Umberlee quests. If I choose to defeat the Luskans, then Haeromos will resume leadership in Port Llast and give me those same quests instead. Completing one of those two quests will allow trade to resume between Port Llast and the sponsoring cartel. Completing both of those quests will allow me to open up a trade post in Port Llast.
I choose straightaway the dialogue options with Rynne Shepherd that will lead to immediate combat with the Luskans. I do this for two reasons. One, it was a roleplaying choice, so I was willing to forgo the 1,000 trade bar payment from the Fated Winds. Second, Haeromos will offer better xp rewards (1,500) for the Army of Undead and The Wrath of Umberlee quests than Rynne (1,200). I easily slaughter Rynne and his two bodyguards. The bodyguards each leave behind a Halberd +1. Rynne himself leaves behind a Garrison Key.
I go outside and fight more Luskans. Note that there were a couple of ways that I could have gained a greater advantage over the Luskans had I chosen to do so. One way was to first convince either Nya or Andreus to send undead into Port Last to fight the Luskans as part of the Army of the Dead quest.
Another advantage involves a ship called the Platinum Pride, which is docked at #6 on the Overland Map. A Cleric of Luskan and several Luskan Buccaneers would attack me along with the rest of the Luskans in the normal course of events. I could have paid a Priestess of Umberlee to sink the Platinum Pride beforehand as part of The Wrath of Umberlee quest. But I chose to slaughter the Luskans anyway, since it's easy enough to pull off myself.
Once that's all done, I return to the Garrison at #3, and use the Garrison Key to free Haeromos from his captivity in his cell at the back of the Garrison. He then rewards me with an amulet called the Sigil of the Last Port (+3 deflection bonus to armor class vs. Orcs, +2 Constitution). I have no use for it though, since I prefer Amulets of Natural Armor. Haeromos also gives me the Army of the Dead and the Wrath of Umberlee quests. Everyone in the party also gets the Patriot of Neverwinter feat (+1 Diplomacy).
As a last note, I could have done the two quests for Rynne Shepherd instead. If I had, he would have rewarded me with an amulet called the Seal of Illusk (-4 Diplomacy, +8 Intimidate, +2 Strength). It is entirely possible to get both amulets, if you're so inclined. Simply do both quests for Rynne, collect his xp rewards and the Seal of Illusk, then slaughter the Luskans, then free Haeromos and get the Sigil of the Last Port. Ultimately I just prefer the slaughter the Luskans straight up because Haeromos offers better xp rewards for the other two quests.
The Wrath of Umberlee
I travel just a little north and enter the Priory of the Depths at #31 on the Overland Map.
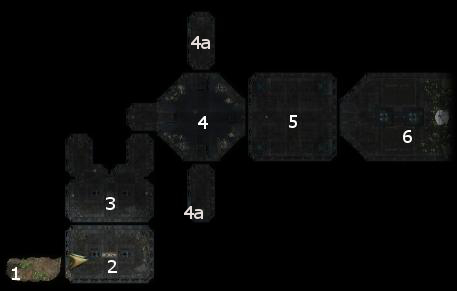
I start off at #1 on the Priory map. There will be a series of tests or challenges that I have to pass before meeting the Prioress of Umberlee who's causing the storms.
The first challenge is at #2 and it's easy enough. Donate either 150 trade bars or 2000 gold to the Shrine of Umberlee.
The room at #3 has a Statue with four placards surrounding it. The Statue will want answers to four riddles, while the placards provide hints as to the correct answers. The answers and correct answers are as follows:
The next room at #4 has several corpses. The first one is that of Sydney Natale's former lackey, Khralver Irlingstar. His corpse has 99 Arrows +3. The other corpses are submerged in the water of the room itself. Items to be found include a Kukri +2 and a Chainmail +1. Entering the water in the room results in a two Water Elementals, one from the north and one from the south, attacking me. I easily cut them down. I switch the levers located at spots marked #4a to open the door to the next room.
The room at #5 has a quite different puzzle. On the floor is a mosaic of nine tentacles protruding outwards, and each tentacle curling around a small circle at its end. The goal is to get a right sequence of a character standing on the right circle, then another character to stand on the next proper circle, and a third character standing on the next proper circle. If the sequence is done right, the three tentacles will stay illuminated and a blue light will appear near the door leading to #6. After that, the characters can move off their circles because the tentacles will stay illuminated and the blue light will remain by the door. After that, two more sequences need to be performed, with the ultimate goal of all nine tentacles staying illuminated and three blue lights appearing near the door, opening it.
You'll know if a character stepped on the right circle if a blue light washes briefly over the character. You'll know if a character stepped on the wrong circle if some minor electrical damage is inflicted on that character.
The thing is, the sequences are completely random. So you can only get it done by trial and error, with characters inevitably taking lightning damage from time to time. Also note that saving and reloading can result in the sequences being completely broken and you having to start over. So you may as well just get it done in one shot. Also, use the "Stand your Ground" command so that characters stay on their circles long enough to solve each 1/3 of the puzzle.
The room at #6 has the Prioress of the Depths. I could bribe her with 6,000gp to stop the storms, and that would be enough to resolve the quest. If the Luskans still happened to be alive, I could go further and pay her another 4,000gp to send waves that will sink the Platinum Pride, which would have made the Under New Management quest easier to resolve. However, I simply prefer to kill her as a roleplaying choice. She leaves behind a Ring of Divine Power (2).
Army of the Dead
First, I make my way to the Armed Alliance Inn. Inside the Inn is a registry book that can be used to add or dismiss cohorts. I dismiss Finch for the time being.
The reason being that I want to include Septimund as a temporary cohort, for he provides a quest unto himself with its own xp bonus. He can be found at #4 on the Port Llast map. First, I query with him what troubles him. After that, a Bluff, Diplomacy or Intimidate check is enough to convince him to join the party.
I now travel to the Gothaladreum, which is at #32 on the Overland Map.
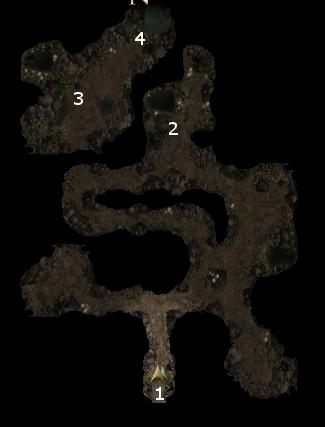
I start off at #1 on the Gothaladreum map. I dismiss Yushai for now. The reason is there seems to be a bug in this area whereby Yushai's hit points seemingly go to zero and he becomes unresponsive. I have Janette cast Mass Death Ward, so that Vandala can blast away with prejudice. Just a little ahead will be a corpse that has a couple of torches.
Ahead at #2 will be several hordes of Undead. Physical attacks, coupled with Beshadowed Blast / Eldritch Chains from Vandala, suffice to blow them away.
At #4 is a Ghostly Visage, the spirit of Lord Adreum. He is potentially an ally in clearing out the Luskans, if they had not been killed beforehand. If I talk to Nya (who's close by) first, she'll want Lord Adreum's help in raising an army of the dead. I can then speak to the Ghostly Visage, and he'll send that army to Port Llast. When you return to Port Llast, the undead will be attacking the Luskan Soldiers in Port Llast, making things easier for you. In fact, if you're so inclined, you could make things very easy for yourself by both raising the army and sinking the Platinum Pride beforehand before moving on the Luskans.
If you had spoken to Eommar beforehand in the Armed Alliance Inn and had him explain Adreum's curse to you, you could then straightaway convince Lord Adreum to raise the army of the dead against Port Llast without the need to speak to Nya beforehand. Keep in mind that if I ever were to agree to raising an army of the dead, whichever way, Septimund will be offended and permanently leave the party then and there.
If you want to leave the Luskans in power, then you'll need to kill Lord Adreum. He'll leave behind a Bastard Sword +2.
If, like me, you had already killed the Luskans beforehand, then Lord Adreum will simply tell you that you are not welcome in his domain.
At #5 will be more undead to kill. There will also be a few sarcophagi, which hold a Full Plate, a Ring of Protection +1, a Greenstone, and a Ring of Protection +1.
At #3 will be Nya, the Elven woman who's been raising the undead in an effort to unseat the Luskans from Port Llast. If the Luskans were still alive, I could fall in with her plans to raise an undead army by first taking her up on her offer and then convincing Lord Adreum to provide assistance. And again, agreeing to any of this will cause Septimund to leave the party permanently.
I could also kill her, but then she would leave nothing behind.
I instead try to convince her to stop raising the dead. Had Septimund not been in the party, I could have made a couple of Diplomacy checks to convince her to willingly stop her plans. However, Septimund is with me, so I let him carry the conversation to likewise convince Nya to abandon her efforts and return to Port Llast.
Within Nya's now abandoned room is a container that has scrolls of:
I make to leave the Gothaladreum. Just as I click on the exit, Septimund indicates a desire to leave the party. A Diplomacy check suffices to convince him to permanently join my roster of joinable cohorts, and a 700xp reward. Note that if Septimund ever left because I fell in with Nya's plans to raise an undead army, or if I never brought along Septimund during this quest, Septimund would be gone permanently and I would never have had the chance to collect the 700xp reward.
I bring the good news to Haeromos, and get 500gp and 1,500xp.
Port Llast Trading Post
I need a 1,000 trade bars and five Ores to build a trading post in Port Last. I buy the Ores directly from Port Llast itself, and then construct the trading post. I then pay out the gold to maximize the caravan route between Port Llast and Neverwinter.
I travel back to the Temple of Waukeen in Neverwinter. Martin Keller is displeased that I routed the Luskans out of Port Last, so he won't pay me my 1,000 trade bars. I still get 1,400xp though.
Headband of Intellect +6
I return to Port Llast. Nya can now be found at #8 on the Port Llast map, where she now operates a store. She sells a lot of spell scrolls, gem stones, wands, and some Adamantine or Darksteel armors. Significant items include:
I buy the Ring of Freedom of Movement for Umoja, which replaces his Ring of Minor Fire Resistance. The Ring of Freedom of Movement will help him cast spells like Tortoise Shell on himself without having to take on any attribute or movement speed penalties.
Another key acquisition from Nya is the six Beljuril gems, which are a true rarity in Storm of Zehir. I have at least two items in mind that I want to craft and that require Beljurils.
I return to the courtyard of Crossroad Keep. I buy a Gold Circlet from Jacoby. I then enter the Merchant's Headquarters.
I collect my trade bar income from Variel, and then head for the crafting benches.
Crafting a Headband of Intellect +6 requires the Gold Circlet, three Beljuril Gems, one Aventurine Gem, 18,000gp, and a Fox's Cunning spell. Gallard gets the Headband, as it helps at once some of his thieving skills, his armor class, and his weapon damage.
Sating the Sensate, Part 1
I return to Neverwinter and speak with a Fire Genasi named Phineas the Sensate, who's waiting just outside the door to the Temple of Waukeen. I can now do his series of quests now that I've established trade with Port Llast. He ultimately wants at least eight rare resources in the course of his series of quests. But for now, he wants at least three rare resources.
I begin by purchasing a unit of Knucklehead Ivory from Port Llast (hence why I needed to resolve matters in Port Llast first).
I next purchase a unit of Mithral from Highcliff on the way to Crossroad Keep.
I then take the portal in Crossroad Keep back to Samarach. I make my way to the town of Torich, and purchase a unit of Salt.
I bring the three resources back to Phineas and get rewarded with 500 trade bars. He indicates that he wants three more resources, which leads to the next quest.
Sating the Sensate, Part 2
For the next three resources, I buy a unit of Zalantar from Thundertree (New Leaf would have served as well), a unit of Cold Iron from Phandalin, and a unit of Darksteel from Conyberry. I need to give out a reminder that the quests for Phandalin and Conyberry need to be completed first before Cold Iron and Darksteel become available as resources.
I give the resources to Phineas, who rewards me with another 500 trades. And he wants yet more resources.
Sating the Sensate, Part 3
Next I buy a unit of Adamantine from Leilon and a unit of Harvest Mead from West Harbor (or Dragon Mead had I sided with the Black Dragons).
I bring the resources back to Phineas, who rewards me with 1,400xp and another 500 trade bars. He also rewards me with the Sensory Stone before departing. Using the Sensory Stone and then selecting the 'Open your mind to the stone' option results in another 2,000xp reward.
My next destination is the northern parts of the Sword Coast.