-

- Forums
- Chatrooms
- Gallery
- Gameplay Videos
- Upload
- Articles
- Mod Reviews
- Shop SP: Games, Movies, Books
|
|
New City | Orkogre Castle | Nyctalinth | Munkharama | The Hidden Temple | Land of Dreams | Rattkin Ruins | The Funhouse | Giant Cave | Witch Mountain | Ukpyr | Sphynx Cave | Dionysceus | Return to Nyctalinth | Return to New City | Dragon Cave | City of Sky | Hall of the Dead | Hall of Gorrors | Hall of the Past | Tomb of the Astral Dominae |
WITCH MOUNTAIN
Vine Rope
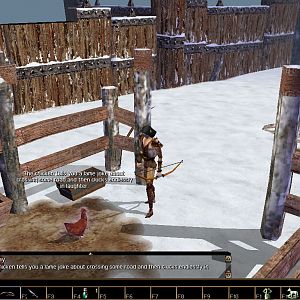
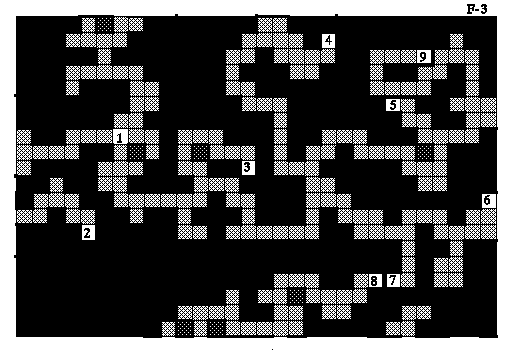
When I first emerge from the Funhouse, I will be at #1 on the F2 map. I travel to #3, fighting monsters along the way. I encounter a new enemy. Rock Lizards are not particularly dangerous, but they can once in a while petrify a character with their bite attacks.
A new kind of monster shows up to interrupt my resting, Vampire Vultures. They're considerably tougher than other bird monsters you will have run into previously, and they have a chance to permanently drain Hit Points with their attacks. But Sleep is actually very effective against them.
Rothgar advances to his 14th level after I defeat a pair of Boulder Giants. He obtains at least the 90 Theology skill points needed to access the 6th-tier Priest spells. I take Cure Stone, which will increase his Earth Mana with each subsequent level-up.
I obtain a a 250-ft Vine at #3. I need three more of them to make progress.
I travel east and then. I get into a couple of battles against Bantari, two-headed lions that can occasionally score critical hits. They're usually pretty easy to defeat, and the critical hits become less and less of a danger as you go up levels.
I get two sets of 250-ft Vines at #4, for a total of three. I combine two of them for a 500-ft Vine.
I backtrack to the south and then head east, and fight a couple of new monsters along the way.
Wood Dryads are more dangerous than Faerie Witches or Water Nymphs. They take somewhat longer to kill, and can crank out spells like Fireball and Dazzling Lights. You usually encounter them one or two at a time, which means sometimes you can just try to kill them with physical attacks before they get off any spells.
The Q'uatari is like the Bantari, but more dangerous. They take more damage, have a greater chance of inflicting critical hits, and once in a while can breathe cold to inflict pretty hefty damage on the whole party. Sometimes you can kill one by itself without much worry.
I get the last 250-ft Vine at #5. I merge it with the remaining 250-ft Vine for another 500-ft Vine. And then I merge both 500-ft Vines to get a 1,000-ft Vine. The reason for this will soon become apparent.
Purple Plumac
I travel east, fighting monsters along the way. Zarax advances another level.
I find the Purple Plumac at #6 on the F3 map.
I then head for #7. To even have any opportunity of climbing down the sheer cliff, you must use the 1000ft Vine Rope. Even then, your Climbing skill must be very good to have any chance of pulling it off without falling down and automatically dying afterwards. Once I do make the climb, I end up at #8.
White Dahlia
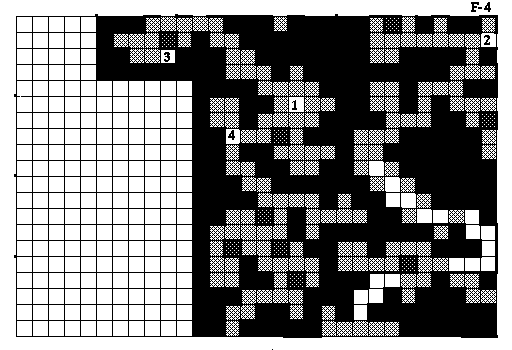
Now I travel south and westwards in order to reach the northwest corner of the F4 map. Terra reaches her 14th level-up after fighting enough monsters. She got 13 Academic Skill Points, which was enough to bring her Thaumaturgy from 77 to 90 and gain access to the 6th-tier Mage spells. She selects Asphyxiate, which is her first mass destruction option that can be used to wipe out several groups of enemies all at once.
At #3 I find the White Dahlia, an ingredient of the Snakespeed Potion. I then merge the White Dahlia with Holy Water to get Dahlia Water.
The Witching Hour
When the party comes to the area that #1 is in the center of, they'll get premonitions in the field.
I leave the glade temporarily and read the Book of Fables again. Note the reference to 'the witching hour'. Now I rest until the sky is pitch black. Errol casts Direction so I can keep track of where I'm going.
Now for the visions, somebody in the party must be wearing the Necromantic Helm. I now go to the squares north, east, south, and west of #1. On each square, a wraith will reveal the name of one of the four wicked witches who imprisoned Hilynda. At #1 itself will be Hilynda herself, who will plead for help.
Now I know that the names are:
I head all the way back to the north east corner of the F3 map. #9 is the way to the top of Witch Mountain.

South Witch Hood
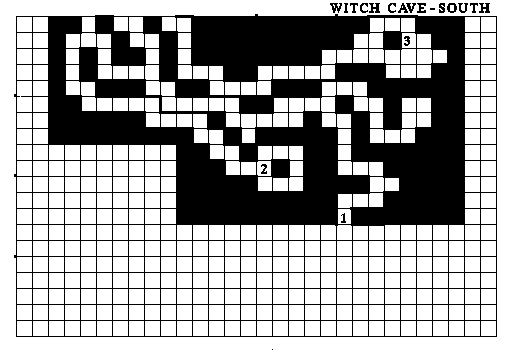
Now I travel from #1 on the south map to #2, which is where the South Witch Hood is located. The correct answer is 'Xandasa', along with 1000gp, whereupon the witch transforms into a statue of Phoonzang which is easily defeated. I then get the Golden Teeth.
West Witch Hood
Now I travel to #4 on the south map, which is where the West Witch Hood is located. The correct answer is 'Carmela', along with 1000gp, whereupon the witch transforms into a vision of Vi Domina. She can attack with her sword, and a Cobaltine Power Glove that can paralyze a single character, but she shouldn't be all that dangerous.
Ryu takes Deadly Poison on his 14th level-up. I also get the Golden Nose.
East Witch Hood
Now I travel to #3 on the south map, which is where the East Witch Hood is located. The correct answer is 'Carmela', along with 1000gp, whereupon the witch transforms into a vision of Aletheides. He can either inflict hefty damage with his touch attack, or cast Psionic spells, so the trick is to kill him quickly before has the chance to do much.
North Witch Hood
At #9 is a chest that holds a Bat Necklace and a couple of other magical items.
Now I travel to #5 on the north map, which is where the North Witch Hood is located. This time I cast my long lasting buffs, Armor Plate, Enchanted Blade, and Magic Screen. The correct answer is 'Naralda', along with 1000gp, whereupon the witch transforms into a vision of the Dark Savant. He tends to use his Glove to either paralyze multiple party members, or as a missile attack on a single party member that can critically hit.
The Golden Witch
Now I head over to #6 on the north map. The witch in the mirror indicates to look behind me. At #7 is where I use all the golden facial features that I've acquired previously. The good witch, Hylinda, arrives and gives me an Elysiad of Divinity. The Elysiad is an item that can only be used during the last boss fight. So long as one character survives the last fight, it can resurrect slain party members anew, and they still get the experience points from the fight.
Sphinx Map
There is a lever just north of #7, which opens the way to #8. At #8 is a chest that holds the Sphinx Map.
Now I go all the way back and leave Witch Mountain through the initial entrance at #1.
That brings me back to #9 on the F3 map. I make my way to the steep climb at #7, and descend to reach #8. I continue west and south to reach the F4 map, for y next destination is Ukpyr.