-

- Forums
- Chatrooms
- Gallery
- Gameplay Videos
- Upload
- Articles
- Mod Reviews
- Shop SP: Games, Movies, Books
|
|
ASHENWOOD
Monsters in the Ashenwood
I do a sweep of most of the Ashenwood. There will be plenty of monsters to kill, Shambling Mounds, Blighted Treants, and Fell Trolls. The ensuing battles demonstrate a solid approach to combat. Pile up on your attack bonus, your armor class, your weapon damage, and your regeneration as much as you can. The more the better. Once you've piled up good enough, you can very often just let combat play itself out as you cut down the monsters rapidly while sustaining very little damage yourself. And in a setting where the spirit eater curse forces you to be judicious about when you cast spells, such an approach allows you to save your spells (damage spells, protective spells) for when it's truly needed.
Telthor Sanctuary
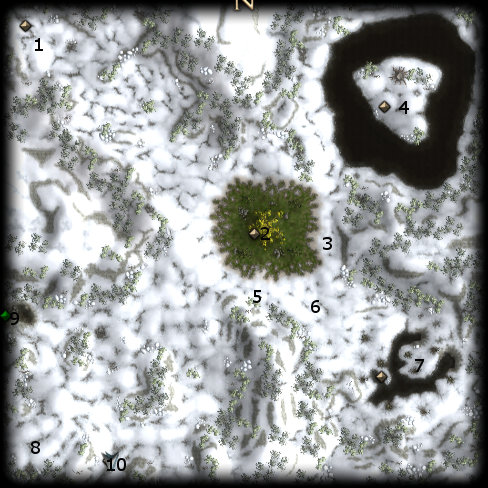
I make my way towards #3, which is on the edge of a lake in the northeast corner of the Ashenwood. Here I find a Telthor Berserker, surrounded by several Telthor animal spirits. I then speak with the Telthor Berserker for a while. The gist of it is that he wants me to get the Frost Giants who have taken over the Sanctuary to leave.
The next part of the video shows an effective use of the Suppress ability. The latest patch removes the +3 to lawful alignment whenever Suppress is used, which might be considered a penalty for those who want to maintain a chaotic alignment (like me). Otherwise, there are a number of things to keep in mind when it comes to Suppress:
Re-Exile
The Frost Giants are waiting in the small isle at #4. I engage in a dialogue with their Jarl, the point of which is to accept their challenge. The Jarl's crown will be placed on the ground of the Isle. Each of the Frost Giants will make a bee-line for the Crown, attempt to put it on, and only then will begin attacking in an effort to claim the crown as the new Jarl.
It's actually pretty easy to pass the first part of the challenge because the time it takes for any of the Frost Giants to reach the Crown to pick it up allows the party to get in a lot of free shots. Many of the Frost Giants don't make it to putting the crown on, let alone begin attacking the party. Valeria's Persistent Haste certainly helps in that regard.
The next part of the challenge is when the incumbent Jarl himself arrives to attack the party. He can actually be quite difficult, since he can hit for enormous damage, especially on a critical hit. Nonetheless, a well-armored and well-buffed party should be able to gang up on him and bring him down. However, if a character does get smacked for a lot of damage, a simple tactic is to have that character run away. The Jarl is likely to redirect his attacks towards closer characters, giving the wounded character a chance to heal or regenerate to full hit points.
The Jarl then capitulates, whereupon I have a number of dialogue choices. The most beneficial choice is to demand tribute, which leads to the Jarl giving me a pair of gloves, Thicket Favors (+1 9th level spell for Druids or Spirit Shamans, +1 4th level spell for Rangers, +6 Wisdom, +2 saving throws, +3 regeneration). These will be Gann's gloves for the rest of the game.
Sacred Pool
Within view is the Sacred Pool. I click on it and obtain the Pure Sanctuary Water that I need for an anointing solution that is a quest item.
To revive the Sanctuary spirit, all I need is to place any spirit essence in the pool. Even one of the unique spirit essences (e.g. Shadow of the Void) will work. I place a Pristine Spirit Essence in the Sacred Pool. The reward is 1,500xp.
Hunting Party
I journey south past the large tree in the middle of the Ashenwood. At #5 is a campsite with a couple of corpses near it. Only one of the corpses can be looted for the time being. The loot is the Reverberating Crossbow of Pain (+6 attack bonus, -5 attack bonus penalty, Reverberating Shot ammunition without limit). The crossbow is best placed in the hands of a character with a high base attack bonus and a good Dexterity bonus (e.g. Ranger) to be effective. And once you can get a good enough attack bonus to compensate for the crossbow's penalty, the damage from the Reverberating Shot ammunition (+6 piercing damage, +4d6 sonic damage) can be devastating. But I had other plans in mind for my party.
The corpse can also be looted for a Potion of Heal, plus a book called "Ceremonies of the Hunt" which provides a clue that an anointing solution can be created from the blood of a powerful animal favored by Malar.
At #6 will be a Hunting Dog that wanders about rather randomly. It is initially too afraid to interact with me in any meaningful way for the time being.
I go back to the campsite. A second corpse can now be looted for the Huntmaster's Garb.
Now that I have the Garb, I can approach the Hunting Dog. Having either Okku or Gann in the party means I can learn that the Hunting Party was massacred, and that the Hunting Dog somehow feels that it was the forest itself that was responsible. I get 1000xp for this quest.
Gnarlthorn
At #7 is an enormous Treant named Gnarlthorn. He explains that an ancient blight in the Ashenwood, the work of the goddess Talona, has revived and is now wreaking havoc on the forest. He also explains that it is possible to petition the goddess Chauntea to undo the blight through an anointment consisting of sacred water (the Pure Sanctuary Water that I obtained earlier from the Telthor Sanctuary), and two tainted items from the forest. He gives me the first tainted item, the Blighted Leaves.
Yurkov and Ferala
The first part of the video consists of me travelling towards the southwest corner of the Ashenwood. At #8 will be a Rashemi Berserker named Yurkov and a Malarite Hunter named Ferala having a stand off with each other, while another Berserker named Grigarii lies dying.
Valeria chooses to help Yurkov, for which she earns good points. She and her party have little trouble defeating Ferala and her Beasts of Malar. Grigarii soon dies and becomes a Telthor spirit. Note that it is possible to talk Grigarii into becoming the guardian of the Sanctuary towards the northeast corner. But I've already taken care of that. Choosing to help Yurkov in this way means that a good party will be able to acquire a magical greataxe later on.
*Evil* Yurkov and Ferala
*Evil* I could choose to attack both of them, but then I'll just get some gold from their corpses afterwards and nothing more. The way for Zarathos to get the max out of this encounter is to help Ferala take down Yurkov. I get 10 points towards evil for choosing the "Beg for your life" dialogue option with Yurkov. Yurkov himself is fairly easy to take care of.
Ferala will afterwards turn into a Werewolf and attack Zarathos after Yurkov is taken care of. I wear down Ferala as well. It is at that point that I choose the option of 'skinning Ferala'. For this I get a Pristine Earth Essence and the Grasp of Earth (Banded Mail +6, Greater Stoneskin (11) 2 / day, Stonehold (11) 1 / day, +10 fire resistance, -25% sonic damage vulnerability), but the evil party doesn't have any use for the armor.
The video concludes with the party making its way towards #9, which is the entrance to the Predator Den.


