-

- Forums
- Chatrooms
- Gallery
- Gameplay Videos
- Upload
- Articles
- Mod Reviews
- Shop SP: Games, Movies, Books
|
|
THE SKEIN
Exiles
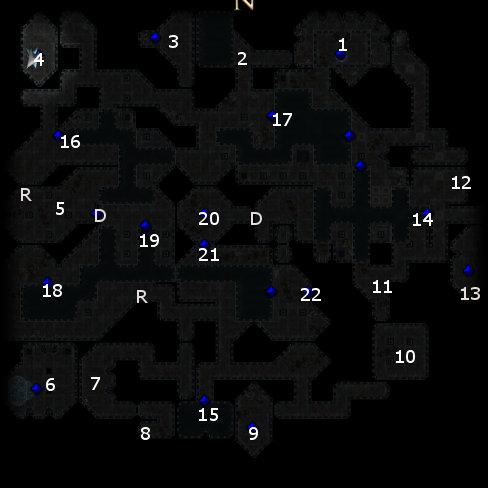
I start off at #1 on the map. There will be loot amongst the corpses nearby, but a lot of it is mundane by now. I do scoop up a few Heal Potions though.
Just up the stairs are some Exiles, some of whom are determined to attack me. I can get some of them to leave either by making a Diplomacy check, or letting them argue amongst themselves. I easily kill the ones that stay behind and attack me. They'll leave behind magical weapons and armor, often of +3 enhancement bonus.
Geiard Riverdweller
The video begins with me exploring the northeast corner of the Skein, killing a few Maverick Fire Elementals and a few Telthor Panthers along the way.
Afterwards, I make my way due west. I also kill a few Hags with straight physical attacks at around #2. The spot at #2 marks the location of a fresh corpse, which may become relevant later on.
At #3 will be a group of Exiles, led by Geiard Riverdweller. If I were so inclined, I could kill the lot of them and then loot Geiard's corpse for the Belt of the Avowed (+7 Wisdom, +6 Dexterity, Improved Critical (Unarmed Strike), Legend Lore (15) 1 / day, -4 Charisma). The belt is made more with a Monk character in mind, and I don't have any use for it.
Instead, I speak at length with Geiard to learn a lot of background information and ways of possibly escaping from the Skein.
The good party doesn't interact with the woman that Geiard alluded to, The Sleeper, at least not yet. The evil party though ...
*Evil* The Sleeper
One of Many expresses a desire to devour The Sleeper, and Zarathos obliges. One of Many gains the powers of the Mad Woman, which I'll get into just below. I gain +11 influence with One of Many as well. I would have lost -11 influence with One of Many had I turned him down.
An alternative was to have Zarathos devour the Sleeper's soul. Had he done so, he would have acquired a Pristine Spirit Essence, as well as the Dream Haunting ability which allows him to travel the dreams of others. There will be another opportunity to acquire the Dream Haunting ability.
Either way, her protectors attack naturally afterwards. Here, the video shows how to use Spirit Gorge effectively. Gann hits the closest enemies with Mass Drown. Zarathos hits the Gnome that is 'near death' with a Spirit Gorge. This not only sucks all the life energy from the 'near death' Gnome, but also sucks in some energy from nearby beings as well in an area of effect similar to Fireball.
*Evil* The Madwoman
One of Many can now change to the Madwoman, which will allow a class change to Warlock whenver Zarathos wishes it. Having said that, I don't find it terribly useful since the Madwoman won't even have the Eldritch Chain which I consider to be crucial to any Warlock build.
The other benefit is that One of Many will also acquire the Dream Haunting ability, allowing it to join me during those parts of the game where I and Gann enter somebody else's dream.
*Evil* Primal Earth Elemental
The evil party first explored every part of the Skein that has not been flooded over. At some point Zarathos enters the room at #6.
I eventually make my way towards the room at #6. A corpse on the floor will have a spell scroll and a Staff of Defense (+2 deflection bonus to armor class, Ghostly Visage (3) / 2 charges, Mage Armor (2) / 1 charge, Protection from Alignment (5) / 3 charges, Sorcerers and Wizards only). Also on the floor will be Swift Legs (+4 dodge bonus to armor class, Haste), which I save for when I want to assemble a Golem in a later part of the expansion.
Also in the room will be an enormous Primal Earth Elemental. It is being held in place by an Imaskari Device that is controlled by an Imaskari Device Lever. There are two possible methods of escape from the Skein, and they are exclusive from each other. You can only do one, but not the other. And which one you do boils down to a choice made with the Imaskari Device that's just in front of the Primal Earth Elemental.
One choice is to use the lever in order to release the Primal Earth Elemental. It will attack. While it can inflict devastating damage should it connect, a well-armored and well-equipped party should be able to handle it. If you use Devour Spirit as a killing blow on it, it will yield a Pristine Spirit Essence. It will also leave behind the Ring of the Untherite Generals (War Cry (7) 1 / day, Battletide (9) 1 / day, Mass Cure Moderate Wounds 1 / day, Expert Tactician, +4 Charisma).
There are a few consequences for doing things this way. One is that it will mean completion of the Fentomy's Wish quest in the way that Fentomy wanted. Second, it will mean that the spots marked by 'R' will have rubble collapsing down on them, preventing the party from ever going past them again. But that also means that the doors marked by 'D' are now open where previously they had been locked. In a sense, it presents a shortcut to escaping from the Skein. I describe the alternative method just below.
Primal Earth Elemental
The video consists of me traveling along the west edge of the Skein, killing various monsters along the way like Telthor Rats and Exiled Hagspawn. Along the way I sometimes get attacked by one of a few Air Elementals that travel at random throughout the Skein, and always teleport away just before I can finish them off. Furthermore, they always leave behind a Glittering Powder upon teleporting away. Keep mental track of where the Glittering Powders get left behind, because they can be used in the other method of escaping from the Skein. I eventually make my way to the room at #6.
The alternative method of escaping from the Skein is to instead use three other Imaskari Devices that are located at #4, #9, and #13 on the map. You may have noticed that some parts of the Skein are inaccessible because they are flooded. If you can power up all three of the other Imaskari Devices, it will result in a draining of the flooded areas. There won't be any rubble falls at the spots marked 'R', and there won't be any opening of the doors marked 'D'. However, the corpses in the previously flooded areas yield plenty of loot. They also provide a different pathway to leaving the Skein that bypasses the doors marked 'D'. However, one consequence will be that Fentomy will be upset afterwards since the Primal Earth Elemental will be left trapped in the Skein.
Activating each of the other Imaskari devices at #4, #9, and #13 requires the use of three different Imaskari Device Levers. One of the levers is in the Imaskari Device that is just in front of the Primal Earth Elemental. So the choice becomes clear. Leaving the Lever in this Device and using it to release the Primal Earth Elemental would commit me to going through the doors marked 'D', but never being able to access the flooded areas. Removing the Lever from the Device means escaping the Skein through the flooded areas that become drained, but would commit me to leaving the Primal Earth Elemental trapped, to never being able to fulfill the Fentomy's Wish quest in a way that would be satisfactory to him, and never getting the Pristine Spirit Essence or the Ring of the Untherite Generals for killing the Primal Earth Elemental.
Valeria prefers the latter choice for a number of reasons. One, I hate the screen shaking that would result if I kill the Primal Earth Elemental. Second, I find the ring rather underwhelming and I have no use for it. Third, I actually want to kill Fentomy for an item that he has.
First Imaskari Device
East of the Primal Earth Elemental will be the first of three other Imaskari Devices at #9. There will always be some requirements for getting one of the Devices operational:
Duergar Waraxe
Now I enter the room at #10. There will be several Exiles there, including a Mad Axe-Wielding Duergar. I loot its corpse for the Duergar Waraxe after I've finished the battle in short order.
Next I return to Geiard's hideout at #3. One of his followers is a Gnoll who has the last Imaskari Device Lever that I need. I trade the Axe for the Lever straight up. In the alternative, an evil party could slaughter everyone at #3 and get the Lever that way.
Second Imaskari Device
Now I use the same procedure to activate the Imaskari Device found at #4. A Fresh Corpse for blood can be found in the very same room.
Charming Sling
Now I travel back to the east side of the Skein, where I had first acquired the Duergar Waraxe. I continue north, rest up a bit, and continue north till I get to #12.
Once there, I get attacked by a lot of Telthor Panthers, but they're easily dealt with.
A nearby corpse has a Charming Sling (Sling +3, +2 Charisma), but I have no use for it.
Third Imaskari Device
I repeat the procedure for the Imaskari Device at #13. A Fresh Corpse for blood can be found in the room at #10.
All three Imaskari Devices are now powered up, for which I get 5,000xp. All of the flooded areas in the Skein have now been drained as well.
Storm Armor and Kukri
Now I begin to explore the parts of the Skein that were previously flooded but have now drained away. They usually have Bloated Corpses that offer some loot, as well as Malignant Water Elementals waiting to attack. Mind you, I have no use for any of the loot except for a Bag of Holding and another Cloak of Blackflame that I'll find soon. The corpse at #15 has the Storm Armor of the Earth's Children (Full Plate +1, +15 electrical resistance, +15 fire resistance) and the Kukri of the Eclipse (Kukri +4, +1d6 negative energy damage, darkvision, immunity to Darkness).
Bag of Holding
There will be more items in the drain section around #14, including:
Rogue Links
There will be three items, in addition to the odd random item or two, in the drained section around #17. One is the Wand of the Heavens (Flamestrike (7) / 5 charges), and another is a Rod of Thunder and Lightning (Chain Lightning (20) 1/day, Sound Burst 3/day). The third item is the Rogue Links (Chainshirt +3, +6 Hide, +6 Move Silently). The latter item may be useful for a character built around the Hide in Plain Sight ability.
Gloves, Shield, and Flute
The drained off section around #16 has three more items:
Leech
The drained off section that starts at #18 has corpses that will yield random items, plus:
*Evil* Gulk'aush
At #20 is the Night Hag called Gulk'aush. I first show this part of the game with the evil party. The battle goes in three phases. First, cutting the Hag down to 'near death'. Second, she'll possess one my party members forcing me to bring that party member to 'near death'. Third, finally finishing the Hag off for good.
Had One of Many not yet devoured The Sleeper, he would now want to devour Gulk'aush as the other way to gain access to the Madwoman's abilities as well has his own Dream Haunting power. Whether I acceded to his request or turned it down would have had the same influence repercussions as with The Sleeper as well.
However, since One of Many already has the Madwoman, he suggests I devour Gulk'aush. Zarathos obliges and uses Devour Soul on Gulk'aush. He thus obtains the Dream Haunting power, as well as Gulk'aush's Essence. The Essence can be fused (using Mold Spirit) with the Orglash Crystal, the Hulmarra Emerald, the Gem of Brightness, or the Gem of Seeing to produce the Amulet of Pure Love (immunity ability / level drain, immunity to fear, +2 regeneration, Greater Restoration (13) 1 / day). It's a decent amulet, but I ultimately wouldn't have had any use for it. I prefer amulets that confer a natural bonus to armor class during Mask of the Betrayer.
I also lose -11 influence with Gann. No worries, I'll still be able to get at least 75 influence with Gann over the course of the rest of the game.
Lastly, no matter how you handle the situation involving Gulk'aush, you will get 5,000xp and the Hag's Eye, which will allow your protagonist to enter the dreams of others.
Gulk'aush
Here is where Valeria chooses to spare Gulk'aush, which has the benefit of gaining influence with Gann. Doing things this way means I won't be able to get Gulk'aush's Essence, but I get the 5,000xp and the Hag's Eye in any event.
The Hag's Eye allows Valeria to enter the dreams of others. The difference here is that Valeria has to have the Hag's Eye in her inventory to be able to enter the dreams of others, while Zarathos can gain Dream Haunting as an inherent power by using Devour Soul on either The Sleeper or Gulk'aush.
Kaelyn's 27th Level
Gann gets enough xp to reach his 28th level, while Kaelyn gets enough to reach her 27th level. There aren't any particular highlights for Gann, although he does add +1 to his Charisma.
Kaelyn adds the Divine Shield feat. She can now add a dodge bonus to armor class that will stack with everything else that's equal to her Charisma bonus modifier. It will also last for as many rounds as her Charisma bonus modifier. Can really come in handy during particularly intense fights.
Dreamer's Heart
Valeria now speaks to Gann, who brings up the subject of Gulk'aush. He then makes a statement that if he is ever loved, then he will vow to love in return. The dialogue becomes a key opportunity to benefit Valeria. I deliberately choose the option: "What if I told you that I loved you?" The benefit is that both Valeria and Gann get the Dreamer's Heart feat. For Valeria that means a spell resistance of 30, and immunity to mind-affecting spells. For Gann it also means immunity to mind-affecting spells, and another +5 to spell resistance that stacks with the spell resistance he already had.
Note that I could have gotten this feat later on when I'm ready to enter the City of Judgment, but why not get it and enjoy its benefits now?
Dreamer's Voice
I speak with Gann again, and since my influence with him is high enough, he replaces the Dreamer's Eye feat with the Dreamer's Voice feat. That means +2 Charisma and +10% to Devour Spirit for Valeria. It means +4 Charisma for Gann.
The Sleeper
Now I make my way back to #3, where the Half-Drow woman called The Sleeper sits suspended in an endless nightmare. I can now enter her dreamscape after having acquired the Hag's Eye. Once there, she wants me to kill her in order to end her torment but without ruining the trove of knowledge that has been acquired by the Slumbering Coven. I choose to spare her, and earn 500xp in the process.
The video concludes with me making my way back to Gulk'aush's den.
Weather-Resistant Golem Torso
I then proceed through the drained area that starts at #21. The Bloated Corpse on the floor has some gold, an Emerald, and a Sapphire. There will also be a Weather-resistant Golem Torso on the floor. I stow it in my Bag of Holding for now. It can be used later on in the construction of a Golem such that the Golem itself will have completely immunity to damage from acid, cold, electricity, and fire.
At #22 is the stairs that allows me to return to the Coveya Kurg'annis.