-

- Forums
- Chatrooms
- Gallery
- Gameplay Videos
- Upload
- Articles
- Mod Reviews
- Shop SP: Games, Movies, Books
|
|
DEATH GOD'S VAULT
Ancient Mosaic
I make my way back to the first level of the Death God's Vault.
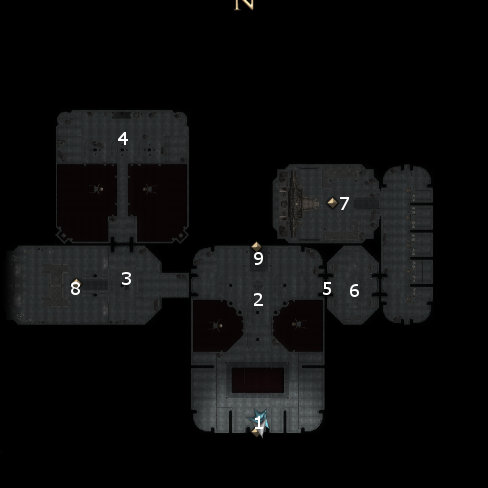
At #9 is the entrance to the next level, which I can't access for the time being. To either side of the entrance, for interest's sake, is an Ancient Mosaic depicting a battle that involved Akachi the Betrayer.
Mummified Priests
I venture west and run into some Mummified Priests. As long as your saving throws are good enough, it should be easy enough to overwhelm them in physical combat.
Death Knight's Key
Talking to the Death Knights at #4 results in them attacking me, and they can be very dangerous with their highly-damaging physical attacks. And indeed, a critical hit from their scythes can be truly devastating. Kaelyn is the key to winning this battle. I carefully position her so that she's close enough to place a Mass Heal spell just so, but at the same time not close enough to expose her to their attacks. A well-placed Mass Heal spell will at once recoup any damage sustained by the party while at the same time inflict significant damage on undead. Just that fact makes taking down the Death Knights so much easier.
Once the first Death Knight falls, it becomes a matter of ganging up on the next one until it falls, and then the last. If necessary, Gann and Kaelyn can help things along by targeting them with Heal spells which will damage them.
One of the Death Knights leaves behind a Death Knight's Key, which I'll use very soon. The other is the Bone Dancer's Ring (immunity to death magic, immunity to ability / level draining, +10 slashing resistance, +10 piercing resistance), which becomes one of Okku's rings for the rest of the game. It is probably his only opportunity to gain significant damage reduction that will enhance his role as a front line warrior. Immunities to death magic and ability / level draining are sugar on top.
Stoneeater's Ring
I travel east to #5, and use the Death Knight's Key to open the door there. On the other side will be a few more Mummified Priests, whom I again overwhelm in physical combat.
The Skeletal Remains will have various treasures like spell scrolls, gold, and a few Heal Potions. The Offering Urn in the northeast corner of the room will have the Stoneeater's Ring (Stone to Flesh (5) 1 / day). Taking the ring causes a Dread Wraith to attack, but I easily kill it as well.
Cremated Spirits
I continue on and travel to #7 towards the northeast corner of the level. I then get ambushed by a LOT of Cremated Spirits and Dread Wraiths. They swarm me from all sides, so it is best to use damaging spells that won't harm party members, like Chain Lightning and Fire Storm.
There will be plenty of crafting essences to collect afterwards. The many Skeletal Remains on both sides of the room will also each have a Fire Agate gem that can be looted.
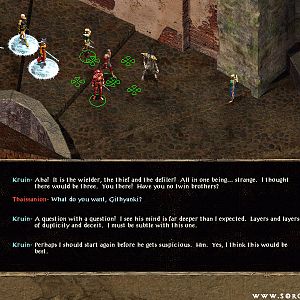
One of Many
There will be the spirit of a Priest of Myrkul standing at the entrance to the crematorium. I could use Devour spirit right away. However, the best course for a good character is to explore the dialogue options that will lead to sympathizing with the Priest's suffering and then learning the Eternal Rest power, as shown in the video (i.e. "I am sorry" and then "Your sacrifice was not in vain ..."). The Eternal Rest power can be used on any undead, corporeal or incorporeal, and will not increase Craving with each use.
Once the Priest is gone, several Furnace spirits, along with the spirits called The Child and The Brute, will appear. I use my Eternal Rest power to release all of the spirits besides The Child and The Brute. The Child and the Brute will attack as undead spirits known as Shadows of the Void. A Shadow of the Void can use Cone of Cold about three times each day, enjoys 50% concealment, and inflicts extra cold damage with each physical attack. Their physical attacks can also drain Constitution unless the target has immunity to ability and level draining. It also has a very good armor class, making it difficult for a character in the 20th to 25th level range to connect physical attacks on.
First, Valeria places her new Eternal Rest power in one of her quick-bars. She sits back and allows her comrades to eventually wear down the first Shadow of the Void. Once it's down to 'near death', she uses her Eternal Rest power to finish it, and she thus gets a Shadow of the Void Essence. She then issues a 'follow me' command to stop the party members from attacking the second Shadow of the Void. The reason being that she can't use Eternal Rest again until 5 minutes elapse, as indicated by a time counter that will appear on top of both the Devour Soul quick-cast icon and the Eternal Rest quick-cast icon. The party simply waits it out, surviving the Shadow's physical attacks with Kaelyn occasionally obliging with the odd Heal spell, until the 5 minute cooldown timer elapses (most of which I edited out of the video). Once that happens, Valeria issues the 'attack nearest' command, and waits until her companions wear down the second before finishing it off as well with Eternal Rest and getting a second Shadow of the Void Essence.
A Shadow of the Void Essence can be used to enchant either a weapon or an armor through the use of the Mold Spirit feat. If used on a weapon, it confers +6d6 cold damage but a 50% vulnerability to fire damage. If used on an armor, it confers complete immunity to cold but 25% vulnerability to fire damage.
I may as well say out the outset that I prefer to use the Essences for armor enchantment instead of weapon enchantment. The difference between +5d6 cold damage (achievable through enchanting and without the fire damage penalty) and +6d6 cold damage is negligible. Swallowing a -50% fire damage penalty is certainly not marginal, and makes me wonder if that kind of penalty is really worth an extra +1d6 damage. On the other hand, using it on an armor confers 100% damage resistance against cold, while accepting a smaller -25% penalty against fire damage. By way of a heads up, later in the game will be a Shape of Fire Essence that confers similar benefits and penalties for weapons (+6d6 fire damage and -50% penalty for cold damage) and armor (+100% damage resistance against fire and -25% damage penalty against cold). What I actually have in mind for Valeria is for her to use a Shadow of Void Essence on her Mithral Chainshirt and the Shape of Fire Essence on her Zalantar Light Shield in order to gain a net 75% damage resistance to both cold and fire. But that's not till later on.
I also plan to use the second Shadow of the Void Essence on an armor for Gann as well. He'll be able to offset the fire resistance penalty with fire resistance bonuses from other items. In fact, he already has plenty of fire resistance from wearing a Ring of Power.
*Evil* One of Many
For the evil party, it's the opportunity to recruit the evil NPC alternative to Okku. I use Devour Spirit on the Priest, and then convince the Furnace Spirits to enter into the Spirit Husk left behind by Okku.
Note that I don't have One of Many join right away. I instead first send him to the Road to Mulsantir, so that he can 'waylay travelers'. This increases my influence with One of Many by +11. The reason I'm doing this is to unlock access to The Brute's abilities as early as possible. Note that this dialogue option is available only when I first create One of Many.
Scriptorium
I go to the large room at the west end, #8. Once there, I bang on the gong to cause several spirits to appear. On the west edge of the room will be the spirit of the Chief Scribe. Valeria uses her Eternal Rest power to send him and the other Scribes to their final rest. There's no xp bonus for doing this, but I do get a few Spirit Essences out of it.
There will also be scrolls of Acid Fog, Circle of Death and Greater Shadow Conjuration about the room.
*Evil* Scriptorium
Zarathos on the other hand prefers to use Devour Spirit on the spirits of the Scribes.
*Note* This does ramp up my Craving considerably, so I subsequently ended up having to use Satiate to reduce my craving and restore my energy afterwards.
Dread Wraiths
Now I begin to loot the Urns on the west side of this level for gold and the odd item. Each time I do, a Dread Wraith attacks me. It's easy enough to bring it to 'near death' and then use Eternal Rest on it. I figured a few extra Volatile Spirit Essences can't hurt, right?
I don't show the process for every single Urn and Dread Wraith, only when there's a particularly noteworthy item that I looted. One of the Urns yields a Magic Pouch (carry items at -20% weight), which is inferior to any other carrying bags so I'll just sell it. Another has the Drum of Hauntings (3 charges of Animate Dead (5), 1 charge of Cause Fear, 2 Charges of Fear (2). I don't have a Bard, so I'll sell that too.
Silver Sword of Gith Replica
Lastly, I return to the Crematorium. I click on it, sift through its ashes, and find the Silver Sword of Gith Replica.
I then return to the Shadow Door at #9. The Silver Sword of Gith Replica opens the door, for which I get 4,000xp.
Valeria's 24th Level
I now have enough experience to advance Valeria to her 24th level. She takes a level in Arcane Trickster, and adds plenty of skill points to her conversational and thieving skills. She also selects the Wail of the Banshee and Etherealness spells.
Kaelyn advances to her 19th level, and adds a couple of skill points to Use Magic Device.
The Shadow Door, meanwhile, is the entrance to the next level of the Death God's Vault.