-

- Forums
- Chatrooms
- Gallery
- Gameplay Videos
- Upload
- Articles
- Mod Reviews
- Shop SP: Games, Movies, Books
|
|
INSTRUCTORS' QUARTERS
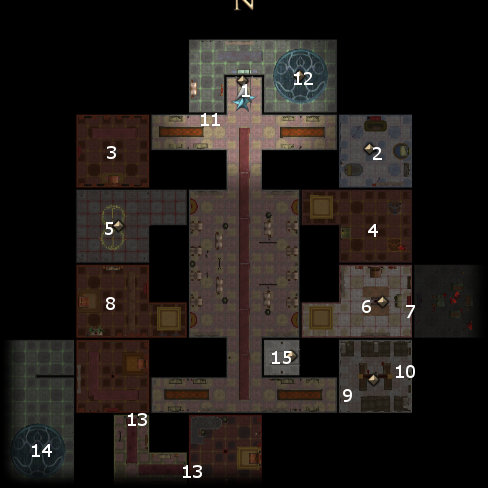
Safiya's Bedroom
At #2 on the map is Safiya's bedroom. The only two real items of interest are the Galvanized Golem Torso (damage reduction 10 / adamantine) and the Scorching Gaze Golem Head (which allows a Golem to use a single-target fire damage effect).
Golem Competition
Now I have the pieces I want, so I return to the Golem crafting room in the Academy Classrooms. I speak with Artesh for a bit to get the scoop.
On the south side of the room is a table that has a Hammer of Golem Crafting, which I take. The table itself works like any other crafting bench, but only for Golems. You basically put in the pieces you want, and a Brilliant or Pristine Spirit Essence, into the table. You then use the Hammer of Golem Crafting and voila, you'll have your Golem. If Safiya is in your party, you can click on your creation and pick an option that will allow Safiya to make the Golem more resilient. It is also my observation that using a Pristine Spirit Essences instead of a Brilliant Spirit Essence will make the Golem tougher.
My preference was to assemble my Golem from the Scorching Gaze Golem Head, the Galvanized Golem Torso, the Shocking Golem Arms, and the Swift Golem Legs. Now I can enter it into the competition for bets.
The first Golem is Hollow Hamadi, which resembles a smaller statue such as was found in the Temple of Seasons during the OC. The second Golem is The Beardless Assassin, which resembles an Imaskari Golem. The third Golem is Little Poruset, which resembles a Clay Golem. The fourth Golem is Deathblade, which resembles a Blade Golem and can inflict extra acid damage.
I managed to breeze through all of them in short order. I can repair my own Golem, with Safiya's help, in between each fight.
The last fight is against a Golem called The Maiden, which resembles an enormous Iron Golem. Artesh also drops a hint that The Maiden has resistance to electrical damage, so I reassemble my Golem with the Weighted Golem Arms instead of the Shocking Golem Arms. My Golem manages to outlast the Maiden in a long one.
Just so you know, there's almost no stake in this whole affair besides the opportunity to increase (or decrease) your gold. And I'm at the point where money is no object, but I did this anyway for the sake of completeness. There is a 1000xp reward for having my Golem beat all of the other Golems. I thereafter return to the Instructors' Quarters.
*Note* A last side note, it is possible to talk Artesh into wagering his own soul during the last bet. If you win the last bet, you can then use your spirit eating powers to devour his soul and have his soul appear in your inventory as an item. Artesh's Soul can then be used to barter with a couple of Pit Fiends named Oronock and Thael-ka (more on this below), should the need arise.
Kitten Slippers
The room at #3 has a few Gnoll guards that are easily killed. A cabinet has the Kitten Slippers (+6 Dexterity, Freedom of Movement, +6 Move Silently, Haste (10) 4 / day, Power Word: Petrify 1 / day). I don't have any use for them, as I prefer to add enchantments to Boots of the Sun Soul with the idea of adding extra benefits on top of the dodge bonus to armor class.
Oronock and Thael-Ka
At #5 will be a pair of Pit Fiends named Oronock and Thael-Ka. They sell quite a diverse and powerful selection of goods like weapons, armors, and other miscellaneous items. I am, however, pretty close to the point where I already have everything I want.
I could also buy elemental and power essences from the Pit Fiends. These particular essences won't merge with others that I may have. The fix would be simple, use the Alembic to divide the essences that I purchase, then re-combine them, and they'll merge with other essences that I already have.
Book of Waves
I begin the video by resting up. Valeria issues a 'stand your ground' command and goes forward by herself into the room at #4, where there's an Elder Earth Elemental. Valeria brings it to 'Badly Wounded'. Once that happens, she pecks it down a little to 'Near Death' with an Acid Splash cantrip. That is when Valeria can maximize her use of Devour Spirit in order to replenish her spirit energy.
She collects the Earth and Power Essences, and then converts all other Essences that are not in her Bag of Holding and are not Air Essences into more Power Essences.
A book case has the Book of Waves (40 charges, -10% arcane spell failure, Extract Water Elemental / 3 charges, Mass Drown / 4 charges, Summon Water Elemental / 2 charges). Forget the water based spell-like abilities, the real appeal of the book is its ability to reduce the changes of arcane spell failure by 10%. Problem is, that feature is broken. The book was originally intended to provide the reduction just by being in a character's inventory, but there's a bug whereby the reduction won't take effect unless the book itself is equipped, only there's no item slot into which the book can be equipped. For a fix that gets the Book working properly, see this link. Simply deposit the file into your override folder. For Valeria, it suffices to erase that small 5% chance of experiencing arcane spell failure.
Master Inarus
I enter the room at #6, and then bash down the bookcase at #7. The room beyond is the private room of Master Inarus. He resents my intrusion, so combat starts. The battle can play out one of two ways. One way is, because the party is within hand's reach of him already, they can strike him down right away before he does anything.
The second way, as seen in the video, is that he can get off Ethereal Jaunt right away, and start cranking out offensive spells as well as Epic Gate which will summon two Balors, one after the other. If that happens, a party with good enough saving throws and spell resistance should still be able to outlast him without much trouble. He leaves behind the Binder's Robe (+8 armor, +1 6th level Bard spell, +1 7th level Sorcerer or Wizard spell, Polymorph (7) 2 / day), which becomes Safiya's robe for the rest of the game. The +8 bonus to armor class is enough, but the bonus 7th level spell is extra sugar on top.
Gnollgrip
A chest in the room at #8 has the Gnollgrip (Warmace +8, +1d12 massive criticals, +2 vampiric regeneration), but everybody in the party already has ideal weapons.
Four Failed Souls
I explore the Headmistress' Tower, which is accessible through the stairs at #15, because it's necessary to make progress.
In one corner of the tower is Nefris' journal. Reading the section titled "Replication" leads to discovering Nefris' Key, which I'll need shortly.
In the other corner is a door, which requires four 'flawed souls' to open. It is that piece of information, the needing of four flawed souls to open the door, that I also need to make progress.
Conflicted
I already have one of the four souls I need, the Fragmented Soul, from when I performed the Mephit experiment upstairs in the Classrooms. Oronock and Thael-ka have another one of the souls that I need, the Marked Soul. What they want in return is a soul that is at once selfish, selfless, having lived in poverty, and yet have lived in luxury at the same time.
The next step is to return to Master Poruset upstairs and explain what is needed. He indicates that he can fuse souls with opposing qualities together, although it won't result in a perfectly unitary soul. He gives me a Promissory Note so that I can check out two souls from the Soul Depository.
I give the Promissory Note to the Caretaker. At the south end of the Soul Depository is a Viewing Receptacle. If you want to learn the hard way which souls you need, you can simply take a soul from its housing, place it in the receptacle, and get a sense of its life story and personality, until you find the right souls. In any event, the souls needed for this quest are Soul No. 91 and Soul No. 127.
I return to Master Poruset, who instructs me to place the souls in his forge. The result is the Fused Soul. Master Poruset also gives me two more Promissory Notes, which I give to the Caretaker so that I'm not held accountable for having removed two souls.
I give the Fused Soul to the Pit Fiends. They aren't exactly impressed with what I did, but they nonetheless give me the Marked Soul that I need. I get a 2,00xp quest bonus as well.
Uncanny Reflections
I use Nefris' Key to open the door at #11. The room at #12 has an Obelisk and an Activation Orb. Using the Orb will cause the Obelisk to shoot a ray of light, but only as far as one mirror can refract it onto the next mirror. The objective becomes clear. I must open an unimpeded path from #12 to the dais at #14. Along the way there are doors marked by #13 that must also be opened by Nefris' Key. The first such door is hidden by a bookcase that must be smashed away to reveal the door. I must also adjust the numerous mirrors found on this level so that the ray of light will travel all the way from #12 to #14 unimpeded. I show the entire process of setting up the path for the light beam from 0:30 to 3:10 of the video.
Once the path is cleared, I position Valeria in the dais at #12 and have Safiya activate the Orb. The beam of light shoots all the way to #14. Once I get there, an image of Valeria wearing the Mask of the Betrayer appears on the dais at #14, strongly suggesting that Valeria is sharing her soul with Akachi the Betrayer. I also get the Incomplete Soul, which is one of the four flawed souls that I need to open the door in the Headmistress' Tower.
You can also use the whole device on your companions with sometimes interesting results. Safiya will actually think her image is that of her own mother, dropping a hint that the bond between herself and Nefris is more than familial. Gann's image will resemble that of a more standard and much uglier Hagspawn. Kaelyn's image will have blackened wings, strongly suggesting that her opposition to the Wall of the Faithless will lead to her becoming a Fallen Celestial.
Epic Cloak Enchantments
Gann now has enough to advance to his 30th level, and that in turn means he can add the very highest-tier of enchantments to magical cloaks.
Valeria places the Shroud of the Elder Doom she had been wearing into the Enchanter's Satchel along with 3 Pristine Power Essences, and then hands the Satchel over to Gann. Gann casts Tortoise Shell on the Satchel, increasing the deflection bonus to armor class to +8. Valeria takes the Satchel back, and now places 3 Pristine Spirit Essences into the Satchel. She uses Malleate Spirit on the Satchel to add +9 Charisma as the fourth and last enchantment.
I hand the cloak over to Kaelyn, who wears it as her cloak for the rest of the game, and discards the Cloak of Fortification +5 that she had been wearing. Immunity to death magic is the key benefit that the cloak comes with. The +8 deflection bonus to armor class is likewise a key benefit. The +9 Charisma will mesh with Kaelyn's Charisma of 18 plus the extra point of Charisma she added during her 29th level up for a total of 28 Charisam. Higher Charisma will augment Kaelyn's use of abilities like Smite Evil, Divine Might, and Divine Shield.
I now place Gann's cloak into the Satchel. Gann uses 3 Pristine Power Essences and the Tortoise Shell spell to raise the deflection bonus to armor class to +8. Valeria uses 3 Pristine Spirit Essences and the Malleate Spirit power to add +9 to Charisma. Finally, Gann uses 3 Pristine Fire Essences and the Endure Elements spell to add +5 to saving throws vs. fire and +25 fire resistance.
The deflection to bonus to armor class and the immunity to armor class are both key benefits for Gann. The +9 armor class will mesh with Gann's Charisma score that has now reached 21 for a total Charisma of 30. Charisma increases the saving throw DC of his spells. I added fire resistance to compensate for the fire resistance penalty that comes with having applied the Shield of the Void Essence to Gann's Mithral Chain Shirt.
Now I pull out the other Cloak of Blackflame that I found earlier in the Skein and place it in the Satchel. Gann uses 3 Pristine Power Essences and the Tortoise Shell spell to raise the deflection bonus to armor class to +8. He then uses 3 Pristine Earth Essences and the Endure Elements spell to add +5 to saving throws vs. acid and +25 acid resistance.
Valeria now has her cloak for the rest of the game. The immunity to ability and level draining, and the deflection bonus to armor class are both key benefits for her. The reason I chose acid resistance for the cloak is that it was the only element that Valeria did not have a specialized saving throw against after enchanting her rings.
A Fitting Replacement
Now I go to #9, where I find a Red Wizard named Bebtu lying dormant. He explains that he needs his own soul returned to him, which will be in the Soul Repository. The one that I need is Soul No. 346.
Once I return his soul to him, he gives me the Surrogate Soul, which is the last of the four failed souls that I need. He also gives me a Promissory Note, which is helpful in case I need another soul to resolve a quest involving other souls afterwards.
*Evil* A Fitting Replacement
Zarathos, on the other hand, finds it easier to use Devour Soul on Bebtu to acquire the Surrogate Soul.
Ammon Jerro's Soul
Lying at #10 is Ammon Jerro. Whether or not I have enough skill ranks in Heal, I ascertain that he is without his soul.
I speak to Oronock and Thael-Ka again, who happen to have Ammon's soul. Their initial deal is 50,000gp and three other souls. If you are unable to get them to budge from the initial offer, there's more than one way to get a third soul (besides the two that can be found on this level). One is to win Artesh's soul by betting him for it during the final competition between your custom-made Golem and The Maiden. The other is to make sure that any souls you previously took out from the Soul Depository are forgiven by giving the Caretaker the needed Promissory Notes. That then allows you to simply walk out of the Depository with one of the remaining souls.
A successful Appraise check can get them to bring their offer down to 20,000gp and two souls, and it would also earn a 500xp bonus. But the skill rank in Appraise needs to be very high. If it doesn't work, Gann will be able to drive the bargain down if he's in the party.
After that, the two souls that I need are easy to find. One Soul Housing is in a trapped chest at #6. The other is in a trapped vase at #8. I bring the Soul Housings back to the Pit Fiends and get the Soul of Ammon Jerro.
I next revive Ammon Jerro at #10. What follows is finding out the fates of my former companions from the OC, and getting him to join me again as a temporary companion. He cannot be directly controlled by though, and will use his own AI during combat.
*Evil* Just as with Bebtu, Zarathos can also use Devour Soul when he speaks to a revived Ammon. Doing so means you can loot Ammon's dead body for an Amulet of Greater Health, a Ring of Elemental Resistance, and a Cloak of Blackflame, the same starting equipment he had when he first joined the protagonist during the OC.
Red Wizard Ambush
Now I return to the Headmistress Tower', and use the four failed souls to open the door. Only, once I open the door, I get ambushed from behind by several Red Wizards. Araman, their leader, speaks to Valeria as though Valeria were really Akachi and then leaves. I can get Master Djafi to side with me if I have Safiya in the party. If Safiya were not in the party, it would require a successful Diplomacy or Intimidation check to get him to change sides.
The battle itself is easily won when Valeria unleashes Vampiric Feast, Kaelyn casts Word of Faith, Gann casts a Storm of Vengeance, and Safiya casts Wail of the Banshee, leaving only one Red Wizard alive who is Ethereal but still goes down after taking enough damage from the Storm of Vengeance. One of the Red Wizards leaves behind the Rod of Reversal (50 charges, Dispel Magic (5) / 3 charges, Greater Dispel Magic (7) / 5 charges), but I have no use for it.
Kaelyn's 29th Level
Kaelyn now has enough xp to advance to her 29th level. She is able to select two feats.
One feat is the Damnation epic spell. A single-target instant death spell with a nice boost to saving throw DC. It also bypasses the Death Ward spell.
The other is Great Charisma +1. Kaelyn will get a +9 to Charisma from her cloak, so it makes sense to take this and round out her Charisma to the next even number integer.
Beyond the door is the portal to the Boneyard.


