-

- Forums
- Chatrooms
- Gallery
- Gameplay Videos
- Upload
- Articles
- Mod Reviews
- Shop SP: Games, Movies, Books
|
|
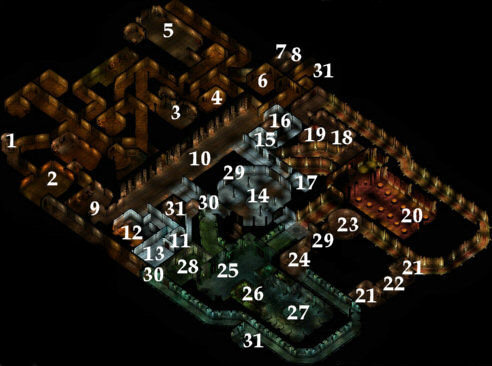
TEMPLE DUNGEON LEVEL 2
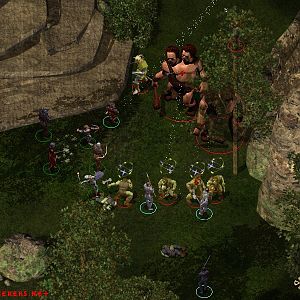
Here is where the party will find the other three competing factions, the Temples of Air, Fire, and Water. You may be left with the impression that you have to complete the quests for at least one of the factions in order to progress. Strictly speaking, that isn’t true. It is merely optional. In the meantime, milk this place for all the treasure and experience points it offers.
1. Stairs to the first level of the Temple.
2. A Minotaur lies in wait here, initially appearing as a dormant statue. It can pack quite a wallop, and will cast Stoneskin on itself just as combat starts. It’s a matter of maximizing your armor class with spells, then pressing the attack to wear out its Stoneskin, and ultimately kill it.
The chest it leaves behind contains some treasure as well as a Potion of Protection from Elementals.
3. Here you’ll find the Littlest Troll. For my advice on killing Trolls generally, see paragraph #21 of this page. In the meantime, the barrels contain a wide variety of mundane weaponry.
4. Here you’ll find a Carrion Crawler. It is capable of paralyzing its victim with its bite attack. With its meager number of hit points, the party should be able to take it down quickly by now.
5. In this room you’ll find a large number of Greater Temple Bugbears. You can kill them without fear of not being able to complete the quests for one of the elemental factions. If you’re going to, crank out the area-effect damaging spells as much as you can. There’s a lot of them, and many of them are capable of barbarian rage.
In a chest to the northwest corner of the room, the party will find two Greater Temple Black Robes.
6. Here a Bugbear and an Ogre stand guard over the nearby cells.
7. Through the north door the party will find the elven Countess Tillahi, and her consort Sir Juffer. It is earnestly recommended that you set them free as part of the Daring Rescues quests.
8. In here, the party will find a few merchant prisoners as well as a pirate named Wicked. Wicked is apparently a joinable NPC, although not much is known about him at this time.
9. Here you’ll find a large force of humans in the employ of the Temple. Kill them at leisure. On the Lieutenant (the Orc Lieutenant that is), you’ll find some treasure, and a Ring of Protection +2. The Commander will be carrying a Long Sword +2, a Leather Armor +1, a Ring of Invisibility, and a Cloak of Resistance +2.
The Commander will also leave behind a key to his chest, which is against the north wall. In the chest you’ll find scrolls of Shield, Cure Light Wounds, and a Potion of Invisibility.
10. Here you’ll find a small group of Ogres, led by an Ogre Shaman.
11. Here you’ll meet Kelno, the chief cleric of the Air Temple. Actually, he’s the only cleric in the Air Temple. It won’t take much exploring, and much listening to Kelno, to figure out that the Air Temple is definitely losing the competition with the other factions. At any rate, Kelno desperately wants your help, leading to the Air Temple Quests.
If, like me, you decide to end his pitiful existence, he’ll leave behind a Mace +1, and a key to his chest, which is in plain view.
In his chest, the party will find a Cloak of Resistance +1, a Chainmail +1, and a Dagger of Venom +1. The Dagger of Venom makes an ideal weapon for either a Rogue or a Druid. Indeed, I have Alliria wield the Dagger of Venom with one hand, and improve her defence by carrying a Wooden Elven Shield in the other hand.
12. Some human troops loyal to the Air Temple are stationed here.
13. A fair number of Bugbears loyal to the Air Temple are found here. One of the Female Bugbears also leaves behind a Great Cleaver. Now Ferofist has found his weapon for the balance of the game.
14. The shrine for the Air Temple. The Air Elementals here will attack if your party members are not wearing the Air Robes and have not been initiated into the Air Temple by Kelno.
15. Here you’ll find a mirror. It would seem that two celestial beings are trying to speak to you, and render wise assistance through the mirror. They’d like you to leave all your possessions in the room and leave the way you came. Sounds a little too sacrificial, doesn’t it?
16. Through a secret door you’ll find two Werewolves. Provided you have decent Armor Class for your fighters, and they’re carrying enchanted weapons, you shouldn’t have too much trouble with this. The Silver Arrows that are scattered throughout Level 1 also come in handy. Take them out one at a time.
They leave behind a chest which contains a scroll of Otiluke’s Resilient Sphere.
17. This room is accessed through a secret door. You’ll find a Drelb, which is apparently classified as an Evil Outsider instead of Undead. I had the good fortune to avoid getting hit by it, but apparently its touch attack has a chill effect which causes the victim to limp for 1 round without a saving throw. Keep in mind that it is also incorporeal, meaning that all melee attacks have a 50% chance of not affecting it. The motto here is kill it as quickly as you can.
The creature leaves behind a Holy Ranseur +1. I couldn’t fit this into my party’s setup, but it can be sold for a wad of cash.
18. Here the party will find two priests of the Fire Temple, Tulab and Antonio, along with their Bugbear guards. For more on this pair, refer to the Rivalry in the Fire Temple quest.
If you decide to kill them, Tulab leaves behind Full Plate Armor, and a Ring of Protection +1, while Antonio leaves behind an ornate mace that, while not magical, is worth plenty.
19. Here you’ll find the High Cleric of the Fire Temple, Alremm. The rather maniacal Alremm is the one to see if you want to perform the Fire Temple Quests.
If you kill Alremm, he leaves behind a Chainmail +2, a War Hammer +2, as well as scrolls of Dispel Magic, Discern Lies, and Flamestrike. Sir Tirion takes the War Hammer so as to be able to use a blunt weapon when the situation requires it.
 20.
Here you’ll find a warrior named Bassanio, brandishing a flaming
sword. If you attack him, you’ll get ambushed by two Salamanders
and several Flamebrothers. They’ll converge upon you from
all sides, so area-effect spells aren’t all that helpful.
Each time you attack them, you’ll take some fire damage in
the process. The two Salamanders can also unleash Fireballs. Preparation
is the key. I had Lanatir
cast Protection from Energy (Fire) on every party member. Thereafter,
party members will absorb the first 108 points of fire damage they
get hit with. Alliria also
summons a Fire Elemental, which will be immune to the fire damage.
A haste spell is also recommended. Thereafter, it becomes a straight
melee, with Magic Missiles where appropriate.
20.
Here you’ll find a warrior named Bassanio, brandishing a flaming
sword. If you attack him, you’ll get ambushed by two Salamanders
and several Flamebrothers. They’ll converge upon you from
all sides, so area-effect spells aren’t all that helpful.
Each time you attack them, you’ll take some fire damage in
the process. The two Salamanders can also unleash Fireballs. Preparation
is the key. I had Lanatir
cast Protection from Energy (Fire) on every party member. Thereafter,
party members will absorb the first 108 points of fire damage they
get hit with. Alliria also
summons a Fire Elemental, which will be immune to the fire damage.
A haste spell is also recommended. Thereafter, it becomes a straight
melee, with Magic Missiles where appropriate.
Bassanio will then leave behind a Flaming Sword +1. Sir Tirion will find this sword very useful for certain monsters, like Trolls. You’ll also notice a locked and trapped chest that contains 2 Potions of Protection from Energy (Fire), a Frostbrand +3, and a Ring of Lesser Fire Resistance.
21. Here the party will find Trolls. It is well known that Trolls can only be permanently killed with Fire or Acid. For all you Baldur's Gate 2 veterans, killing Trolls works a little differently in ToEE. In BG2, all you had to do was pound away at the Troll until it had 0 hit points. You could then deliver a coup-de-grace with an acid or fire attack, however little damage it caused. In ToEE, damage against Trolls falls into two categories. Any attack other than fire or acid damage causes non-lethal damage. It can make the Troll fall unconscious, but it is only a matter of time before it recovers and gets back up. To finish off a troll, you have to take away all of its hit points with either acid or fire. Once the necessary ‘lethal damage’ has been inflicted by either fire or acid, the Troll will die.
For a single Troll, what you can do is knock it out with non-lethal damage, and then have a fighter pound on it constantly with the Flaming Sword +1. Another option is to perform a Coup-de-Grace attack to cut off its head. For a large group of Trolls, my recommendation is to knock them all out with non-lethal damage. Then have the party move away a distance. Your spellcasters can then pummel the prone Trolls with spells like Fireball and Flamestrike.
 22.
Here you’ll find the chief of the Trolls, Oohlgrist. Oohlgrist
is rather easy to distinguish from his fellows, due to his increased
size and impressive looking bone armor. Oohlgrist, or his loyalty,
is the subject of competition between the Fire and Water Temple.
For more information in this regard, refer to the Fire
Temple and Water Temple
quests.
22.
Here you’ll find the chief of the Trolls, Oohlgrist. Oohlgrist
is rather easy to distinguish from his fellows, due to his increased
size and impressive looking bone armor. Oohlgrist, or his loyalty,
is the subject of competition between the Fire and Water Temple.
For more information in this regard, refer to the Fire
Temple and Water Temple
quests.
Incidentally, you can convince Oohlgrist to join your party by repeatedly initiating dialogues with him and selecting the options available through the Intimidation skill (i.e. with the Strong Arm icon).
If you decide to kill Oohlgrist (like I did), you may be in for quite the challenge. He’ll augment his already considerable combat prowess with his barbarian rage. He’s already wearing a Ring of Lesser Fire Resistance, meaning that minor fire-based attacks like Produce Flame or Burning Hands won’t make much progress. His Armor Class is at 26. Attacks like Melf’s Acid Arrow which depend on making a ranged touch attack will miss more often than not. The recommended strategy is to knock him down with non-lethal damage as fast as you can. Then go into one of the adjoining rooms and pummel him with spells like Fireball and Flamestrike, which will still inflict significant damage notwithstanding his minor fire resistance.
Oohlgrist then leaves behind a Ring of Lesser Fire Resistance, a Troll Bone Armor, and a Troll Bone Helm. The Troll Bone Armor is basically the equivalent of Full Plate Armor that can be worn by Druids. It is also a masterwork armor, so it can be enchanted to +3. The Troll Bone Helm is also a masterwork helm that can be enchanted to +3 so as to provide a +3 bonus to Armor Class. This won’t stack with body armor, however. These items in some way represent the ultimate exploit for my Druid, Alliria. Since Dexterity is no longer quite as important (due to the +1 maximum bonus allowed by the armor), it would then be expedient to craft Gloves of Giant Strength for her. Alliria then becomes a very formidable opponent in her own right. She provides healing, summoning spells, and offensive spells. She also becomes a melee force in her own right, all the more so with the ability to cast Stoneskin.
23. Here, a Troll is busy training a pet Hydra. Hydras can be dangerous for no other reason than that they can attack with all five of their heads at once. Their attacks can also cause poisoning. Whenever you find Troll(s) in the company of other monsters, take out the other monsters first. They’ll stay dead, thereby allowing you to take the time to inflict the proper damage on the Trolls. This Troll is also wearing a Ring of Lesser Fire Resistance.
24. Here is where you’ll find a Troll training an Owlbear. Despite some powerful melee attacks, a party with decent enough levels should be able to take down the beast with straight melee combat.
25. Here is where you’ll find the High Cleric of the Water Temple, Belsornig. He’s the man to see if you want to complete the Water Temple Quests.
If you want to kill Belsornig, like I do, I provide advice on that in detailing the Earth Temple Quests. Once you’ve killed him, he’ll leave behind a Rod of Smiting, a Full Plate Armor +1, a Ring of Lesser Fire Resistance, a Ring of Freedom of Movement as well as scrolls of True Seeing, Resist Energy, and Neutralize Poison.
26. On Belsornig’s body, you’ll also find the key to his chest, which is located here. In the chest, you’ll find a considerable amount of treasure, as well as scrolls of Windwall, Bless Water, and Dispel Water.
27. Here is the shrine to the Water Temple. Inside will be some Water Snakes, which aren’t too hard to kill. They won’t even be hostile provided you remain on good terms with the Water Temple (i.e. Belsornig).
28. Here you’ll find Bugbears loyal to the Water Temple.
29. Here you’ll find doors which are magically sealed. There isn’t any way of opening them. They aren’t significant to your progress in the game, so don’t worry about it.
30. Here are some secret doors.
31. Here are the stairs leading down to Temple of Elemental Evil, Level 3.