-

- Forums
- Chatrooms
- Gallery
- Gameplay Videos
- Upload
- Articles
- Mod Reviews
- Shop SP: Games, Movies, Books
|
|
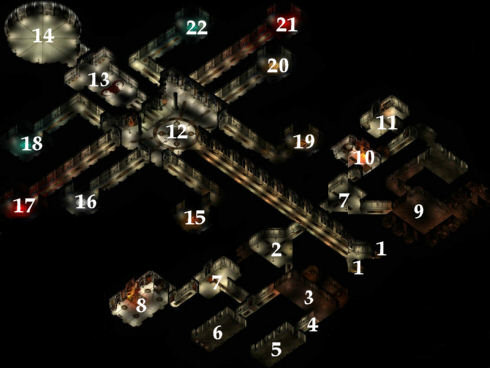
TEMPLE DUNGEON LEVEL 4
Here
the party comes even closer to the end of its quest. The significance
of the Orb of Golden Death becomes
much clearer once youve explored this level, and the destinations
of its magical gateways. Here, the party will also find two of the
major players behind the Temple of Elemental Evil, Hedrack and Iuz.
1. Stairs leading up to the Temple of Elemental Evil, level 3.
2. Here the party finds a couple of Trolls.
3. Here the party finds a Troll and an Ettin.
4. Here the party will find what appears to be a Hill Giant. It is actually Kella, a half-elf Druid who can be recruited into joining your party by another Druid in your party. She has a ring that allows its wearer to transform into a Hill Giant, but she wont allow anyone else to use it. Therefore, the only way to get it is for her to die.
5. Three Hill Giants are here.
6. Here the party will find 3 Ettins. After killing them, the party will notice 3 chests along the west wall. The top one is the one thats worth the trouble, which is both locked and trapped. It contains a pile of treasure that can be sold for plenty of gold.
7. Here the party will get attacked by 4 Trolls.
8. Here the party will find Hedracks concubines. Theyre not hostile, and tend to try and scare you away by warning you that Hedrack will not be happy if he catches you in his personal quarters.
One of those concubines happens to be Paida. For anybody who happens to be playing Lawful Good parties, Valen wants you to rescue Paida as part of the Paidas Rescue quest. Incidentally, theres also a Scroll of Dispel Magic lying on the floor here. You can use that scroll to free Paida, and then have her join your party. Escort her back to Valen at #11 in Hommlet to complete the quest.
9. Here the party will be subject to a MASSIVE onslaught of Ogres and Bugbears. Hitting as many foes as you can with as many offensive spells as you can is absolutely imperative. Here, Alliria begins to make great use of the spell Spike Stones. It stays planted in its area for a considerable period of time. It will inflict considerable damage on anybody who crosses it, and can slow them down considerably. For his part, Valarian can also wreak a more subtle havoc with spells like Confusion and Slow.
10. Here the party finds the Commander of the Temple Guards, Deggum, along with a couple of Bugbear bodyguards. Its an easy fight. Deggum leaves behind some treasure, a few potions, as well as a Ring of Lesser Fire Resistance.
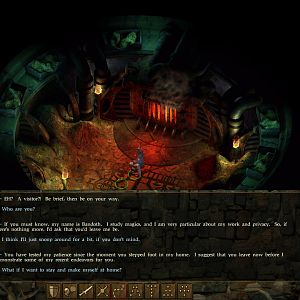
11. Here the party will find the evil wizard, Senshock. He received advance warning of your approach so that by the time you step into the room, he will have summoned two Quasits and Large Elementals of each type.
My approach was to plant a Silence spell over him so that hes always in it. I then had Alliria continually summon monsters around him to hold him up. Once the party has thinned out the ranks some, they can start to surround Senshock with a view towards scoring Attacks of Opportunity.
Senshock leaves behind Bracers of Armor +3, Bracers of Armor +5, Senshocks Robes, a Ring of Protection +2 and a Wand of Fireball.
My general rule of thumb here is to let Valarian, the Wizard, use the wands that the party finds. In this instance, it is open to Lanatir to simply draw upon his 3rd level spell slots in order to crank Fireball over and over again. As such, the Wand of Fireball is more meaningful in Valarians hands, allowing him to concentrate his memorized spells on one-time spells like Haste or Keen Edge, etc.
12.
Off-hand, just before you enter this room from the south hallway,
is where youre likely to meet another Commander of the troops,
Barkinar. You might also find him near Senshocks room at #11. Hell
speak briefly to the party and then attack. Anybody else nearby
will join in. Kill him and youll get to loot his Full
Plate +1 and Boots
of Speed, which double the wearers foot speed. Suffice to say,
these can prove very valuable for a warrior type. It helps to close
the distance on a foe very quickly during combat. However, have
a care not to let the wearer go too far ahead without enough support.
 But
now, brace yourselves. Here is where you can expect your confrontation
with the High Priest of the Greater Temple, Hedrack. Hedrack has
rather a clichéd and intimidating appearance to say the least. However,
he will pause to converse with the party. A character with sufficient
skill in Gather Information can exploit Hedracks overwhelming pride
to learn much of the Temple, past and present. Be that as it may,
a battle is inevitable.
But
now, brace yourselves. Here is where you can expect your confrontation
with the High Priest of the Greater Temple, Hedrack. Hedrack has
rather a clichéd and intimidating appearance to say the least. However,
he will pause to converse with the party. A character with sufficient
skill in Gather Information can exploit Hedracks overwhelming pride
to learn much of the Temple, past and present. Be that as it may,
a battle is inevitable.
Hedrack will be assisted by many creatures, including Bugbears, Ettins, Hill Giants, Gargoyles, and a couple of minor Wizards. Crank out every spell that you can to obliterate the opposition as quickly as you can, Fireballs, Ice Storm, summoning spells, Spike Stones, etc. Haste and Stoneskin are also recommended buffs before entering combat. In short, hold nothing back.
 At
some point, Hedrack will feel threatened by his low hit points,
and summon an avatar of his patron deity, Iuz. Iuz can be pretty
dangerous, since he can score some pretty hefty damage with his
touch attacks. However, you only need to last about 2 or 3 combat
rounds before things seem to take a turn for the better. An avatar
of St. Cuthbert intervenes, compelling Iuz to take his divine beef
with St. Cuthbert elsewhere. But first, he unleashes a wave of evil
energy. Any foes that you killed (meaning DEAD! when you rest your
mouse over them) rise again as Zombies. Any that were simply left
unconscious are restored to their full hit points. St. Cuthbert
for his part rejuvenates the party before leaving as well. In short,
you pretty much have to do this fight all over again.
At
some point, Hedrack will feel threatened by his low hit points,
and summon an avatar of his patron deity, Iuz. Iuz can be pretty
dangerous, since he can score some pretty hefty damage with his
touch attacks. However, you only need to last about 2 or 3 combat
rounds before things seem to take a turn for the better. An avatar
of St. Cuthbert intervenes, compelling Iuz to take his divine beef
with St. Cuthbert elsewhere. But first, he unleashes a wave of evil
energy. Any foes that you killed (meaning DEAD! when you rest your
mouse over them) rise again as Zombies. Any that were simply left
unconscious are restored to their full hit points. St. Cuthbert
for his part rejuvenates the party before leaving as well. In short,
you pretty much have to do this fight all over again.
Hedrack leaves behind Hedracks Full Plate +3, Hedracks Shield +3, Hedracks Warhammer +2, and a Wand of Fear. Ferofist dons the full plate and the shield.
With the central room cleaned out, the way is now clear for the party to visit the Elemental Nodes.
13. Here the party will encounter several slimes of various types. Yellow Molds respond well to slashing damage. For the Ochre Jellies and Black Pudding, apply the usual formula of bludgeoning damage and Magic Missiles.
There will be also four chests in the room, all of which are trapped and locked. Each one contains a certain amount of gold, and robes specific to one of the four elemental factions.
14. Here the party finds 3 Ascomids. Rather an easy fight.
15. A portal to the Earth Elemental Node.
16. A portal to the Air Elemental Node.
17. A portal to the Fire Elemental Node.
18. A portal to the Water Elemental Node.
19. The point where the party returns after exiting the Earth Elemental Node.
20. The point where the party returns after exiting the Air Elemental Node.
21. The point where the party returns after exiting the Fire Elemental Node.
22. The point where the party returns after exiting the Water Elemental Node.