-

- Forums
- Chatrooms
- Gallery
- Gameplay Videos
- Upload
- Articles
- Mod Reviews
- Shop SP: Games, Movies, Books
|
|
BONEGNASHER LAIR
Fey Spear +1
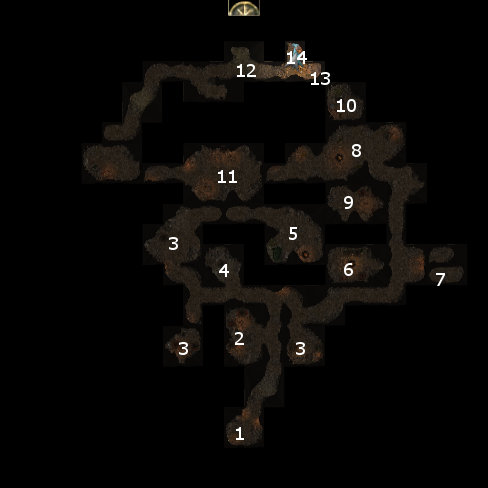
I start off at #1 on the Bonegnasher Caves map. There are plenty of Orcs to kill, especially at rooms marked by #3. Of course, I am always on the lookout for traps so that Valeria can recover them.
At #2 will be an Orc who will try to sound the alarm so that everyone in the Caves comes after me at once, but he's stopped once I attack him. The cave at #4 has a trap, so I have Valeria use the 'follow me' command beforehand so she can disarm it, with Qara using a well-placed Fireball.
More Orcs and traps in the cave at #5. I cherry pick the chest for treasure of sufficient value (i.e. worth 600+gp), in this case a pair of Topaz gems.
Yet more Orcs in the cave at #6. The chest has some random loot. The weapon rack has the Fey Spear +1 (Spear +1, Daze DC=14 75% / 1 round), which makes for a decent interim spear for Qara.
Pentin
I then go east and kill a few more Orcs. A Half-Orc miner named Pentin will be locked in a cell at #7. I free him, and he will become one of my employees so to speak after I take over Crossroad Keep.
Fundamentals of Terrible Destruction
I continue north and then west, killing plenty more Orcs along the way with the usual methods. A chest at #9 has a recipe book called the Fundamentals of Terrible Destruction and other random loot.
Orc Matron
The large cave at #8 has a chest with random loot, and a weapon rack with a Composite Longbow +1 that I'll just sell.
Now I go across to the cave at #10. I get attacked by an Orc Matron who's pretty tough and a couple of Orc Cooks. Valeria immediately whips out a Slow spell to minimize their chances of hitting, whereupon I bring them down fairly easily. The Orc Matron leaves behind the Orc Rolling Pin (Club +1, Stun DC=14 10% / 4 rounds), which will become an interim weapon for Elanee.
Yaisog Bonegnasher
I move west to #11, and speak with the Chieftain of the Bonegnasher Clan, Yaisog Bonegnasher, for the first time. He sends three guards after me, who are easily killed after my party members flank them.
The cave further west has a lot of traps and some containers. There is a Katana in the weapon rack.
I leave through the door and disarm another trap right on the other side. The tunnel now goes in a northeast direction, and of course I kill more Orcs along the way.
I encounter Yaisog a second time at #12. I make a point of killing his Guards first in order to collect the xp. I then gang up on Yaisog, who packs a pretty mean Greataxe. I choose to let him live for now, and he flees. He'll appear again later on, in a different part of the game, so it won't be like I'm missing out on xp for killing him.
*Evil* Yaisog Bonegnasher
Here's the evil alternative, where Zarathos kills him then and there in his own lair.
Olov
At #13 is Olov, who is pretending to be the Waterdeep Emissary. It is not advisable to let him go at this point, because if I do the next time I see him he'll be aiming Fireballs at me from a distance. It's much better to kill him here and now. All I need to do to blow his cover is insist that he accompany me repeatedly, and then make a Bluff check while pressing him on his credentials. Killing him now is much easier as I've already surrounded him up close. He leaves behind a Kukri +2, Bracers of Armor +3, a Wand of Fireballs, and a Book of Seeing.
Neeshka equips the Bracers of Armor +3. The rest I'll just sell.
Next is the approach to the Eyegouger clan.