-

- Forums
- Chatrooms
- Gallery
- Gameplay Videos
- Upload
- Articles
- Mod Reviews
- Shop SP: Games, Movies, Books
|
|
SWAMP RUINS
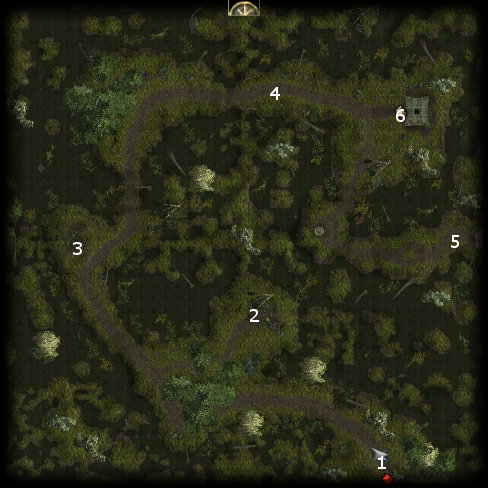
Gloves of Concentration
Valeria and Bevil arrive at #1 of the Swamp. They have to fight a few Swamp Beetles, who are killed easily enough. Note how Valeria allows Bevil to go ahead, and then flanks the Beetles for sneak attacks. A chest at #2 has Gloves of Concentration (+3 Concentration), which Valeria wears for now.
Beetles and Lizardlings
I continue to battle my way through Swamp Beetles, and now Lizardlings as well. They all go down with a swipe or two. The Shamans like to target Valeria with Magic Missiles spells, so sometimes she'll cast a Shield spell on herself both to immunize herself against those spells but also to give herself a temporary shield bonus to armor class.
The door at #5 cannot be opened for plot reasons. The door at #6 leads to the Ruins themselves. And somebody else is watching Valeria.
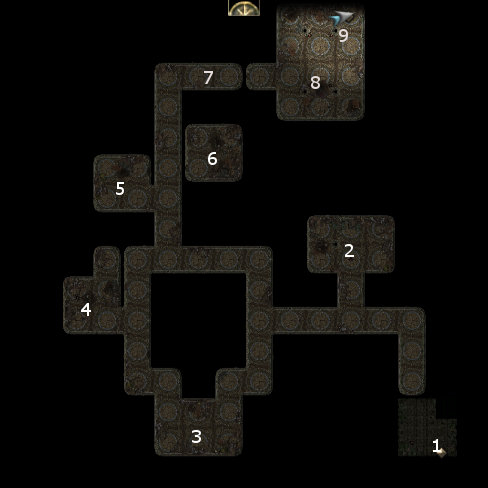
Lizardling Ruins
Once I enter the Ruins at #1, it's more of the same, killing Swamp Beetles and Lizardlings. Some Bolts +1 are included with the loot at #2.
There will be traps on either side of the room at #3, so I don't charge in. I retreat a little and let them come to me. This affords Valeria the leisure of recovering both traps after the battle is over.
There will be a pair of slightly tougher Lizardling Guards at #7 who pack Greatswords, but Bevil and Valeria still get the better of them.
Ruins of the Past
The room at #8 has several Lizardlings along with a Lizardling Shaman. I could use Bluff or Intimidate to get them to leave, but it's more xp to just kill them. I let Bevil put himself ahead, while Valeria waits for positions to set so that she can angle for sneak attacks. The Shaman targets Valeria with Magic Missiles, so she uses the Harvest Cup to keep her hit points up. Once the rank and file Lizardlings are killed, the Shaman soon follows. A nearby crate has some random loot.
The chest has #9 has the Golden Chalice of Lathander (Mass Cure Serious Wounds / 3 charges, Light (5) / unlimited), as well as the Silver Shard: Health Bonus (+10 hit points). I choose the dialogue option that immediately brings me back to West Harbor.
Investigating the Shard
Daeghun now sends Valeria on a quest to reach the city of Neverwinter so as to learn about the Silver Shard.
Farewells to West Harbor
Now I take the opportunity to speak with a few people before leaving West Harbor.
Bevil is willing to hand over whatever equipment he had beforehand. It will appear in a sack beside him. A Diplomacy check also convinces him to give me 100gp.
Tarmas runs a shop, so I can sell whatever excess loot I've found along the way. He offers some wares for sale, but I'm not interested in any of it in the long-term. A Diplomacy check also convinces him to give me a Potion of Barkskin.
I explore all the dialogue options with Retta Starling. I also make a point of telling her that I'll let her know what happened to her son, Lorne, if I hear anything. This dialogue branch opens up the "A Soldier's Story" side quest.
I also speak to Orlen about the farming conditions. I would have been able to get the Archer's Belt (5/- piercing resistance) if I had the Farmer's background.
I speak to Brother Merring. I would have been able to get the Ring of Crimson (red light) if I had the Devout background.
I then speak to Georg, who gives me a Light Shield +1 which Valeria equips.
Lastly, I speak with Daeghun a second time on how I'm going to reach Neverwinter.
*Evil* Farewells to West Harbor
Here I show only the conversation between Zarathos and Georg, and it has two differences. One is that Zarathos is actually willing to reveal that the shard is the reason West Harbor was attacked. Second, Georg refuses to give the Light Shield +1 to Zarathos because of the latter's Bully background.
My next destination is the Weeping Willow Inn.