-

- Forums
- Chatrooms
- Gallery
- Gameplay Videos
- Upload
- Articles
- Mod Reviews
- Shop SP: Games, Movies, Books
|
|
Docks District
Repko and Wirth
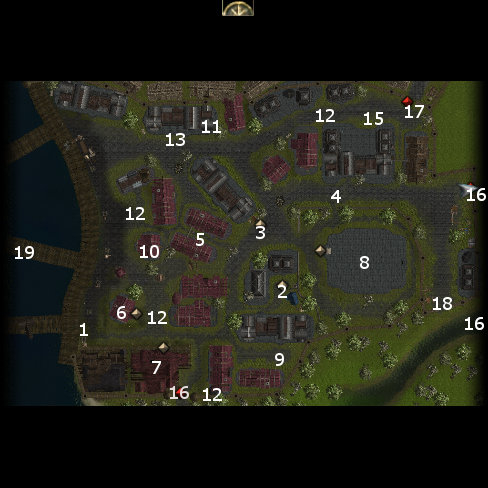
I start off on the west side of the district. I first go to Werth the Armorsmith at #2 on the map. He sells armors, some of them unique +1 armors and such. I'm not interested in any interim armors, but I buy all 6 Duskwood Planks from him in pursuit of my long-term crafting plans that I previously described. Further to this, I also buy a Half-Plate Mold and a Full Plate Mold for him. Neeshka also cleans out quite a bit of gold from him.
I go north and get attacked by a few Bladelings, whom I kill easily. Repko the Weaponsmith is at #3. He specializes in weapons, and offers a few unique +1 weapons. Neeshka cleans out his gold, plus manages to lift the Blade of the Gladiator (Longsword +2, +1d6 acid damage). I save the Blade for Casavir when he joins the party.
Neither Repko nor Werth will offer more than 10,000gp for any time, so I grab the opportunity to sell the Ravager +1 to Repko, which is just below 10,000 in sale price.
Wounded Wolf
At #5 is the Wounded Wolf who reveals the location of the Skymirror, for which I get 250xp. I also choose dialogue options that will increase my influence with Elanee. Places marked #16 provide World Map Transition points.
*Evil* Zarathos could kill the Wounded Wolf right away, which would definitely earn Evil points and negative influence with Elanee, but would also result in losing the Skymirror quest. I prefer to initially suggest leaving the Wolf unattended, but relent afterwards, which still suffices to lose -1 influence with Elanee. I then also refuse to share the secret of the Silver Shard with the Wounded Wolf, which results in another -1 influence loss with Elanee. That way, I get to annoy Elanee but still get to do the Skymirror quest.
Skymirror
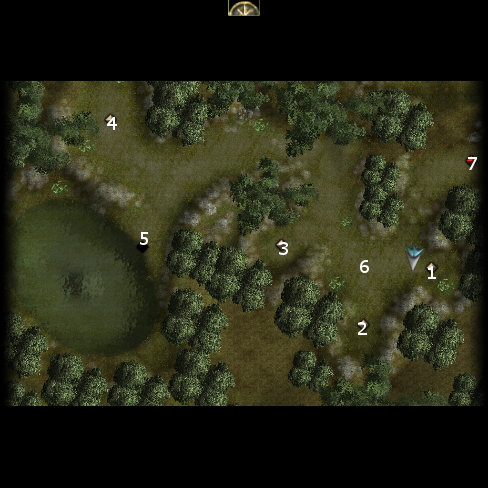
The party now travels to the Skymirror over the World Map. Elanee needs to cast a particular spell on each tree to make progress, Bull's Strength on the tree at #1, Cat's Grace on the tree at #2, Barkskin on the tree at #3, and Owl's Wisdom on the tree at #4. I then get a piece of wood that I can use as an offering.
I then head over to the small lake at #5, whereupon Elanee speaks at length with Elder Naevan. I get another 400xp. I then backtrack towards #7, but periodically have to fight Water Elementals and Ghasts along the way.
Waiting for me at #6 will be a Shadow Priest and several Mercenaries. I use the 'follow me' command to hold the party still long enough for Elanee to catch the Shadow Priest and the incoming Mercenaries with an Ice Storm. I then have little trouble killing off the weakened Mercenaries and then ganging up on the Priest. The Mercenaries using crossbows at a distance then become a mop up. The Priest leaves behind a Light Shield +1 and a Scimitar +2. Elanee equips the Scimitar. I head back to the Docks District.
Uncle Duncan
Now I enter the Sunken Flagon at #7, and speak at length with both Duncan and Sand. I now have the Silver Shard that provides a +5 bonus to both acid and electrical resistance. Valeria indicates a preference for joining the City Watch instead of the Shadow Thieves, which wins +1 influence with Khelgar but loses -1 influence with Neeshkia.
*Evil* Uncle Duncan
The parallel video for Zarathos. He indicates a preference for joining the Shadow Thieves instead of the Watch, which wins +1 influence with Neeshka but loses -1 influence with Khelgar.
Hagen's Imports
I enter the City Watch headquarters at #8, and speak with Marshall Cormick and Lieutenant Roe to sign up. My first job is to protect a shop called Hagen's Imports from an intimidation effort by several Thugs. The Thugs are easily dealt with in physical combat, aided along by a Call Lightning spell from Elanee. I also loot the chest but have to take a very minor hit on my alignment towards evil. But there's plenty of good points towards alignment to be obtained later on anyway.
*Evil* Extortion for Caleb
The flip side is for Zarathos to join up with Caleb, and then extort money from Hagen. A decent Intimidate check suffices.
Once I see Caleb again, Hagen has a few members of the Watch come after me. They're easily killed after Zarathos softens them up with Call Lightning. Caleb then tells me to go see Moire.
Caleb
I get 100xp for protecting Hagen. Marshall Cormick's next job for me is to arrest Caleb, who can be found at #9. It doesn't matter what I try, he and his Thugs will attack me. Caleb leaves behind 200gp.
I get another 100xp when I report back to Cormick. His next job for me is to do a sweep of the Docks.
*Evil* Speak with Moire
The evil side has Zarathos making contact with Moire, who can be found inside a building located at #11. Her job for me is to go around and get members of the Watch to go on the take so to speak.
The Fiery Sorceress
It is once the second City Watch quest has activated that I now find Qara just outside the Sunken Flagon, having it out with two students of the Academy named Glina and Heth. I could use a Diplomacy or Intimidation check to talk the students out of it, but there's no alignment penalty for killing them. And besides, I get more xp as well as a Ring of Protection +1 and a Quarterstaff +1 out of it as well. Khelgar wears the ring for now. I then enter the Sunken Flagon and witness a mudslinging contest between Qara, Khelgar, and Neeshka. Qara is now a joinable companion.
Praven
I now leave the Sunken Flagon with Qara in tow. Neeshka is the odd one out, since I need all the spell power I can get for the next couple of fights. That means having Qara and Elanee as two of my companions, and Khelgar as the warrior who can quickly mop any survivors.
Several Academy students led by Praven show up. A shot of Fireball from Qara and Ice Storm from Elanee suffices to blow them away in short order.
Qara takes the opportunity to equip herself with the Spear +1 and the Robes of Fire Resistance that I had saved up for her.
Ashni
I go back into the Sunken Flagon, rest up, and leave again with Qara. I get accosted by another group of Academy students, this time led by Ashni. Qara aims a carefully placed Fireball on the most numerous group to her right. Elanee hits the group to her right with an Ice Storm, and then follows up to hit as many Students as she can incoming with Call Lightning. An Academy Instructor named Johcris comes by and chides Qara for killing his daughter.
Coaxing Qara's Fire
I speak at length with Qara now, and deliberately encourage her in the unrestrained use of her power in order to increase influence with her. I want to keep Qara instead of Sand at the endgame. Note that dialogue options that caution restraint will have the opposite effect. They'll cause you to lose influence with her.
*Evil* Smothering Qara's Fire
Zarathos by contrast goes out of his way to annoy her by cautioning restraint in the use of her power, losing -3 influence with her at multiple turns. The intention here is to drive her out of the party during the endgame and keep Sand instead.
Sand's Shop
Now I visit Sand's shop at #6, and briefly explore his brewing animosity towards Qara. I then buy the following scrolls from him:
Thugs in the Docks
The quest to weed out corrupt Watch officers will also cause bands of Thugs to appear when you stop over certain points at the Docks. Now for a word of advice. It is always advisable to squeeze in as much xp for killing monsters instead of quest xp bonuses before you advance a level. Quest xp bonuses are always the same no matter what level you're at. Xp for killing a monster gets less and less the more levels you advance. Logic thus dictates to kill available monsters when you're lower level and thus get more xp in the long run, and save quest xp bonuses for after you've advanced to the next level. My next objective is to get as much experience as I can for killing the wandering bands of Thugs first before I touch the Watch quest.
Sometimes you have to hit certain spots to flush them out. For example, early on I go behind Sand's shop to trigger one such fight. How I react depends on the situation. If they're spread out, I'll whittle them down in physical combat. If they're in a tight cluster at a distance, Qara and Elanee will hit them with spells. If they surround me, Elanee will unleash a Call Lightning. I encourage you to be thorough in sweeping out the Docks and killing all of them while you're still lower level in order to maximize your xp.
I also take advantage of another opportunity at #15. I could let the wagon go, but I prefer to shake it down, both to get xp for killing the thugs, but also score some loot that I can sell off, which includes 1,000gp, a piece of Obsidian, some Bullets +1, and a Wand of Stinking Cloud.
8th Level
Now the companions have enough to advance to their 8th level of experience. One highlight is that Qara acquires the Stoneskin spell, so as to be better able to protect herself. Another highlight is that Valeria acquires her 4th Wizard level, and adds a couple more touch attack spells, Ghoul Touch and Touch of Idiocy, to her repertoire.
Enforcing Order in the Docks
The Guard contingents that I need to visit are marked by #12 at various places on the Docks District map. I can simply talk the Sergeant just a little east of the Sunken Flagon into taking a stand against the corruption.
There is more than one way to play the Sergeant near Sand's shop. I can join in on his scheme, or ignore him, or try to arrest him. I prefer the last option, since I rack up a little xp for killing him and his Guards.
The Sergeant just a little north of Hagen's shop is in the middle of being offered a bribe by some Thugs. I make a Diplomacy check to convince him not to take it, and then rack up some more xp for killing off the Thugs.
I use a Diplomacy check on the Sergeant towards the northeast corner to provide inside info on the Thugs, and get 150xp for it.
I also get 75xp for using a Diplomacy check on Trent Vidall at #14 to convince him to take his drinking indoors.
The Shadow Thieves have apparently burnt down the City Watch Headquarters after I completed my sweep by checking in on all four Sergeants. My next task is to speak with Captain Brelaina in the Merchant Quarter.
*Evil* Sweep of the Docks
For Zarathos, the quest is similar but in reverse. His goal is to convince members of the Watch to join Moire's gang. At one point I failed an Intimidation check and was forced to fight, but Moire won't mind the show of force.
*Evil* Burning Down the City Watch Post
The quest for Moire is of course to help her burn down the City Watch Post. She'll give you a torch. All you need to do is equip the torch as a weapon, and then click on the crates and wagons and such surrounding the building. A wandering Guard may accost you, but you can either just kill him or use a skill check like Diplomacy or Bluff.
When I leave the perimeter, a cinema shows the Watch Post burning down. Moire then directs me to a meeting with her superior, Axle Deivre.
I now have a number of quests to look into that originate from the Merchant Quarter, one of them involving Neeshka and an old enemy of hers.