-

- Forums
- Chatrooms
- Gallery
- Gameplay Videos
- Upload
- Articles
- Mod Reviews
- Shop SP: Games, Movies, Books
|
|
WAREHOUSE
The Warehouse
I get 300xp for finishing the Weapon Smugglers quest. Captain Brelaina's next job for me is to shut down the Warehouse that the smugglers were trying to get the weapons to.
9th Level
But first, I go back to the Sunken Flagon. The xp bonus for the Weapon Smugglers is enough to allow my characters to advance to their 9th level of experience.
Highlights include:
Craft Armor and Craft Weapon
Khelgar has 10 skill points in Craft Weapon, so now he is able to craft two weapons that will become part of my long-term plans. The first is a Duskwood Longbow for Bishop, which he will use once he joins the party. All that's needed is to place a Longbow Mold and two Duskwood Planks in the Blacksmith's Workbench, and then using the Smith's Hammer on the Workbench.
The other weapon is an Alchemical Silver Rapier for Valeria. A Rapier is probably the best possible weapon for this build. Alchemical Silver will also penetrate the damage reduction of lycanthropes, Vampires, and Devils. Vampires in particular become a frequent occurrence during the later stages of the game. Khelgar places an Alchemical Silver Ingot and the Rapier Mold in the Blacksmith's Workbench. He then uses the Smith's Hammer on the Workbench to craft the Rapier.
Elanee now has the Craft Magic Arms and Armor feat. So I place the Alchemical Silver Rapier, a Faint Water Essence, a Faint Power Essence, and a Diamond in the Magician's Workbench. Elanee casts Cure Critical Wounds on the Bench to add the Holy Weapon property (+2d6 magic damage vs. evil) to the Rapier. I don't add any enhancement bonus to the weapon, since Valeria can always use her Greater Magic Weapon spell for that. Bonus acid damage will have to wait until Qara gets her 10th level. Bonus electrical damage will have to wait until I find a Canary Diamond.
My next item is a Mithral Chainshirt, which requires 14 skill ranks in Craft Armor. Khelgar is a little short, at 12 skill ranks. Valeria overcomes that by casting a Fox's Cunning spell on Khelgar. He then places two Mithral Ingots, and the Chain Shirt Mold, in the Workbench. He then uses the Smith's Hammer on the Workbench to craft the Mithral Chain Shirt. *NOTE* I used the NWN2gff Editor to make the Mithral Chain Shirt resemble the green-hued Elven Chainmail, for aesthetic reasons.
A Mithral Chain Shirt has base armor class of +4, plus a maximum Dexterity bonus of +6. Valeria will be able to take full advantage of that maximum Dexterity bonus once she crafts a Belt of Agility +8 (raising her Dexterity to 22) for herself. It also has an arcane spell failure of 10%. A Mithral Chain Shirt and a Zalantar Light Shield combined together results in an aggregate 5% chance of arcane spell failure. That makes it the ideal combination for a character build that wants to combine with arcane spellcasting with melee combat.
Darksteel Chain Shirts
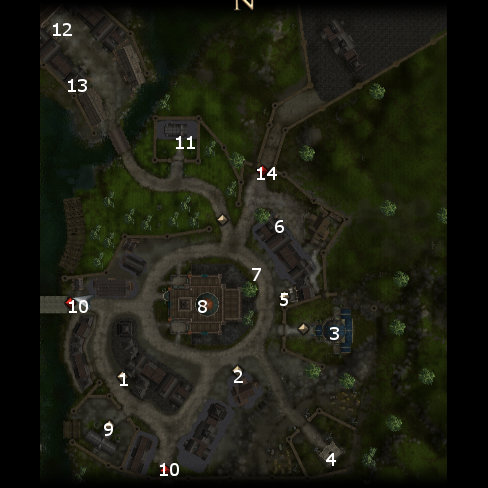
The entrance to the Warehouse is at #12 on the Merchant Quarter map.
Once inside, I start off at #1 on the Warehouse map. Just up ahead will be a group of Thugs, including two Elven Wizards. A well-placed Fireball or two from Qara suffices to get the job done.
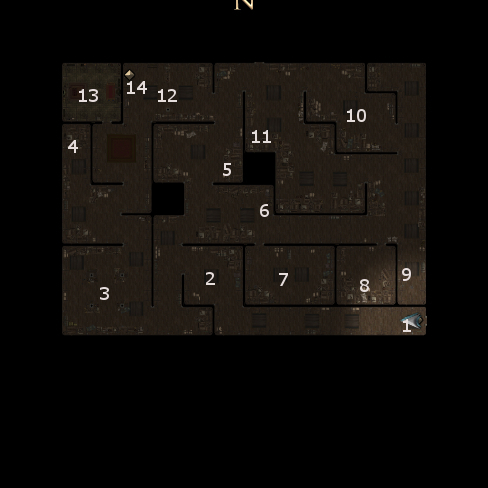
I continue on to #2, where there are more Thugs. I am extra careful about how Qara places her Fireballs so as to avoid damaging any of the containers.
One of the containers has about 13 Darksteel Chain Shirts. Thing is, trying to get all of them into my inventory is going to weigh me down. At the same time I want to maximize my gold returns because my long-term shopping list has some pretty pricey items.
One thing to keep in mind, and as cheesy as it sounds, you can leave in and out of the Warehouse at leisure until you finish everything you need to inside. And without any in game consequence.
It only requires a simple trick. Have one party member take all the Darksteel Chain Shirts, then have another party member leave the Warehouse at #1. All of the party members, including the one member weighed down, will be instantly outside the Warehouse and back in the Merchant Quarter.
Once outside, I have Valeria take all the Darksteel Chain Shirts into her inventory. I send another party member who is not encumbered to run ahead and speak with Pap, which results in Valeria instantaneously appearing in his place to conduct the dialogue. I can then sell the Darksteel Chain Shirts for 504gp a pop.
Thieves' Tools and Traps
Now I move on to #3. It's a large room where the Thug Wizards will have a long head start on me and are well back, so I retreat around the corner and let them come to me. They tried to get me with Grease spells, but it ends up working to my advantage instead once I finish rounding the corner and getting away. The Thugs instead have to slog through the Grease to reach me, allowing me to either kill them piecemeal or blast them with Fireballs while they're still struggling to get through.
I milk a barrel in the room for a Diamond, which even if I won't need it will still sell for plenty. The other containers have some random loot, plus several traps, and some Thieves' Tools.
Duskwood Shortbow
Now I head north, and kill a few more Thugs. Here Qara shows how having the Lightning Bolt spell can provide more flexibility. A Fireball is ideal when the enemies are bunched together at a distance. Lightning Bolt becomes better when the enemies are in a straight line and right next to my own party members.
The containers to the north will have more random loot. One of them at #4 will have several Shortbows, including a Duskwood Shortbow that can be sold for quite a bit of gold.
Shortsword +2 and Spirits
I do some backtracking and then head to #5. One of the crates will have random loot, while the other will have several Shortswords including a Shortsword +2 that Khelgar holds onto for Shandra.
I go south a bit and waste another group of Thugs after I get in first blow with a Fireball. A nearby barrel at #6 has several alcoholic drinks.
Healing Potions and Traps
I enter the room at #7, and hold up just at the door so that Qara can get in an early Fireball. I then retreat so that the Thugs come out in the open, allowing me to flank them. Note how different spells are appropriate for different situations. After the early Fireball, Qara subsequently uses a Lightning Bolt instead when they're lined up in front of Khelgar. One barrel holds a few Potions of Cure Serious Wounds and Potions of Cure Moderate Wounds. The other barrel holds a few traps.
Formulae of the Learned Scholars of Halruaa
At #8 is a barrel from which I can milk either an Emerald or a Diamond or 600+ gold. In this case it's a Diamond. At #9 will be a few containers with plenty of random loot. I manage to extract another Diamond from one of them.
I end up having to kill more Thugs at #10, after I get an early jump on them with a well-placed Fireball from Qara. There will be more containers with random loot, as well as a recipe book called the Formulae of the Learned Scholars of Halruaa.
Adamantine Light Shield
At #11 is a crate that holds plenty of Light Shields, including an Adamantine Light Shield that can be sold for plenty of gold. I don't show it in the video, but I leave temporarily to sell off all my excess loot and then come back.
I go a little northwest, bring the first wave of Thugs into view, and retreat. I once again exploit the theme of letting their own Grease spell work against them, as they take longer to get to me and Qara lets loose with Fireballs.
A second wave of Thugs will have spawned while I was dealing with the first wave, and they start to trickle in. Qara makes effective use of carefully placed Lightning Bolts to wear them down as they settle in position alongside other party members.
There will be two more containers along the north wall with random loot.
Barlowe
I continue west and run into a Thug named Barlowe who fights by throwing damaging flasks at me from behind a barricade of creates. It's a simple matter of hitting him with single target spells.
Warehouse Ledgers
There will be a few more Thugs for me to kill in the northwest corner at #13.
At #14 will be the ledgers for the Warehouse. One of the advantages of bringing Neeshka along is that she'll now loot the Warehouse for some extras. I show the dialogue options that will raise influence with both Khelgar and Neeshka, "have fun" for Neeshka and "I'll keep an eye on her" to Khelgar. I announce my intention to hand over the ledgers to the Watch when Neehska returns. She gives me the Shining Light of Lathander (Greatsword +2, orange light, Searing Light (5) 1/day). The best dialogue option is "I'll make good use of it" so that Neeshka will have The Nightthief's Nimbleknife (Dagger +1, Two-Weapon Fighting, +2 Tumble) in her inventory. I'll sell the Shining Sword of Lathander when I get the chance. Neeshka equips The Nightthief's Nimbleknife as an interim off-hand weapon. It may also become an interim weapon for Shandra later on once she joins the party.
In the meantime, towards the end of the dialogue, I choose the option asking Neeshka whether she's sure she found everything. I then make a combined influence / Bluff check to convince her to give me a Ruby. A combined influence / Diplomacy check was possible as well, but it required a higher DC.
Sir Darmon
Once I leave the Warehouse, I engage in some brief dialogue with Sir Darmon which doesn't really have any consequence.
Captain Brelaina's next quest will send me to Fihelis' Estate.